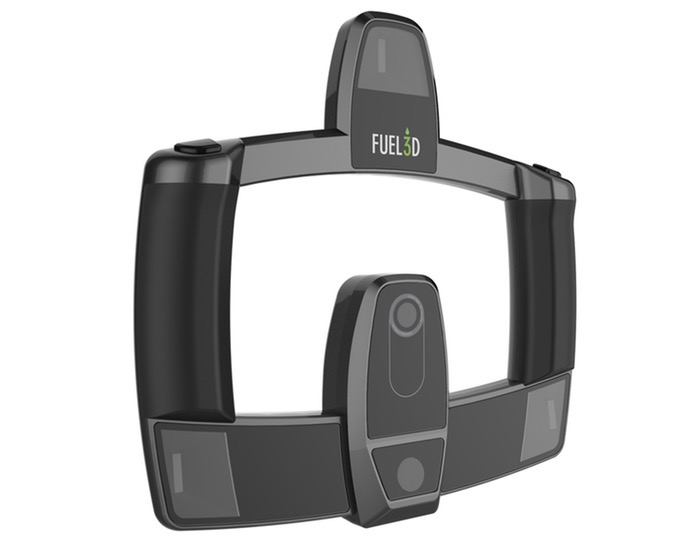
The Fuel3D SCANIFY, a lightweight portable 3D scanner

Introduction
Today, we‘re going to test the Fuel3D SCANIFY, an entry-level portable 3D scanner. This article aims to evaluate the performance of this 3D scanner in action and to benchmark it against some of the most famous 3D scanners on the market. The SCANIFY is Fuel3D’s flagship model with a retail price of $1,490.
We’ve been following Fuel3D for a few years now. This is one of the few startups in the 3D scanning/3D printing ecosystem which successfully raised money on Kickstarter ($325,343 to be exact) and actually managed to deliver a working product on time, SCANIFY. It’s also interesting that this UK manufacturer is pretty much the only new company to focus solely on 3D scanners, while there’s been plenty of startups entering the 3D printing hardware space.
A few weeks ago, we asked the Fuel3D team in the UK about testing their SCANIFY 3D scanner. We had already seen the scanner in action at the 3D Print Show in Paris last year, but we never had the opportunity to perform an in-depth test and review. We also wanted to benchmark the SCANIFY against other 3D scanners at various price points, so we performed several tests using the 3D scanners we have access to in our testing lab.
Useful resource: we’ve listed all the handheld 3D scanners currently available on the market in our top portable 3D scanners list.
Enough talk, let’s start this review now.
| Technology | Photography |
| Max resolution | 0.3 mm |
| Weight | 0.51 kg |
| Price | $ 1,490 |
Packaging
Unboxing: a nice packaging with thick foam and a well protected product
On a beautiful February day, the Fuel3D SCANIFY was delivered to our testing lab in Tokyo. The first thing to be noticed: for an affordable product, the packaging is really nice! The 3D scanner and the accessories are all packaged in sleek-looking cardboards with protective foams.

Instructions manual
Two instruction manuals are provided. They provide the setup steps and how to install the Fuel3D software. The manufacturer also offers a detailed .pdf of these explanations on their website.
Accessories
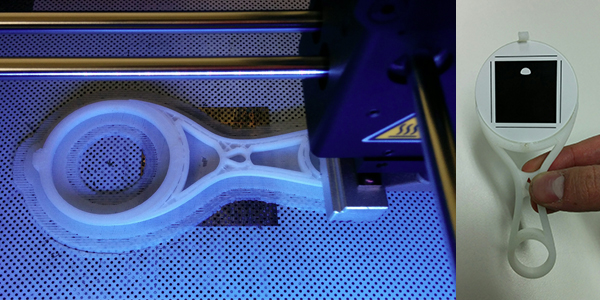
The SCANIFY is delivered with a USB cable, an AC plug with worldwide adaptors, a microfiber cloth, and 3 round black and white markers. You can also download the STL files to 3D print the target holder, a precision target tracker to ensure scans are taken at the optimum distance.
Overview and setup
Software
Several versions of the software are available: Fuel3D Studio Basic (Free), Fuel3D Studio Plus ($49.99 annual subscription), and Fuel3D Studio Advanced ($99,99 annual subscription). We tested the Fuel3D Studio Advanced (the free trial for one month). Make sure you use the latest version of the software (2.1 and above), as the performance of the online cloud processing engine dramatically improves the quality of the scans, as we reported in this article.
Hardware
The SCANIFY has two 3.5 MP cameras and 3 xenon flashlights. This 3D scanner works with a technology called photogrammetry. The SCANIFY takes two pictures at the same time on the same scene, from 2 different angles, under different lighting conditions. With the help of a small round black and white marker, the software can reconstruct a 3D model of the object.
The capture angle is limited to around 60 degrees, so to capture a round object it is required to take more than 6 scans. In our experience, it was closer to 10-12 scans because the scans need to overlap so the software can reconstruct the 3D model.
Before using the 3D scanner, we 3D printed the marker holders on a Zortrax M200. To simplify this step, the Fuel3D team provides a link to their SketchFab 3D files, where you can download and 3D print yourself, two different marker holders. One for 3D scanning faces, the other one to position next to the objects you want to scan.
Experience
Software
The software is pretty intuitive to use. Not a lot of options and menus are easy to navigate. Each 3D scan requires an extensive amount of work for cropping and stitching together several captures, and cloud computing is slow but paramount to get the best results. It’s also easy to export 3D scans in STL, PLY, and OBJ formats.
3D scanning
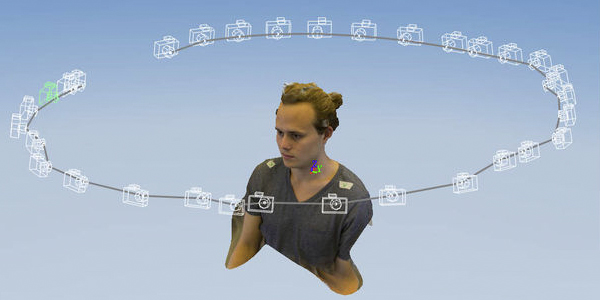
The process of scanning with the SCANIFY is similar to taking several pictures all around the subject. Then the software does the job of reconstructing a 3D model from all this data. Between each capture, it is required to wait until the flashes cool off, which takes around 4-5 seconds.
It can be quite frustrating when you have several shots to perform to fully capture an object in 3D. Working with good lighting conditions (uniform, not too many strong shadows) is helpful to obtain better results.
Regarding applications and use cases, Fuel3D recommends using their scanner to capture 3D models of the following objects: low relief and sculptures, plants and flowers, and human faces. The SCANIFY is not designed for other use cases such as full-body scanning, reverse engineering, etc. The use cases are pretty limited so you need to take that into account if you’re considering purchasing a SCANIFY.
To capture the scans, the SCANIFY is required to have a good view of the marker, so before scanning, you need to make sure the markers are well-positioned. This is kind of difficult to do because you need these markers to be visible by the cameras, while not hiding the object you want to scan.
At the same time, you need to find the optimal way to hold the scanner, check what it sees and verify the relative position of the marker towards the object. It definitely took us some time to practice and learn how to do this properly.
For face 3D scanning, the process is really intuitive with the marker holder and the fact that the capture is instantaneous (compared to face scanning using a structured light 3D scanner for example).
The scanner itself felt comfortable to hold with its very cool design and its 2 handles. The buttons on the top are used to capture the 3D scans. Pressing any of them takes the shot. It is also possible to hold the SCANIFY with only one hand to scan yourself (3D selfie!).
There is also a standard mount to easily connect it to a tripod. However, the proximity to the connectivity plugs makes it only compatible with smaller tripods (the connectivity slots for USB, power, and future extension plug are positioned right under the tripod mount slot).

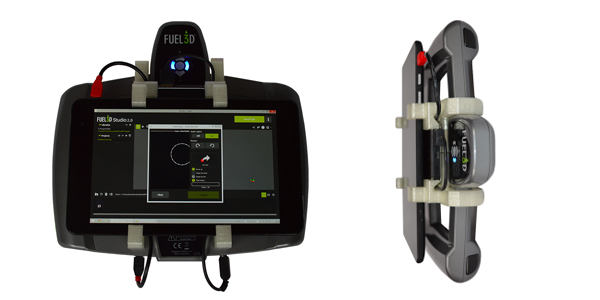
The scanner is portable but not wireless, as it has to be connected to the computer via USB and to a power plug to work. It’s possible to use the SCANIFY with a tablet for a wireless experience but we haven’t tested this configuration, called the mobile package. This mobile package retails for $50 and contains a battery pack, cables, and 3D printable file for a windows tablet mount.
3D scanning results
3D scanning human faces: SCANIFY vs Intel RealSense vs Einscan-Pro vs Artec Spider
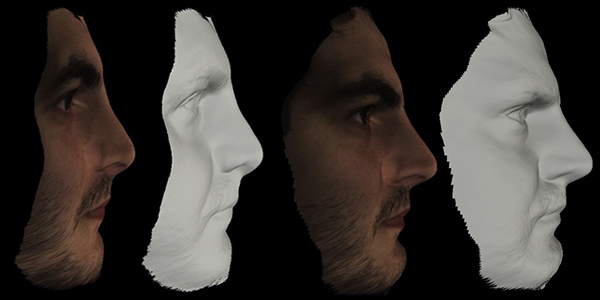
Human face 3D scanning is one of the highlights of SCANIFY. We’ve compared the results we obtained against face scans from other well-known 3D scanners that we’ve tested before. All these scans were performed under the same conditions, inside an office without specific lighting. We used the software provided by the respective manufacturers and did not perform any additional corrections, except the automatic ameliorations.
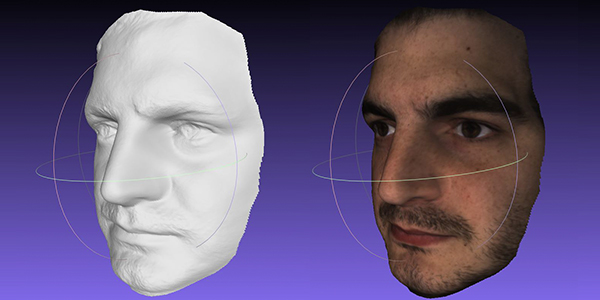
Fuel3D SCANIFY 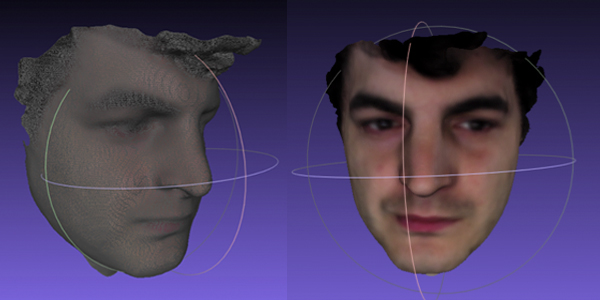
Intel RealSense 
Shining 3D Einscan-Pro 
Artec Space Spider
Fuel3D SCANIFY – $1,500
- Mesh Quality: The mesh is really good in the center, the cheeks have fewer details and are more approximate.
- Texture Quality: Excellent quality of textures due to the technology and high resolution of the cameras.
Synthesis: The best-case scenario for the Fuel3D SCANIFY is definitely face 3D scanning, where it delivers an excellent performance. The capture is instantaneous and the user can even keep his eyes open. The marker is the only constraint.
Intel RealSense – $99
- Mesh Quality: The mesh quality is really good. Dense and detailed.
- Texture Quality: Texture quality is quite poor, the resolution of the sensor is limited to 640 x 480.
Synthesis: The 3D scans took a very long time to obtain. A decent result at an affordable price, however, necessitates a lot of practice to get good results.
Shining 3D EinScan-Pro – from $3,999
- Mesh Quality: High mesh quality, hair tends to degrade performance.
- Texture Quality: Good sensor quality. However, the color module is an option and costs an extra $700.
Synthesis: the scan process takes some time. The Einscan-pro is not specifically designed for face scanning but is a very versatile portable scanner.
Artec Space Spider – $27,600
- Mesh Quality: Excellent mesh resolution and accuracy.
- Texture Quality: Texture is very detailed and high resolution. Colors are less realistic compared to the SCANIFY. The example is not very good as it is a picture we took with a smartphone of the computer screen.
Synthesis: A product made for metrology and reverse engineering but capable of producing amazing face 3D scans. Its price puts it in an entirely different category.
Conclusion
When it comes to face 3D scanning the Fuel3D gives excellent results. The capture area is limited but in most cases will be sufficient. The textures have very good quality and resolution. There is a huge performance gap when using the cloud version of the software vs the older software version.
3D scanning a plush: SCANIFY vs Makerbot Digitizer
We wanted to test the SCANIFY on a small object and opted for 2 plushies. They are difficult to scan because of their specific texture. Totoro is a famous Miyazaki character, while Fuji-san is the little embodiment of Mount Fuji, the greatest sacred mountain in Japan.

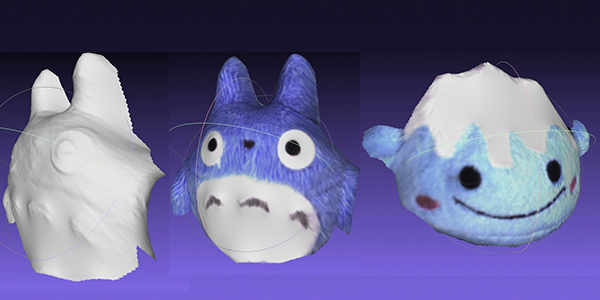
Fuel3D SCANIFY – $1,500
- Mesh Quality: Very good mesh quality on local parts of the object. Extremely difficult to obtain a full 360 scan.
- Texture Quality: Very good quality of the textures due to the rendering technology and high resolution of the cameras.
Synthesis: Not the recommended use case for the SCANIFY but yet good results on a small part of the object.
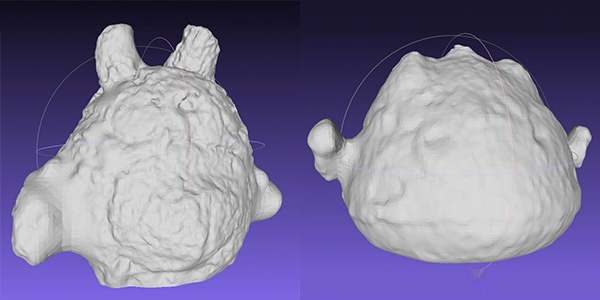
MakerBot Digitizer – $799
- Mesh Quality: Difficult to recognize the shape of the plush.
- Texture Quality: No texture
Synthesis: This 3D scanner only gives correct results on very specific objects. However, at this price, there are a lot of better options like photogrammetry software, or “low-cost” sensors like the RealSense or Kinect.
Verdict
For 3D scanning 360° around an object, the SCANIFY is not the best suited 3D scanner. The software works fine but a lot of cropping is required to get the most of the scans and the realign feature requires overlapping and similar lighting conditions to be able to properly reconstruct several meshes into one 3D model.
For a smaller area, the results are however very good and the textures are really good. On relatively flat surfaces, the SCANIFY produces very nice results. It is efficient for small leaves, tree bark, so mainly natural textures.
Value
The Fuel3D SCANIFY is an interesting product but limited to very specific use cases: face 3D scanning and low relief. For other situations, there are better (but more expensive) alternatives.
Conclusion: Aniwaa’s opinion
For affordable 3D face scanning, the Fuel3D SCANIFY is among the best products on the market. The process is intuitive and the results are really good compared to both cheaper and more extensive options. The generated files could be used to merge very realistic 3D captures on a stock head and produce a great representation, for animation or video games for example.
We really liked the quality of the hardware with a sleek design and a high-end finish. The resolution of the captured textures is also amazing. On the downside, the markers are a huge constraint and make the scanning process sometimes cumbersome. That said, the use cases where SCANIFY is a performant solution are quite limited and in many situations that do not involve face 3D scanning, it could be worth investing more money to purchase a more advanced 3D scanner.
