 English
  Français
10 Things I Learned Building an Automated Print Farm

Building an Automated Print Farm
There can be many reasons you’d want to build a print farm. Maybe you’re making a bit of money from your printers on the weekend as a side-hustle, or maybe your company or university has outgrown a single 3D printer, and you need additional printing capacity. Whatever the reason may be, it can be a daunting project.
In 2020, our team at 3DQue built a print farm to develop our 3D printer automation technology. The goal was to enable printers to self-release parts and start the next print automatically, requiring very little supervision. As you can imagine, this requires a high level of reliability, as prints would restart overnight without an operator present.

Starting at 36 3D printers, then expanding to 50, we kept improving our farm to the point where we reached 99.7% uptime, requiring just 3 hours of human labor for every 1000 hours of 3D print time. To reach this level of productivity, we had to make a lot of mistakes in order to learn from them. So here are 10 of the most important tips that we wish we knew before starting our print farm!
1. Dial in one printer before adding more
If you’re thinking about buying more 3D printers, you should know that more printers means more moving parts, and more things that can break down.
Before scaling up, get one printer working perfectly, so that you can start a print without even watching the first layer, and be confident that it will finish successfully. If you have to babysit each printer, expanding your farm will become a nightmare.
2. Invest in reliability
Reliability is the most important thing when it comes to running a print farm. Failed prints are a huge waste, and they can be stressful too, especially when on a tight deadline. With smart investments in reliability, as well as proper assembly and maintenance, you’ll find that 3D printers are surprisingly consistent and reliable.
Your time as a farm operator is limited, and therefore quite valuable. Every minute you spend fixing a clogged nozzle or leveling a bed is a waste of time and money. Here are two upgrades we invested in to improve the reliability of our farm and reduce operator time:
- Auto-leveling: Auto-leveling removes one of the most tedious tasks of 3D printing, which is bed leveling. Automatic bed leveling is essential for print farms due to how much time it saves. Even if you can level a bed in 2 or 3 minutes, having to do it multiple times per day will quickly give you headaches.
- Quality hotend: Cheap hotends tend to be unreliable. Investing in well-manufactured, all-metal hotends will help tremendously, and reduce the number of clogs, strings, and extrusion issues that happen with cheaper models.
3. Consider climate control
At the beginning of the pandemic in 2020, we had to move our print farm into a woodshop. Good idea, right? Well, you won’t believe this, but there were problems!
Problem:
There was sawdust in the air, and it got into every printer, on the filament, in the hotends – it was terrible! Beds got dusty really quick and had to be cleaned, and dusty filament caused clogs.
It was also an open space, so ambient temperature fluctuations between night and day caused print quality inconsistencies.
Solution:
What we did was simply build a room around the printers. We called it “The Freezer” but it was just a room with a household a/c unit added to keep everything at a consistent room temperature.
You don’t need to build an entire room like we did, but you should be mindful of where your printers will be. You may need to heat or cool the area depending on where you are and avoid drafty, dusty environments.
4. Keep it organized

While starting up the print farm, we initially ran into problems due to a lack of organization. Prints were failing due to preventable issues such as loose screws, unwashed print beds, and gummed-up extruders. We also did not have protocols in place for maintenance.
To solve these problems, we implemented a maintenance checklist, where certain maintenance tasks were to be repeated weekly or monthly for every printer. For example, each week we would wash the print beds and clean the extruders. Every month, we would do a thorough inspection.
We also came up with simple maintenance cards. When the printer malfunctioned, we flipped the card to a red side and wrote down the issue. When it was fixed, we then flipped the card to the green side, so we knew when it was ready to use again. Simple, but effective.
5. Join a Community
Setting up a print farm from scratch is challenging, especially when doing it all by yourself. It doesn’t have to be a solo journey, though. There are many online 3D printing communities with experts who are very willing to help!
When we started, it was particularly difficult because nobody had really attempted to automate a print farm quite like we did. For this reason, we created a Discord community that focuses on high-volume 3D printing.
6. Consider Redesigning Parts

Ever want to print something, but you just can’t seem to orient it properly, or it just doesn’t come out quite right? There is a common misconception that you can take every ordinary object and replicate it exactly on a 3D printer. The truth is, a lot of parts require some redesign to optimize them for 3D printing.
At the beginning of the pandemic, there was a face shield shortage and one of the perks of having a print farm is that we were able to produce a lot of these shields. Instead of designing a new one from scratch, we found a model online.
At first glance, the model seemed quite good; however, upon further inspection of the Gcode, we found the walls were inconsistent and the first layer was unnecessarily complicated. To remedy this, we spent some time redesigning the part.
In just a few hours, we were able to design a frame that cut our print time in half, removed the need for post-processing, reduced material use by 10%, and overall increased the quality of the print.
7. Use Large Nozzles

How can you benefit from using a larger nozzle? First of all, ask yourself why you’re choosing to use the standard 0.4mm nozzle. Do your prints have intricate details or are most of your prints fairly simple?
One of the products we were printing for a client was a box with numerous pockets, and it took us about 14 hours to print. We decided to experiment with a 0.8mm nozzle, and the results were outstanding!
Once we switched over to the larger size, we were able to reduce the print time by 6 hours, nozzles had fewer clogs, and the final product had a nicer surface finish. We occasionally still use 0.4mm nozzles, but only for prints that have high detail.
8. Optimize Your Slicing
At first, we did not spend enough time optimizing our slicing. Once we had reliable Gcode, we considered it “final” and continued with it for the rest of the production run. We now have a process for print optimization to ensure we are always printing efficiently.
In a nutshell, here is our process for attaining print optimization:
- Slice some initial Gcode that works and start running on your printers even if it is slow.
- In the meantime – try a few different versions using faster speeds, thicker layers, or bigger nozzles, and have a test printer set aside for this purpose.
- Then, once you have a significantly better Gcode, swap production over to the optimized version.
- Repeat if necessary.
For larger production runs, many iterations may be useful. For small production runs, just one or two improvements should be enough.
9. Avoid Complex Batch Prints
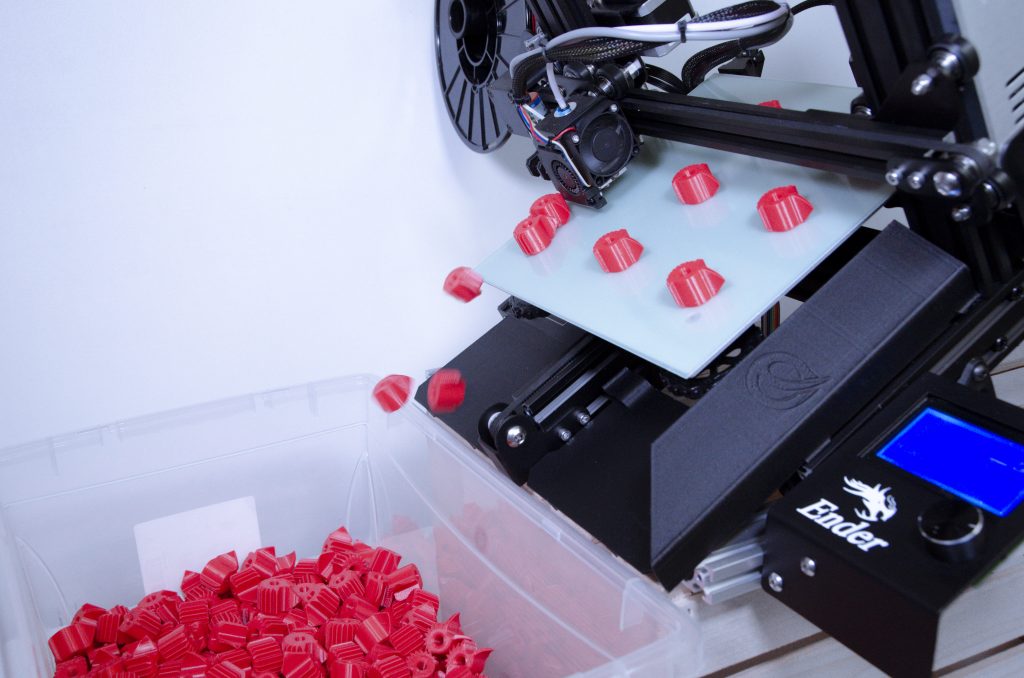
In order to print high volumes, many people try filling their build plate completely, printing many parts at the same time and therefore taking 1-2 days per print.
We have found some problems with this approach:
- Reduced part quality due to strings and blobs from thousands of retractions.
- If one part fails, then the whole batch can get ruined
- Excessively complex first layers are hard to print reliably.
- You cannot stop a print halfway through without ruining the batch.
Our solution to printing higher volumes was to print small batches of 4 – 9 parts. Most slicers allow you to print sequentially so that one model completely finishes before moving on to the next one.
There are several benefits to this approach as opposed to batch printing:
- Less chance of defects and print failures since the nozzle doesn’t cross over partially printed parts.
- Smoother prints because of fewer retractions.
- Easier to slice. There’s no need to pack parts as efficiently as possible, and there is more flexibility with part orientation.
10. Standardize Your Filament

Offering many filament colors may sound like fun, but in practice, it is incredibly inefficient! We used to offer a product in many different colors, but we quickly realized that for each different color, we would have to go through the slicing optimization process as each material was printed at different temperatures.
Once we realized how much time was being wasted with this process, we decided to limit ourselves to a few popular colors and to buy 100 spools of bulk filament at a time (even if you buy 5 – 10 kg at a time, you’ll see improvements).
