 English
  Français
Peel 3d review: a cost-effective handheld 3D scanner
Introduction
The goal of peel 3d is to manufacture cost-effective, high-quality handheld 3D scanners and therefore offer businesses the possibility of increasing productivity at an affordable price.
Most high-end handheld industrial 3D scanners cost above $20,000. Thus, peel 3d wants to appeal to a wider range of customers with a more affordable price point of under $6,000 for their handheld 3D scanner.
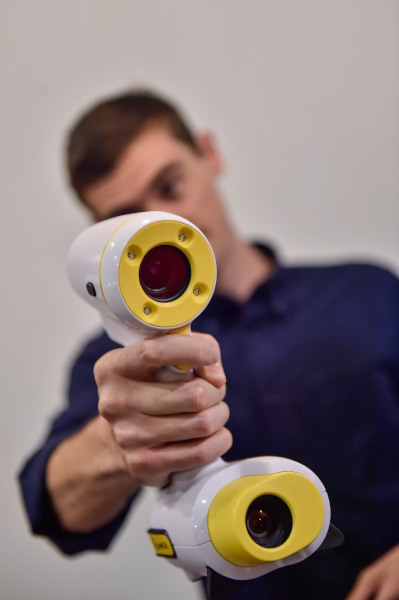
The peel 3d is an entry-level professional handheld 3d scanner suitable for reverse engineering, 3D body scanning, education, design, and other applications. The device uses a white LED light to capture objects in 3D with structured light technology.

| Country | Canada |
| Technology | Structured light |
| Max resolution | 0.5 mm |
| Weight | 0.85 kg |
| Price | $ 5,990 |
peel 3d peel 1 overview
The peel 1 is an handheld 3D scanner produced by peel 3d, a manufacturer based in Canada.
The peel 1 peel 3d uses the structured light technology.
Aniwaa has reviewed popular handheld 3D scanners before like the Artec Eva, the Creaform Go!SCAN 50, and the Shining 3D EinScan-Pro.
Our aim in this review was to verify that the peel 3d is a 3D scanner that is ideally suitable, as the manufacturer claims, for a user with a restricted budget, minimal hands-on 3D scanning knowledge, and operating without a lab setup.
Before starting the review, we watched the tutorial videos produced by peel 3d and prepared a list of protocols and features we wanted to test.
We experienced some issues with the hardware during the scan testing (caused by a power fluctuation) so we were not able to fully test the capabilities of the peel 3d or produce further detailed scans as we had planned.
 Pros
Pros
- Fast software processing time
- Start-and-stop scan system
- User-friendly process
Cons
- Easy to lose track of the target
- Cable is too short for large scans
peel 3d unboxing
Hardware and software first steps
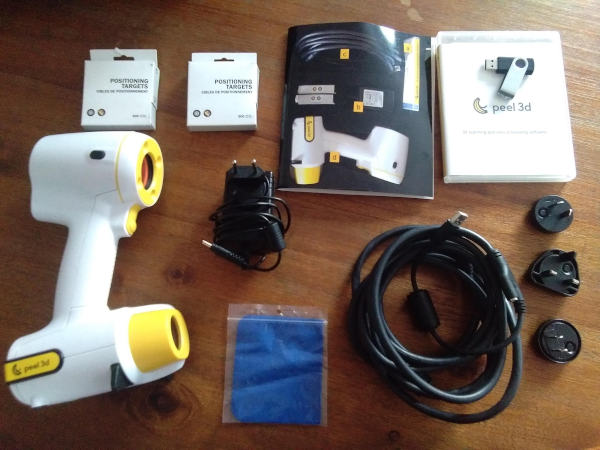
Aniwaa’s office is based in Phnom Penh, Cambodia and even after a lengthy shipping journey from Canada, the product arrived in a professional-looking protective hard-plastic travel case which enables the user to transport the 3D scanner safely and easily.
All of the accessories and the peel 3d scanner are neatly organized within the travel case, firmly positioned in foam padding.
Peel 3d hardware
This 3D scanner looks professional and is easy to hold in our hands. The design is simple yet ergonomic. The device is well-balanced and fits well in the user’s hand. Its weight is reasonable (850g), not overly heavy but not light either.
Accessories and documentation
The following items come with the peel 3d scanner:
- One 4m cable to connect the 3D scanner to the computer (USB 2.0)
- Documentation of the basic process for scanning
- A power cable
- A USB key to install the peel 3d software
- Two boxes of 500 positioning targets each (1 regular, 1 super-adhesive)
- A calibration plate

Minimum PC requirements
Peel 3d provided us with a laptop to run the software during our tests. (The peel 3d does not usually ship with a laptop!)
The HP EliteBook Mobile Workstation has the following specs:
8570w – 15.6’’ – Core i7 3610QM – 8GB RAM – 750GB HDD graphic card.
The specs fall within the range of the minimum PC requirements peel 3d suggest on their website to run the software:

peel 3d scanner review
First steps with the peel 3d software
The software was really easy to install. After inserting the USB key to the laptop, we selected “peel 3d”, entered the product serial number included with the key, and the software was effortlessly installed.
The software is very user-friendly, and the technical terms are understandable with even minimal 3D scanning knowledge. There are many options within the software, but the layout remains simple and intuitive:
- On the left side of the screen are the settings that the user will enter based on what is being 3D scanned.
- On the right side of the screen are the working platforms which show the 3D scanning process in real-time.
- Towards the top of the software are the different tools used to enhance the scan results: meshing, texturing, cleaning, etc.
To connect the peel 3d scanner with the peel 3d software, the user is only required to plug the 3D scanner into the computer and everything happens automatically. It is a very simple plug-and-play system.

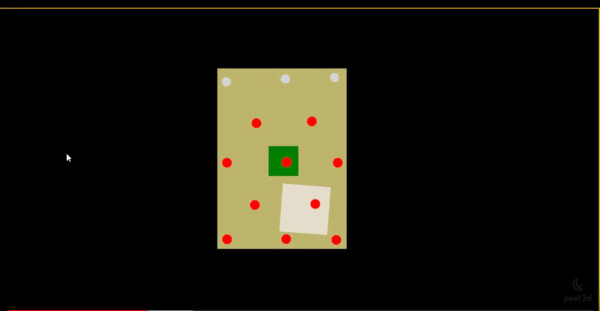
peel 3d calibration
Calibrating the peel 3d was simple and fast. The calibration plate was placed on a flat surface and we followed the steps that were displayed at the bottom of the software on-screen. We tested the calibration process several times and it took less than a minute to accurately calibrate the peel 3d.
Main features of the software
The peel 3d software offers several main tools that are used to help users optimize their 3D scans.
Start and stop system: It is possible to pause and change the settings while 3D scanning, or to rest in case of long 3D scan sessions for bigger objects, and to resume scanning thereafter.
Delete frames: Some 3D scans can result in distorted images. This easy-to-use tool allows the user to correct the mistake, recognize the poorly-scanned frames, and delete them.
Clean mesh: This is an automatic cleaning tool that erases the small potential imperfections made within a 3D scan.
Fill holes: The image mesh may have some holes, big or small. It is always possible to rescan if needed, but thanks to this tool, it is possible to manually fill in the gaps. The tool is precise and fast.
Watertight remesh: This tool allows the user to automatically fill in all the holes of the model. It is less precise than manually filling in all the gaps and there is room for improvement, but it is still a great tool.
Users should note that no printed manual is provided to explain the tools, but we used peel 3d’s YouTube tutorials to help us understand the software options, and we would suggest potential peel 3d users to do the same.
peel 3d experience
Our experience with the software was very satisfying. It was user-friendly and the online tutorials are really comprehensive and helpful. Finally, the peel 3d software quickly processed the scans. The average scanning process from setup, to a final, edited and ready-for-export scan result was 25 minutes based on the 3D scans we completed.
Summary of the steps
- Plug-and-play setup (1 minute)
- Calibration (1 minute, recommended after the scanner has been transported)
- Enter the desired settings (2 min)
- 3D scanning (from 5 to 20 minutes for larger objects)
- Texturing and meshing (1 to 5 minutes based on the size of the scan)
- Cleaning the mesh (on average 5 minutes)
- Watertight meshing (5 to 15 minutes based on the object)
- Export 3D file
Total average time per fully-processed scan: 25-30 minutes.
Limitations
peel 3d makes the following limitations very clear on their website; these issues are common for many 3D scanners available in the market:
- Hair, beard, or fur are very hard or impossible to 3D scan. peel 3d claims it simply doesn’t work, and this is what we experienced when we tested scanning hair and beards. It is possible to sculpt hair on sculpting software such as Sculptris, which is the advice peel 3d gave us when we asked them for a solution.
- Very shiny/reflective surfaces are very hard or impossible to scan with the peel 3d. Gold, silver, and some metals are also difficult to capture, but not impossible to scan, which can be problematic for industrial objects (for example the silver engine of a 170 cm Suzuki Step motorcycle we scanned – see further below).
- It is not possible to 3D scan transparent objects.
In addition, specific to the peel 3d, some limitations include:
- It is very hard to 3D scan small objects (less than 30cm), however, it does not mean that the peel 3d cannot capture small details on larger objects. Indeed, this 3D scanner can produce realistic and highly detailed scans.
- It is hard to 3D scan thin objects (for example tree leaves or cactus pikes).
Are peel 3d scan results satisfying?
Our goal was to verify the claims of peel 3d and challenge the limitations of the 3D scanner. To do that, we chose to 3D scan objects that peel 3d claimed should work, but we also attempted to 3D scan what peel 3d claimed to be hard or impossible to scan.
Our 3D scan list:
- Semi-rigid objects: a full-body scan (190cm) and a head scan (30cm).
- A bigger industrial object: a full motorcycle (170cm).
- A smaller industrial object: a plastic coffee machine (40cm), with the particularity of having a transparent water container.
- Challenging items to test the limits of the peel 3d: a shiny lamp (50cm) and a black tee-shirt (50cm).
The settings:
We used the default settings for most 3D scans as recommended by peel 3d:
- Uniform surface
- Automatic shutter
- 1mm resolution (because a higher resolution requires a more powerful computer)
We changed the settings in some 3D scans that required adaptations (as explained in the online tutorials):
- Semi-rigid positioning for human anatomy (head and body)
- Shutter (ms) at 8 for dark surfaces like the lamp
- A textured surface such as the leather seat of the motorcycle
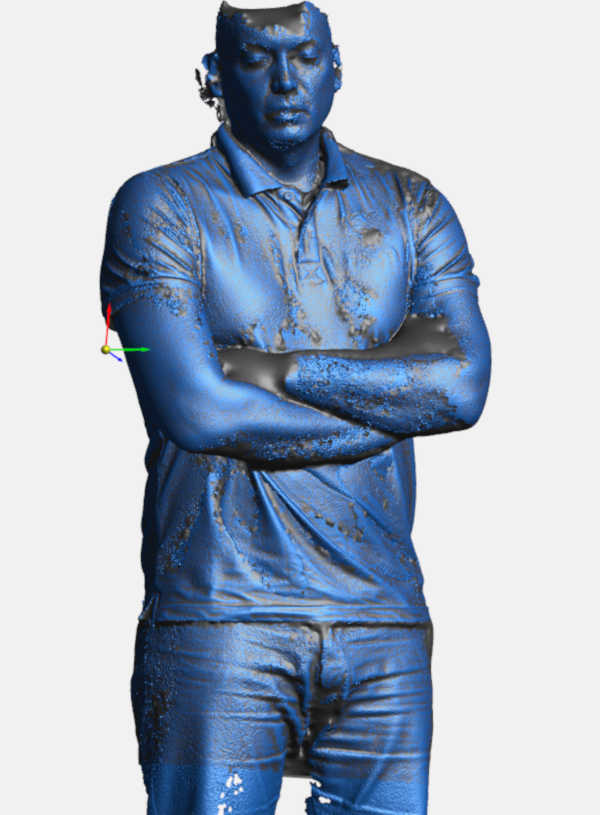
Body scan (190cm)
For our first scan, we wanted to try a full-body scan. We selected the default settings with semi-rigid positioning as per the manufacturer’s advice.
The peel 3d was easy to hold in hand, and the process of scanning was more simple than we expected. One observation we had is that the length of the cable between the scanner and the laptop could be longer than 4 meters, but the overall experience was comfortable and intuitive.

- The 3D scan took 20 minutes and we were quite satisfied with the full-body 3D scan.
- The software took 10 minutes to process the scan, with an additional 10 minutes using the fill holes and water meshing tools. We acknowledged that the tutorial helps the user at every step and that the software was easy to use for beginners. The only problem we had was that the 3D scanner lost focus quite a few times during the scan. We managed to regain the focus, even if the process required some patience, but for other 3D scans, we used a lot of positional targets to help with this issue.
The resulting 3D scan was very rewarding, even if it was far from being perfect, it was only our first scan. Hair didn’t get 3D scanned at all, and neither did the silver watch or the dark bracelet but we anticipated this.
Head 3D scan (30cm)
We 3D scanned a human head to test the quality of the detail on a particular scan (with semi-rigid positioning). We managed to obtain good results on the first head-scan and we were pleasantly surprised that the processing and the editing steps were easy and quick. Our subject, Steve, has no hair, so it was perfect since the peel 3d doesn’t easily 3D scan hair.
- 3D scanning process: 5 minutes
- Meshing: 1 minute
- Watertight meshing and overall cleaning: 15 minutes
Head Scan with peel 3d – by Aniwaa
by aniwaa
on Sketchfab
Motorcycle 3D scan (170cm)
We attempted to try a larger, industrial-grade 3D scan to assess the professional use of the peel 3d and the quality the user can expect to achieve. We scanned a Suzuki motorcycle belonging to the CEO at Aniwaa, Martin Lansard.
We 3D scanned the motorcycle with the default settings of a uniform surface, apart from the seat, where we changed the setting to a textured surface and it worked really well. We also used several positional targets to ensure that we didn’t lose focus whilst completing the scan.
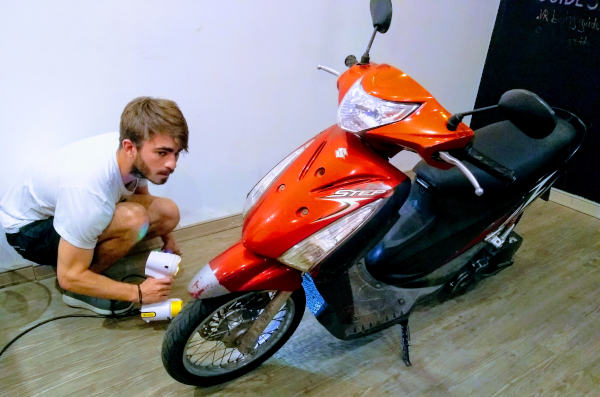
- The scanning session took 30 minutes. We were satisfied with the time it took for a large and complex object. The meshing was almost instantaneous, but the watertight meshing took a further 10 minutes.
- For a first 3D scan of such a big object, we were happy with the results. However, surfaces that are reflective or transparent are difficult to 3D scan but, as mentioned, peel 3d is very clear about this aspect. A possible solution is to use a mattifying spray specifically for this use case, or if possible, paint on the scanned object to make it an easier target for the 3D scanner.

The watertight meshing tool enabled us to fill in the hard-to-scan areas of an object, such as the space between the spokes of the wheel on the motorbike. Sometimes it filled areas that it should not. We found this to be a limitation of the otherwise useful tool.
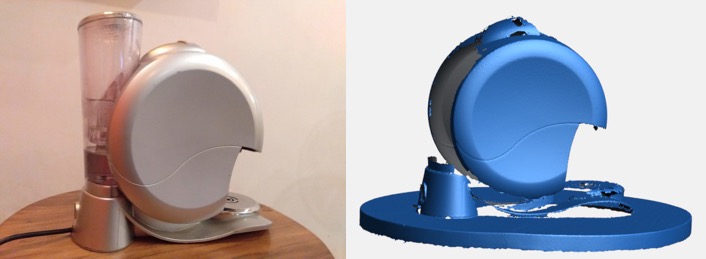
Coffee machine 3D scan (40cm)
- We 3D scanned a plastic coffee machine, with a transparent water container at the rear. Indeed, we wanted to scan a medium-sized object since professional users would likely use the peel 3d to scan objects of similar size for prototyping or design purposes.
- It took us 5 minutes to 3D scan the whole coffee machine, and 5 minutes to process and edit the image. We were really satisfied with the results. However, as expected, the 3D scanner didn’t detect the transparent surface of the water tank.
Challenging 3D scans of small objects (50cm)
After scanning a full body, a human head, a large object (a motorbike), and a small-medium object (coffee machine), we wanted to challenge the peel 3d by scanning more difficult objects.
- The first object we 3D scanned had a shiny, reflective surface– a desktop lamp made in reflective metal- but it didn’t work at all. The 3D scanner simply didn’t pick up the object, even when we used the positioning tracker stickers.
- We 3D scanned a dark and matte surface of a black tee-shirt. The scan worked really well with the shutter set at 8ms. With some patience and the right settings, dark surfaces can be 3D scanned. It took 2 minutes to 3D scan the shirt, and 5 minutes to process in the software.
peel 3d scanner: Aniwaa’s opinion
After testing the peel 3d at Aniwaa’s office, we felt that the peel 3d exceeded our expectations. The 3D scanner is easy to use and the software is intuitive and fast, with a selection of software tools available to edit and prepare a good final mesh in a short amount of time.
Our results were very satisfying even considering that we lacked a professional test lab with high-quality lighting for this review. We were not disappointed when the 3D scanner hit its limitations with some objects, as peel 3d had clearly identified these on their website.
Our opinion on the 3D scanner is positive: peel 3d delivered on their promise in producing an affordable professional-grade 3D scanner. However, some adjustments and upgrades are possible:
- The cable is a bit too short for larger objects that require the user to walk around the target.
- The watertight meshing tool is quite challenging to tweak, and this tool appeared to have some limitations on more detailed parts of a 3D scanned object.

Conclusion and buying advice for peel 3d
Peel 3d targets professionals on smaller budgets with this cost-effective handheld 3D scanner. The manufacturer claims that the user will achieve the quality of a professional-grade 3D scanner at an affordable price, and it is indeed the case.
This 3D scanner is user-friendly, the overall process is fast and simple, and the software is easy to use with intuitive tools to get the most out of a 3D scan. The peel 3d remains cost-effective at its price of $5,900 compared to most high-end industrial scanners available on the market.
