 English
  Français
The Lulzbot Mini, a powerful and compact desktop 3D printer

Introduction
The Lulzbot Mini, from Aleph Objects, is the Loveland, Colorado-based manufacturer’s most consumer-oriented 3D printer to date. Designed to fit on your desktop, the ‘Littlest Lulzbot’ is a mid-range, and mid-priced Rep-Rap-based 3D printer aimed squarely at the open-source/anti-establishment/hacker demographic.
This is reflected through the company’s commitment to the philosophy of “Libre Innovation” (or Open-Source for those who speak only English) as well as the “Illuminati meets Lovecraft” branding on the packaging and machines themselves.

LulzBot Mini overview
The Mini is a 3D printer produced by LulzBot, a manufacturer based in the United States.
It uses the Fused Filament Fabrication technology to produce thermoplastics parts using filament feedstock.
It offers a build volume of 152 × 152 × 158 mm.

- Tested objects: Benchy, Make test files, 3DKitBash test files, Twisted Hex vase, and 3DKitbash Skullbox.
- The 3D filament used for the test: Light Grey Colorfabb NGen 3.00mm.
 Pros
Pros
- Compact desktop footprint.
- Robust and reliable open-source hardware.
- Good repeatability.
- All metal hot-end & PEI covered heated build-plate with automatic leveling.
Cons
- Very noisy.
- No WiFi or SD card interface. Machine must remain tethered computer via USB.
- 3mm filament size may limit material availability in certain regions.
- Open-source Cura software needs work.
- Time-consuming automated processes.
Packaging
Unboxing: a simple and efficient packaging
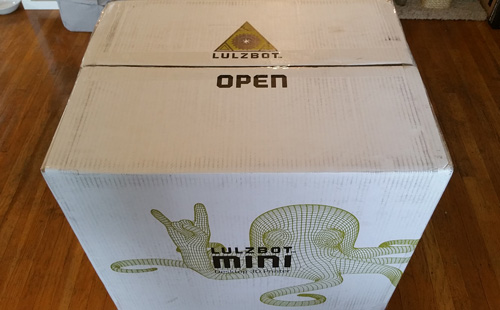
Our review unit arrived via FedEx in an undamaged box emblazoned with the Lulzbot “Rocktopus” mascot and stamped with the aforementioned secret society-inspired iconography. A quick swipe of the boxcutter revealed two packets: one containing a branded “Start Here” manual, a sweet poster with a diagram of the Mini, assorted QA paperwork, and the second full of an assortment of 3D printing-related tools.
The printer itself was encased in a two-part flexible foam cage, of which the top lifted out easily and allowed us to remove two spongy blocks keeping the build volume and print-head secure. The 3D printer lifted out easily and was on our desktop in about a minute and a half.
Instructions manual
The manual, printed on high-quality, heavyweight glossy stock is relatively simple to understand and will get a 3D printing enthusiast up and running in minutes. However, it contains a lot of addendums on what to do in case things aren’t exactly as illustrated, which can cause some uncertainty and erode the confidence of novice users.
It also requires first-time users to skip around the pages a fair bit to follow the correct steps necessary to print the autoloaded “Rocktopus” file which appears the first time Lulzbot’s version of Cura is opened.
Accessories
As noted, the Mini comes with a set of dental picks and what is best described as an oyster shucking knife, designed to assist in the removal of prints off the bed. A tiny metal brush rounds out the post-processing gear. Also included are several spare nozzle cleaning pads and a USB stick loaded with print software and files. A sticker, octopus print, and a meter of HIPS filament round out the kit.
Overview and setup
Software
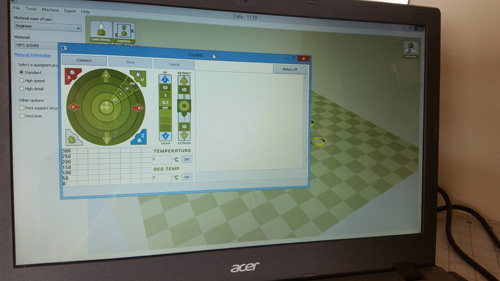
Cura is the open-source printer control and slicing software made by Ultimaker. Some users swear by it and say it produces excellent prints. Lulzbot supplies its own variant of Cura and after running a very standard installation procedure off of a provided USB stick, it autoloads a preset, ready-to-print, “Rocktopus” model.
It is highly recommended, however, to go directly to the Lulzbot website and download the most recent version, available for Mac OS, Windows, and several Linux variants.
Hardware

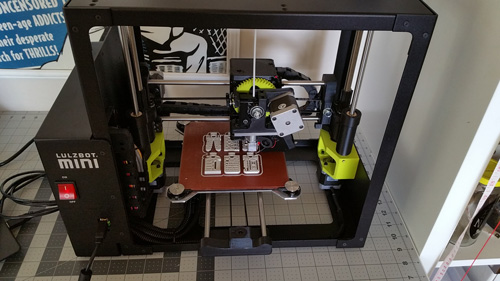
The Lulzbot Mini is a spiffy little machine. It oozes rebellious practicality with its small, footprint, black powder-coated steel frame and fluorescent yellow accents courtesy of several 3D printed components.
Filament spools are meant to hang above the machine, on a provided (and also 3D printed) holder positioned unobtrusively, above the 6 X 6 X 6.2 inch (or 152 x 152 x 158mm) build volume and feeding directly into the v2 Lulzbot Mini Toolhead.
Featuring the all-metal Hexagon Hot End and capable of reaching a sustained maximum temperature of 300 degrees celsius, this high-temperature capability permits the use of materials such as T-Glaze and experimental filaments. It also provides more even heat distribution resulting in more consistent print results.
The 0.5 mm nozzle allows for faster and stronger prints but can sacrifice detail if a file is set to print at too high a speed. Still, watching it consistently lay down plastic onto the heated PEI-covered 6 X 6-inch build plate is truly a thing to behold.
Designed for maximum durability, Aleph Objects consulted with their advanced users and decided on Polythermide as the ideal platform material due to its low maintenance requirements. Our personal opinion is it’s an excellent print surface and we had absolutely zero issues.
With upgradability in mind, the Lulzbot Mini can also accommodate a growing family of tool heads, including the recently developed Flexystruder designed for flexible and specialty materials. The disadvantages of this RepRap variant are few.
A lack of build volume enclosure, which may come in handy when printing materials requiring consistent environmental conditions come to mind as does the odd requirement to use 3mm (or 2.85 if you want to get technical) filament. At Aniwaa we have no preference, but it may affect material availability for those in remote locations. Like Canada.
Getting started
Once plugged into the power and tethered to the computer via USB, initiating the pre-loaded “Rocktopus” print is a simple task if the instruction manual is followed. Yes, you read that correctly. The Lulzbot Mini does not use SD cards or wifi and must remain plugged into your computer during printing.
Therefore it is CRUCIAL to set your laptop to NEVER SLEEP DURING A PRINT. Before printing, however, you must preheat the extruder to remove the filament used during the QA process and then load the supplied length of HIPS. Again, a simple task if the instructions are followed carefully, but it is easy to overlook the sequence before printing.

After loading the filament and hitting print, the Mini executes a pre-print cleaning and leveling procedure, consisting of a preheat, nozzle wipe, and leveling procedure using the 4 conductive pads on each corner of the print bed.
Depending on the bed and nozzle temperature, this process will take between 2 and 5 minutes and will cycle EVERY TIME a print is initiated. While this guarantees a properly leveled print bed and therefore greatly improves the all-important first layer adhesion, it does get annoying and time-consuming.
Finally, after much waiting, the Mini comes to life and begins methodically laying down precise layers of molten plastic. Approximately twenty-odd minutes later, the eponymous “Rocktopus” has been transmuted from bits on the computer into atoms on the build plate.
Experience
Software
The Lulzbot Mini ships with its own version of Ultimaker’s Cura slicing and printer control software. As an open-source application, it has a couple of benefits; namely that it’s free and it has a large community of users who help each other out. That being said, it’s not without limitations or annoyances.
The USB key which shipped with my machine contained an outdated version of Cura, so after that first “Rocktopus” print, we were unable to get any first layer adhesion and needed to get in touch with Tech Support to find a solution. A quick install of Cura’s latest version and we were up and running with prints turning out as advertised.
The interface, while lacking refinement, will be familiar to 3D printing veterans, but novices may be temporarily stymied as they plod through a process that unlocks functionality based on a user-selected level of difficulty. Additionally, access to the 3D printer’s controls is strictly dependent on a very annoying auto-slice feature which re-slices the model (or models) EVERY SINGLE TIME a change in orientation or position is made.
Want to add or remove a file? You’ll have to re-slice and wait. Depending on the complexity of the build, this can take anywhere from a few seconds to several long minutes. Still, many users swear by Cura, and frankly, the software, while idiosyncratic, does produce good results.
3D printing
Printing with the Lulzbot Mini is very satisfying. After loading orienting and slicing the model, it’s simply a matter of hitting the “Print” button in Cura which positions the extruder above the build plate to begin the preheating sequence.
Capable of reaching temperatures up to 300 degrees Celsius, the all-metal Hexagon extruder undergoes a nifty nozzle cleaning procedure that is intended to remove any extraneous residue but isn’t always 100% effective.
Immediately afterward, the Mini begins a very useful self-leveling routine by touching the tip of the nozzle to a conductive plate on each of the build surface’s four corners. While this process ensures rock-solid first layer adhesion, it gets old very quickly. Especially if the goal is a quick turnover between print jobs.
Lulzbot has chosen to use 3mm diameter filaments with their machines. While many will debate the merits of using 3mm vs 1.75mm, there is little evidence one is better than the other and it really is up to the user, what they prefer to use. My review unit shipped with a spool of “Light Grey” Colorfabb nGen; a zero-odor co-polyester chosen for its forgiving properties, ease-of-use as well as a nice look and feel.
Still, it remains a potentially fragile material with a tendency to chip if not removed carefully off the build plate. With a 0.5 mm nozzle, the Mini can lay down more filament, faster, resulting in slightly shorter print times, but at the cost of some details. The 6×6 inch heated build plate is PEI-covered, borosilicate glass, capable of reaching a temperature of 110 degrees Celsius and allowing for the use of materials such as ABS or more exotic fare like Colorfabb’s experimental 910A transparent filament.
Capable of a maximum 50-micron resolution, the Mini is no slouch when it comes to producing a high-quality part, however, for ease-of-use, the “Beginner” print setting deposits material at 225 microns per layer, which, considering the relative thickness, looks very good when used with a material such as nGen.
The actual print process occurs with relative speed and efficiency and it is easy to monitor any changes in the process via the tethered computer. Once the print is finished, the bed moves to the back of the machine where it cools until it is safe to touch (about 60 degrees Celsius).
About ten to fifteen minutes later, the bed repositions itself to the front of the machine as if prompting the user to remove the part. It is important to note here, the necessity to remove parts as soon as it is safe to do so. I encountered a tendency for objects to stick VERY well to a room temperature build plate and needs to be carefully pried off with the suddenly inadequate shucking knife.
This is where great care must be taken to not damage the PEI coating on the build plate itself as slips of the hand can ruin not only equipment but vulnerable hands and fingers as well.
Noise
Perhaps the Lulzbot Mini’s greatest failing as a desktop 3D printer is how noisy it is. The high pitched whines and squeals of the stepper motors (especially the Y-axis) are at first novel and even cute as evidenced by the characteristic sounds of the bed-leveling procedure, but you’ll be begging for deafness about halfway into a print as the high-frequency soundscapes burrow their way into your mind.
This is not a machine for a small or quiet home, and at 55 decibels with a print speed of 50mm/sec, measured using the Bosch INVH sound meter app for Android, could be heard through a closed door. Ideally suited for a maker space, garage, or busy classroom, the Mini could stand to tone it down a bit if it wants to live among average consumer families.
3D printing results
All test prints were produced with Colorfabb nGen 3.00mm at a temperature of 230 degrees Celsius with a bed temperature of 85 degrees, a layer height of 225 microns, and a speed of 50mm/sec.
1. Benchy
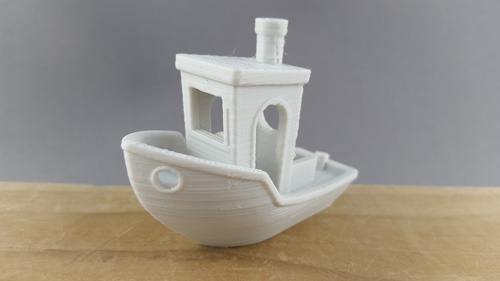
To evaluate the performance of the Mini, we started by printing some Benchys. Sure there are a lot of other options available in terms of 3D models but the Benchy is sort of the “standard 3D model” used to benchmark 3D printers and evaluate several parameters (surfaces, level of details, overhangs, ….).
The 3D Benchy is a de-facto standard torture test for 3D printers and is commonly used to verify dimensional accuracy and overall printer capability. Our version came out very well, with only minimal drooping and surface imperfections.
2. Make torture test

Make Magazine’s 3D Printer Torture Test takes a more scientific approach to testing the limits of a 3D printer. By using a range of parts designed specifically to test particular aspects of the 3D printing task, it is possible to identify and adjust for deficiencies.
Our test pieces all printed successfully, most notably the 70 degrees Overhang Test, with very acceptable results save for some minor droops on the underside at the highest point. The Retraction test revealed stringing between points and a tendency for the tips to droop closer to the top. The Bridging Test provided acceptable results with a tendency to droop more severely as the gap widened.
Z-Wobble was well compensated for, but left inconsistent surface finish at points of filament retraction, mostly towards the base of the print. Negative Space Tolerance overall was good but required some encouragement with pliers to release the peg at .02 mm.
3. 3DKitbash torture test

3DK has released its own set of 10 chips designed to test all the above-mentioned aspects of 3D printing, but also their ability to “Print In Place” which is to mean, produce functional assemblies in one print.
Each of the chips printed successfully, including number 10 which required some flexing to get one of the pincers to open, much like the above-mentioned “Negative Space test”. The surface finish for all prints was very good with clearly identifiable details and legible characters.
4. Twisted Hex Vase

Twisted Hex Vase by bkpsu
A nice-looking vase, perfect to evaluate the 3D printer’s ability to print clean and smooth surfaces. It has a large base so can be hard to unstick from the print bed and can create warping and too much adhesion to the build plate.
While a successful print, some inconsistencies along the edges and planes of this print caused gaps and a less-than-pristine surface finish. The relatively large area of the first area made for a very sticky print and resulted in chipping along the bottom edge.
5. 3DKitbash Skullbox
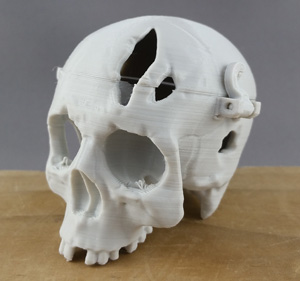
The “Print In Place” models coming from 3D Kitbash are designed exclusively for FFF 3D printing without supports, to maintain as high surface quality as possible. The Skullbox turned out very well, opening and closing with ease.
The small locking hooks on both sides of the skull were also well-formed with only a little bit of torque required to get the printed hinges to start moving. Some filament droops in the eye sockets were noticeable but easily removed during post-processing.
Value
The Lulzbot Mini is an excellent 3D printer that is praised for its price and performance. It is, however, a bit noisy and its small footprint limits its maximum build volume.
Conclusion
Our overall conclusion reflects our experience with the Lulzbot Mini, printing with the Light Grey Colorfabb NGen 3.00mm.
The Lulzbot Mini is a robust, full-featured, open-source 3D printer with multi-material capability and a well-developed community/user base.
The Lulzbot Mini is well packaged and with all necessary accessories to get started on the box. It is relatively easy to get started but requires an adept user or skilled novice to navigate the inconsistent Cura software.
Care must be taken to use the latest version of software or printing problems may arise. Once familiarized with the vagaries of the software, printing is straightforward and reliable with parts turning out relatively consistently, over and again. We recommend you download the latest version of Cura directly from the Lulzbot website to avoid any possible problems with printing.
The Lulzbot Mini comes with a handy auto-leveling feature that ensures models are printed reliably while the all-metal Hexagon hot end and heated PEI build plate to allow for experimentation with a wide variety of materials. Although noisy, the Mini produces high-quality parts quickly and can run jobs over an extended period of time without issue.
Thanks to the well-built extruder and heated build plate, the Mini can handle most geometries with aplomb and any problems can likely be worked out simply by carefully adjusting process settings. At $1,249 USD, it is only slightly overpriced but remains a solid value compared to many lower-priced offerings.
