 English
  Français
The CEL Robox Dual, a small and intuitive desktop 3D printer

*Update Dec. 17, 2018: CEL has reduced the manufacturer retail price of the RoboxDual. This professional 3D printer is now available at the price of $1,349.00 USD.
**Update Dec. 17, 2018: Due to company restructuring, all sales, support, and management are now led by the UK head office, R&D continues at this UK office.
Introduction
In 2009 CEL released the world’s first cordless workstation in the world, the POWER8workshop. It was widely acclaimed by both professionals and DIY enthusiasts. After this first successful product development experience, the CEL team started working on a 3D printer concept called the Robox.
Their idea: promoting their 3D printer on Kickstarter to collect a great number of user feedback and incorporate them in the final product.
The Robox was introduced in 2012 and was vastly praised for its small footprint, ease of use, and affordability. It often scores as one of the best 3D printers in the Plug and Print category and it’s rated 9.0 by 3DHubs users.

In January 2016, CEL introduced a new extrusion head, equipped with two nozzles. This new extruder head is already available as an option. It relies on a smart “Needle Valves” system, a design patented by CEL. This technology helps prevent stringing of low viscosity materials, a common problem faced by dual extruder 3D printer users.

CEL RoboxDual overview
The RoboxDual is a 3D printer produced by CEL, a manufacturer based in the United Kingdom.
It uses the Fused Filament Fabrication technology to produce thermoplastics parts using filament feedstock.
It offers a build volume of 210 × 150 × 100 mm.
This dual extruder head uses 2 independently controlled heater elements which give high levels of control, across a wide range of materials.
The 3D printer we received from CEL for this test is actually a beta version of the RoboxDual, the new 3D printer which will be released in Q4 2016. The RoboxDual is still in development and some of the feedback we made to CEL will actually be incorporated in the final version of the product.
The RoboxDual will be fitted by default with the innovative dual extruder head. When reading this review please keep in mind we are not testing a final product, but rather a “work-in-progress” prototype.
One other important thing to note is that CEL is continually improving its software, called AutoMaker. Again, they rely on users’ feedback, including the ones from Aniwaa. Each upgrade improves the performance of the 3D printer.
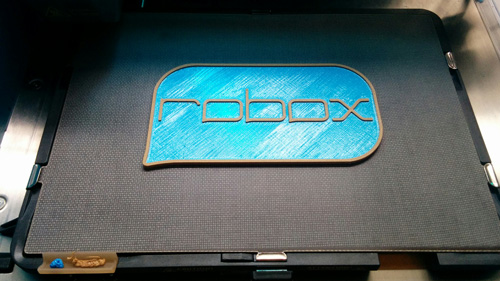
Tested objects: CEL Robox test file, Benchy, Make Magazine Torture Test, Twisted Hex vase, and Standford Bunny Lamps Carved.
The 3D filament used for the test: Robox Woody Beech (Polymaker Polywood) and Polymaker Polysupport.
 Pros
Pros
- Compact footprint and closed frame
- Dual extruder
- Great user experience (hardware and software)
- Sleek design and high-end finish
Cons
- Small build volume
- Average 3D print quality
Packaging
Unboxing: a small and easy-to-open package
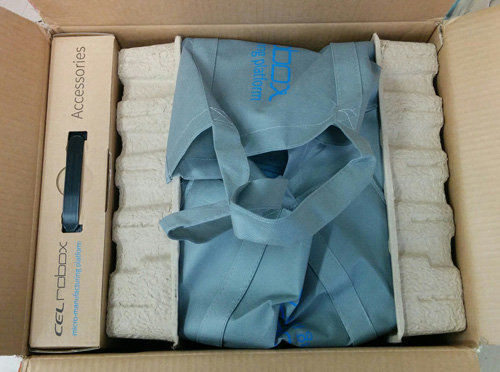
Keep in mind the packaging is not the final packaging in which the RoboxDual will ship when it’s release at the end of 2016.
Our CEL Robox was delivered by FedEx directly to our lab in Tokyo. The packaging is really well designed: on the left side is fitted the accessories box, and on the right side the Robox itself, wrapped in a large bag. We removed the Robox simply by lifting the bag with its handles and put the product on our desk. The Robox is very light (only 8.4 kg) and small, not bigger than a standard desktop 2D inkjet printer (370 x 340 x 240 mm).

Instructions manual
The CEL RoboxDual Quick Start Guide does exactly what it says it does. It is entirely redacted in English and contains all you need to know to get started with the RoboxDual. It starts by introducing the different items included in the box and gives an extensive description of the different parts of the 3D printer.
This quick start guide also provides useful insights about the 3D printing process itself, and the definitions for the specific vocabulary all users need to be familiar with, like extruder, filament reel, brim, and support.
The document itself is printed on a nice thick paper, with a clear font and beautiful design.
Included separately is a Safety Instruction booklet that reminds us that a 3D printer is not a toy and can even do some harm if not properly used. ?
This Quick Start guide is nicely complemented by a USB flash drive that contains all the necessary information in pdf format and even gives access to a quick startup tutorial video. Again, everything is clear and well-presented. Among the many 3D printers we’ve tested, the RoboxDual offers one of the best out-of-the-box user experiences.

Accessories

The CEL Robox’s accessories package contains 4 cleaning tools, a bottle of axis lubricant, some bed cleaning wipes, and the famous CEL Smart Reels.
The Smart Reels system is a unique innovation by CEL. It’s a small electronic part designed to be attached to the filament spool to allow the 3D printer to read and write information about the filament being used, to automatically adjust the 3D printing parameters. This is made possible by the use of some electronic magic, and a reprogrammable EEPROM attached to each filament spool.
These Smart Reels also enable the 3D printer to automatically calculate the weight/length of the remaining filament and the cost of each print. The great thing about this system is that it can be reprogrammed with any data, so it works with the generic material.
Yes, the CEL RoboxDual is compatible with non-proprietary filament! Overall, this feature might seem gadgety but it gives a real sense of ease in the printing experience, and even for 3D printing experts the ability to automatically get the right 3D printing parameters is pretty nice.
Overview and setup
Software
Setting up the RoboxDual is quick and easy thanks to the USB flash drive provided by CEL in the package. The software included is called AutoMaker. It is easy and fast to install on both Windows and Mac OS. Linux is also available but we did not test it.
Note: Most of our tests of the CEL Robox Dual Extruder were conducted with AutoMaker 2.01.01. CEL then upgraded it to version 2.01.02 (which was in beta when we tested it).
At first glance, AutoMaker offers a streamlined user interface. On the left, you can find information about the 3D printer and the filaments (automatically populated thanks to the Smart Reels system). In the middle of the screen, the print layout is visible, along with the status of the 3D printer, with useful information such as the position of the print head and if the door is opened or closed.
Hardware
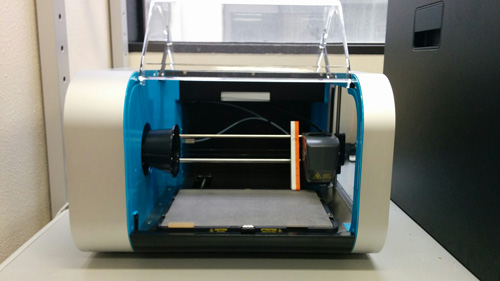
The CEL Robox is a compact and gorgeous 3D printer. It has a quite high-end finish, on par with mainstream consumer electronics products such as inkjet printers. It really looks and feels like a “real” functional machine and not a DIY 3D printer. The CEL RoboxDual features an aluminum casing frame and a plexiglass front door panel which opens and closes smoothly.
Every element of the 3D printer is encased and protected. This 3D printer has a compact footprint of 370 x 340 x 240 mm and offers a rather small build volume of 210 x 150 x 100 mm. The Z-axis is particularly limited, which can be frustrating for specific use cases.
This overall setup is fast and simple, even for people who never used a 3D printer. Definitely, one of the best user experiences we had with a desktop 3D printer. Turning on the Robox Dual only requires connecting the AC plug (the adaptor is included inside the casing) and connecting the USB 2.0 cable to the computer.
The software automatically detects the version of the 3D printer and proceeds to a firmware update if necessary. It is then possible to remove the orange and white plastic part which holds the printhead steady during shipping and to configure the filament holder (on the left of the build chamber).

The dual 3D filament configuration is clever and easy to get with the CEL RoboxDual, thanks to the automatic feeding system.
Getting started
The best way to get started with the CEL Robox Dual is to follow their video tutorial included on the USB Flash Drive.
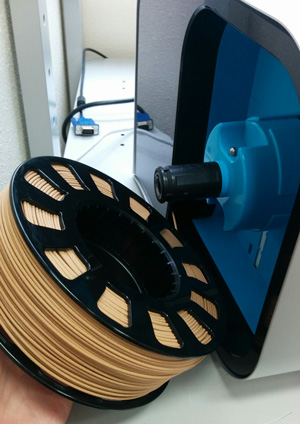
The very first step is to install the 3D filament spools on the side of the machine and to feed the material towards the print head. Once the first spool of the filament is positioned, it’s very easy to guide the filament in the extrusion hole on the side of the 3D printer.
The Robox automatically detects that filament has been inserted and starts feeding it into the printhead automatically. Then you simply can insert the filament spool on the holder. The first filament we used was Robox Woody Beech (indeed a Polymaker Polywood 3D filament).
For the second step, you can repeat the operation with a second spool of 3D filament. Once again it is automatically detected and inserted towards the print head (the hole is properly labeled 2). The second material we used was ColorFabb nGen Light Blue.
The whole operation takes less than 3 minutes and is again really easy to perform. As testers, we’re used to performing a series of complicated software/hardware installation steps before getting the first print out but in this case, the CEL Robox stands out by its ease of use and simplicity.
Our very first print was a dual-color object file given by CEL. The result came out well overall, with no material mix and clean details.
The Robox Woody Beech prints very well but the ColorFabb nGen Light Blue does not offer a very nice surface finish. We will see in the 3D print result that this material never delivered what we expected from it.
Experience
Software
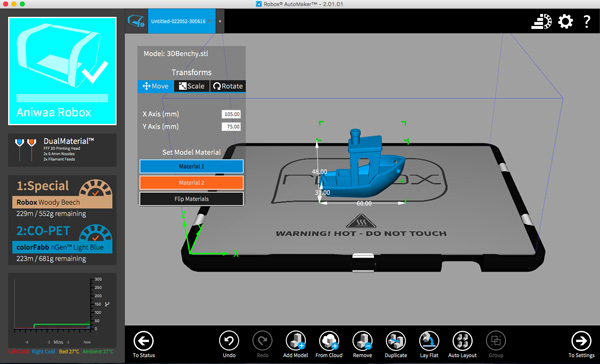
The software provided by CEL with the Robox is called AutoMaker. It is simple to use and very ergonomic. At the time of the test, it was still being refined so some features might have been improved since. The AutoMaker is organized into 3 different sections:
- On the left are the main live parameters of the 3D printer. The first tile is the machine currently connected by USB (AutoMaker can operate several 3D printers simultaneously, and they are rumors of wireless connectivity being soon available…).
Then there is a presentation of the PrintHead (our Robox Dual Extruder is equipped with an RBX01-DM), then the inserted 3D filaments, which properties are directly acquired by the EEPROM, and last the temperature parameters (Left extruder, Right extruder, Print bed and Build chamber).
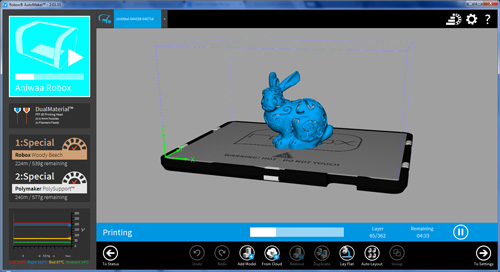
- On the right of the screen is the main event panel, with first a representation of the 3D printer “Status”, the “Layout” configuration (the one on the picture), and lastly the 3D print “Settings” section. The Settings sections allow to fully configure the resolution, print speed, and support/brim parameters (among many others).
- On the top right are two icons that allow the users to access the configuration and modes of the 3D printer and the 3D filaments. These buttons are useful to change the configuration of the Smart Reels, change the 3D printer mode (from beginner first print to expert mode) or edit the slicer in used (by default it is Cura).
The verification feature of AutoMaker analyzes the 3D model and identifies any potential issues. We noticed that a lot of 3D models (including the dual material Benchy) suffer from little defects. The 3D model feedback given by the software is interesting but also a bit stressful, so we feel like it should only display warnings when serious issues might be faced when 3D printing.
While some small improvements could be (will be?) done (like a better fit of colors between the extruders temperature, extruders illustrations, and filament type), overall AutoMaker is really good software with a smooth user experience. An interesting feature would be the real-time progress of the object being 3D printed in the software.
3D printing
3D printing with the CEL Robox Dual is truly a great experience. Everything goes smoothly and is very intuitive, even the usually complex dual extruder mode. As long-time MakerBot Replicator 2X users, we can confidently say that 3D printing with the RoboxDual is much simpler than with the 2X. Note that the small build volume of the CEL Robox limits the height of the 3D prints and the orientation of the objects, but for most users, it should be sufficient.
To start a 3D print, the only requirement is to connect the CEL Robox to a computer by USB 2.0 and hit the Print button on AutoMaker. Once the instruction is transferred (which takes around 1-2 minutes), you either can safely disconnect the printer, or let it plugged if you want to monitor the print. In our own opinion, it is a lot simpler than having to rely on an SD card which must be manipulated several times. Of course, the best would be to directly send the instructions to the 3D printer via Bluetooth or wifi.
The CEL Robox Dual print bed is made out of an epoxy-like surface (an industrial-grade thermoplastic PEI composite) and it’s a heated print bed, so the adhesion is very good. They call this print platform the ThermoSurface. Once finished, the objects are easy to remove with a regular spatula if you can’t wait for the 3D part to cool off or by hand after a few minutes. No special adhesive or additional build surface (like BuildTak) is required to get a consistently good 3D printing experience.
When 3D printing with the CEL Robox Dual Extruder, we only experienced a small malfunction on one of the heat sensors from the 3D print head on the left extruder. After waiting for a few minutes for the right extruder and the print bed to cool off, we simply disassembled the print head from its drive system and plugged it back in again. The whole operation took less than two minutes, as the print head is only attached by a screw connected to a big plastic knob. Once again, a perfect user experience, even when dealing with issues.

The CEL RoboxDual offers a “purge nozzle” automatic process when you change 3D filaments. This efficient system guarantees optimal cleaning of the nozzle, to avoid that any extra plastic jammed the extruder. This is a very useful function for both beginners and advanced users.
Noise
The CEL Robox is neither quiet nor noisy, simply average, thanks to its closed frame. When using the simple extruding mode, the 3D printer is reasonably noisy with most of the noise being made by the extraction fan on the top of the 3D printer.
The dual extruder mode is a little noisier as the 3D printer regularly switches between nozzles, which creates additional noises. We measured values between 60 dB and 65 dB in operation at a one-meter distance, using the Android Sonometer app on a Nexus 5 smartphone.
3D printing results
Test prints were produced using Robox Woody Beech (Polymaker Polywood), ColorFabb nGen Light Blue, and Polymaker Polysupport. We tested several 3D print layer thicknesses (between 300 microns and 100 microns). All the other parameters (temperature, speed, retractation…) were the default recommended by CEL with the Smart Reels.
Again, please note that we tested the CEL Robox Dual Extruder as a beta prototype. We did not test a final product, and the performance of the 3D printer when it will launch (Q4 2016) will likely be better. Most of the tests were performed with AutoMaker 2.01.01. When version 2.01.02 (beta) was released we started using it and obtained better results right away.
1. Benchy
To evaluate the performance of the CEL Robox Dual Extruder, we started by printing out some Benchys. The 3D Benchy is a de-facto standard torture test for 3D printers and is commonly used to verify dimensional accuracy and overall 3D printer capabilities.
The mono-material Benchy is good with the Robox Woody Beech 3D material, in both of the resolutions we tested (100 microns and 200 microns). However, small irregularities are noticeable, and on the 100 microns resolution test the first layer was not a success. With the ColorFabb nGen Light Blue, the results are below average, in both 100 microns and 200 microns resolution with a lot of wobbles.
The first dual-material tests of the Benchy turned out at first pretty bad, we tested 200 microns and 300 microns resolution. We suspect this might be caused by the bad behavior of the ColorFabb nGen Light Blue with the Dual Extruder head and some issue in the valve operating the material changes.
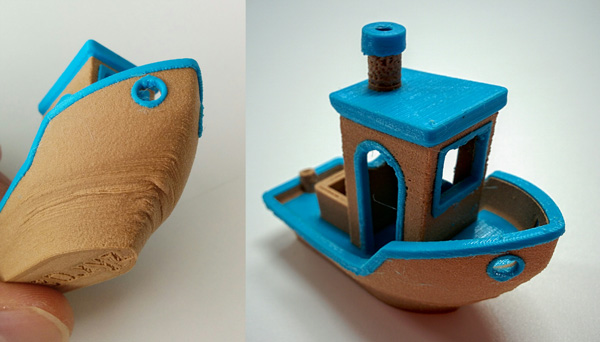
We then upgraded the software to the 2.01.02 (Beta) version and tested a 100-micron print. The Benchy came out really nice, except for some surface irregularities in the front part of the hull. This is due to the difference in print bed temperature for the two materials which are different, much hotter for the ColorFabb nGen compared to the Woody Beech/Polywood.
2. Make torture test
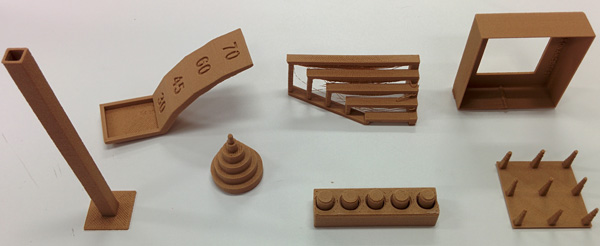
Make Magazine’s 3D Printer Torture Test offers a rigorous approach for testing the limits of a 3D printer.
We use it as a benchmark test.
> Dimensional accuracy
> Bridging performance
> Overhang performance
> Negative Spaces Tolerances
> Fine Positive Space Features Performance
> Mechanical Resonance in XY
> Mechanical Resonance in Z
Notable comments:
Our RoboxDual did a reasonably good job on the Fine Positive Space Features Performance test with minimal stringing at the ends of the spires.
The Negative Space Tolerances test was a success, with no force required to remove the pegs from their slots, except for the smallest 0.2 mm.
The 70 degrees Overhang test delivered very good results for all angles from the top view, but from the bottom, many irregularities were noticeable, starting from the 60 degrees angle.
The bridging performance got the worst result but that could have been caused by the specific testing material we used, the Robox Woody Beech.
3. Twisted Hex Vase
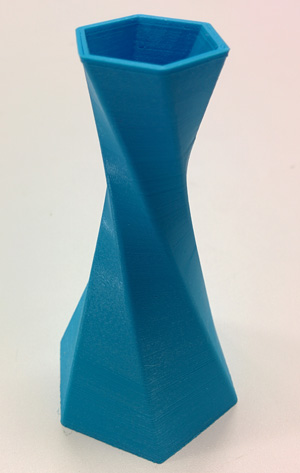
Twisted Hex Vase by bkpsu
This nice-looking vase is great to assess the 3D printer’s ability to print clean and smooth surfaces. It has a large base so can be hard to unstick from the print bed and can create warping and too much adhesion to the build plate.
We also like it because of its hexagon shape that looks a bit like our logo ? . This test was performed after the software upgrade (AutoMaker version 2.01.02 Beta).
Very slight signs of wobble can be seen but the overall result is somewhere between good and very good. The large base of the vase had a perfect adhesion during the print (no warping at all), and thanks to the amazing material of the ThermoSurface print bed, the 3D printed object was also really easy to remove by hand.
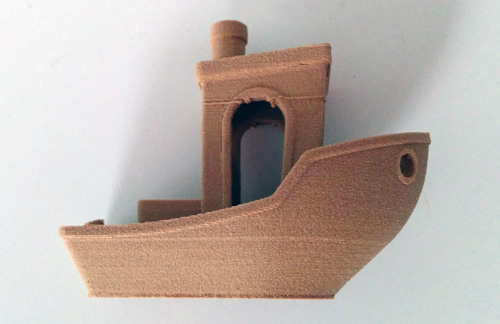
4. Standford Bunny Lamp

Bunny Lamps Carved by mingshiuan
An artistic edit of the well-known Standford Bunny with a lot of complex details and requires intensive use of support. This file was chosen to evaluate the ability of the CEL Robox Dual Extruder to perform multi-material 3D prints with the Polysupport 3D filament.
We obtained decent results with the Robox Woody Beech as the main 3D filament. The Polysupport is an excellent support material, which is easy to remove and break. It leaves almost no traces on the surface of the object, as shown in the picture below.
Value
The CEL Robox Dual is a very good desktop 3D printer offering an amazing user experience, which is according to us its main value proposition. It also offers a range of nice features, including dedicated software, a closed build chamber, and a dual extruder head. However, it suffers from a limited 3D print volume (the downside of its very compact footprint) and a medium-range price point of around $1,799.
Conclusion
Our overall conclusion reflects our experience with the CEL Robox Dual, printing with Robox Woody Beech (Polymaker Polywood), ColorFabb nGen Light Blue, and Polymaker Polysupport 3D filaments.
The CEL Robox is a very good desktop dual-extruder 3D printer with a great user experience. The smooth combination of beautifully designed and engineered hardware with smart and streamlined software is the perfect example of what a consumer 3D printer should be. The CEL Robox offers some amazing features, unique in its price range: a dual extruder, an automatic feeding filament system, a closed frame, specific software, and the Smart Reels 3D filament technology.
However, we’re a bit disappointed by the 3D print quality. We believe it is because the manufacturer is still working on improving its machine. That said, even with an improved 3D print quality performance, the CEL Robox is a medium price range 3D printer that offers a quite small build volume, while larger build volume can be an important requirement for many users.
We recommend this 3D printer for entry-level users or professionals (like engineers, designers, and even museum conservationists) who want a simple-to-use, hassle-free 3D printer and do not want to spend hours tweaking each parameter of their 3D printer to obtain a good print.
For tinkerers and advanced users, we suggest the slightly cheaper Flashforge Creator Pro as an alternative for dual extruding requirements, or the Zortrax M200 for example, for those who do not need dual extrusion but want more build volume.
