 English
  Français
The Ultimaker 2+, one desktop 3D printer to rule them all?

Introduction
The Ultimaker 2+ is the most recent iteration of the Dutch company’s popular desktop line and is positioned at the premium end of the market segment. As an “open-source” printer, Ultimaker enjoys a devoted and active user-base with many people around the world contributing their knowledge and expertise to the brand.

Ultimaker Ultimaker 2+ overview
The Ultimaker 2+ is a 3D printer produced by Ultimaker, a manufacturer based in the Netherlands.
It uses the Fused Filament Fabrication technology to produce thermoplastics parts using filament feedstock.
It offers a build volume of 223 × 223 × 205 mm.
Built in the USA by Ultimaker manufacturing partner, FBRC8, our review unit was supplied by Dynamism and is available for purchase starting at $2,499 USD. A true desktop 3D Printer, the Ultimaker 2+ (also called Ultimaker 2 Plus) earns many accolades, but does it deserve them? Is there more to this minimalist multi-material machine than meets the eye? Let us examine further and start this in-depth review.

- Tested objects: Benchy, Make test files, 3DKitBash test files, Twisted Hex vase, and Ultimaker Airbus.
- The 3D filament used for the test: Ultimaker 3 mm Blue PLA.
 Pros
Pros
- Small Desktop Footprint
- Large Build Volume
- High Speed / High Resolution
- Variable Nozzle Capability
- Excellent Design and UX
- Very Good Setup Guide
- Quiet
Cons
- Expensive
- Slow Slicer with terrible UX
- 3 mm filament size may limit material availability in certain regions.
- Glass build plate can be temperamental
- Manual build plate leveling
- No Enclosure
Packaging
Important note: before ordering any 3D printer, but especially those at the Ultimaker’s price point, make sure to familiarize yourself with any applicable import fees or taxes to avoid the unpleasant surprise of your package being held up without notice along with a demand for the immediate payment of fees.
Unboxing: a robust packaging
Delivered via FedEx, the Ultimaker’s large brown box comes adorned with the slogan, “Imagine It Make It” and a CE compliance sticker indicating the location of manufacture, which in this case is the United States. Also on the box is a QR code which leads presumably to a download of the Ultimaker app, available in Android or iOS flavors.
Once opened, you will find, depending on your desired configuration, a roll or two of filament, the Quick Start Guide with an accessory package as well as some marketing materials.
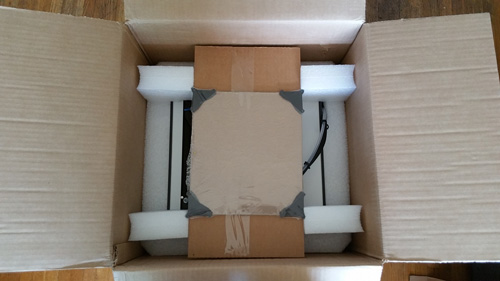
The printer itself is encased in a robust foam cage, engineered for repeatable transport. In fact, Ultimaker makes a point of telling you to keep the box in the event you need to take advantage of the limited one-year warranty. However, this requires having enough storage space for a large 18″ x 18.5″ x 25″ (460 mm x 470 mm x 635 mm) box. Also, remember to carefully remove the glass build-plate BEFORE attempting to lift the printer out.
Instructions manual

The Quick Start Guide is exactly what it says it is and the first thing it tells you to do is download the app and then begin the unboxing process with a reminder to remove the zip ties securing the printhead and some material under the aluminum build plate. The Guide also gives you a visual overview of the Ultimaker’s components and a list of what’s supposed to come in the box and accessory package.
The Ultimaker app provides a step-by-step guide using looping video clips to demonstrate each step required for a successful first print. This feature is surprisingly useful as it leaves your hands free to work while letting you see a given process enough time to complete the task.
After selecting which printer you will use the app for, it gives access to a full complement of manuals, tips & tricks, troubleshooting, and community stories. Overall, it works well to get you up and running with a minimum of fuss.
Accessories
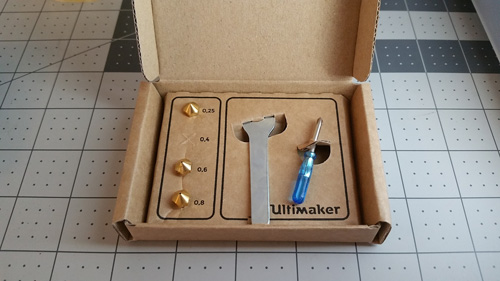
The Ultimaker’s included accessory package is composed of 3 hex wrenches in varying sizes, a USB cable, a tube of Magna-Lube for the Z Screw, leveling sheet, a test print, and (depending on your selected options) the Ultimaker Nozzle Kit, which includes 3 additional nozzles at 0.25, 0.6 and 0.8-millimeter diameter sizes.
The default nozzle diameter for the Ultimaker 2+ is 0.4 mm. This swappable nozzle Kit is an upgrade of the Ultimaker 2+, compared to the Ultimaker 2.
In addition, Ultimaker has decided to include a small glue stick and instruction sheet on how and when to use adhesives during printing. Topping it all off is a handy calibration card and an SD card.
Overview and setup
Software

Setting up the Ultimaker 2+ is easy when you download the Ultimaker app. It’s a very well-designed step-by-step guide that gives you access to setup, manuals, and troubleshooting info.
If followed correctly, the 16 step setup process takes less than 10 minutes.
Hardware

Without a doubt, the Ultimaker 2+ is a very attractive machine for several reasons. First and foremost is the low ratio between desktop footprint and build volume, which is an enormous 223 x 223 x 205 mm, or 8.8″ x 8.8″ x 8.1″. Next up is the well-thought-out industrial design. While most 3D printers are designed strictly from a utilitarian standpoint, the Ultimaker’s aesthetic appeal makes it look more like a lifestyle appliance than a fabrication tool.
The rear-mounted Bowden extruder is set for 2.85 mm filament (a less common diameter compared to the more standard 1.75 mm) and has been upgraded for ease-of-use and reliability in the 2+ while the hot-end has been outfitted with an “Olsson Block”; a community-sourced upgrade which allows for quick and easy nozzle swaps when you need to print things in high detail or high speed.
With a heated glass build-plate, the Ultimaker is a multi-material machine, but the lack of enclosure is a non-starter for high warp plastics like ABS. As a side note, novice users may find the glass build-plate challenging to use at first, but if the plate is properly leveled and heated, first layer adhesion is almost always rock solid.
Getting started
The best way to get your Ultimaker 2+ up and running is by following the step-by-step guide included with the Ultimaker app. Holding your hand from the unboxing, Ultimaker’s guide shows you how to install the spool holder, glass build-plate, and power supply.
It then walks you through the steps required to fire off your first print. Bed leveling is more or less simple, but an experienced eye is better able to determine the nozzle’s distance from the highly reflective build-plate. Loading the filament is a push-button task as the extruder grabs the filament and zips it straight into the hot end.
Finally, the guide asks you to choose a pre-loaded model from the included SD card and to press “Start” on the easy-to-use jog dial. The printer then initiates a relatively fast preheating sequence, homes the extruder and build plate, and primes the nozzle on the way to starting the print. Because all Ultimakers use an SD card, the 2+ works without the need to be tethered to a computer, which is always nice.

Experience
Software
Update June 8, 2016: a new version of Cura, 2.1.2, has just been released. We did not use this version for the test below.
The importance of User Experience cannot be understated, especially in the field of desktop 3D printing. Unfortunately, for Ultimaker, the Cura slicing software will leave you wanting for significantly more. Available directly from Ultimaker, version 15.xxx interacts poorly with windows (we used Windows 8.1) and several crucial components were missing. Namely the ability to adjust nozzle and bed temperature, even when the software was uninstalled and reinstalled. Therefore, each part in this review was printed using Ultimaker’s pre-set profiles.

Cura is also very, very slow. For every change you make to a print, you must wait for the software to re-slice the STL file. Depending on the complexity of the part, this can run anywhere from a few seconds to several long minutes before a file can be saved to disk or sd card.
Otherwise, the software is basically functional. It does permit orientation changes but, moving around the Cura space is cumbersome and awkward, especially with the very annoying tendency to have the camera snap to the object being selected which alters your point of view and more often than not, disrupts attempts to manually arrange and orient parts on the print bed.
3D printing
Aside from the grossly inadequate Cura, the Ultimaker 2+ is a benchmark of how a consumer-grade 3D printer should work. With a well-calibrated and leveled bed, print workflow is almost seamless, but not without the typically idiosyncratic behaviors associated with desktop 3d printing.
Once loaded onto the included SD card, .stl files are accessed via the jog dial and all it takes is a gentle push, to which the machine responds with a beep and initiates the preheating sequence by whichever materials profile you set up in Cura.
About two minutes later, the build plate raises itself to the extruder which primes and begins the print directly onto the glass bed.

Fast and quiet is a good way to describe the printing process with only the cooling fans and low hum of the expertly tuned stepper motors audible in the background. Ultimaker listens to their user base and has made some important changes in the 2+.
The Bowden type extruder gives rise to a faster and more precise printhead by placing the motor at the back of the machine, and the hot-end is made more versatile with the addition of the Olsson Block and 3 other gauges of the nozzle. 0.25 mm for ultra-precise and high detail work, the standard 0.4 mm nozzle for everyday printing, as well as a 0.6 and 0.8 mm sized for higher speed output and larger prints.
The standard layer height with the “Normal” print setting in Cura is 100 microns, which is half of the usual 200-micron layers seen on other printers. This, and the very light printhead gives the Ultimaker a distinct advantage over rivals in print quality and speed.
The enormous 223 mm x 223 mm glass print surface is very flat and allows for more consistent material deposition.
The Ultimaker 2+ offers 205 mm of the available height on its Z-axis. For those who want more the Ultimaker 2 Extended + is an excellent option, with 100 additional millimeters available.
However, the manufacturer has chosen to include a glue stick to help improve adhesion when you run into first layer troubles. If the Ultimaker 2+ build plate is hot and level enough, there should be no problems at all, but sometimes print geometries exceed the material’s ability to maintain contact and a little help is required.
Still, this may not always be sufficient and you will find certain parts to require a brim, or more often, a raft to mitigate the chance of print failure, which, depending on the object geometry, slicer settings, and environmental conditions, can be quite often as you will see in some of our test prints. Most parts with an adequate surface area will stick very well to the print bed and simply pop off once it has cooled sufficiently post-print.
While not important from a strictly practical perspective, but going a very long way towards improving the user experience, the Ultimaker’s built-in LED lighting system provides a very clear view of the printing process but also transforms the build volume itself into a makeshift photo studio, which comes in very handy when taking pictures of your print.
This combination of small footprint, massive build area, speed, precision, aesthetics, and user experience, make up for occasional and even repetitive print failures, which would make other printers virtually unusable. However, the Ultimaker 2+ does not come cheap.
One useful tip: avoid slopping around with adhesive liquids and glue sticks by using a raft.
Noise
Ultimaker has done an admirable job in making the 2+ desktop machine suitable for the workshop or the home. With the Bosch INVH sound meter app for Android, we detected a noise level of about 47.8 dB at a distance of one meter. If not for the moving printhead, you might wonder if it’s on at all.
3D printing results
Test prints were produced using Ultimaker 3mm PLA at a temperature of 210 degrees Celsius with a bed temperature of 60 degrees, a layer height of 100 microns, and a print speed of 50mm/sec.
1. Benchy

To evaluate the performance of the Ultimaker 2+, we started by printing some Benchys. The 3D Benchy is a de-facto standard torture test for 3D printers and is commonly used to verify dimensional accuracy and overall printer capability.
The Ultimaker’s take on the Benchy is sound, but we noticed some minor retraction issues as well as some pitting along some of the bottom layers. Overhangs could have been a bit less droopy, but the overall print is solid and dimensionally accurate.
2. Make torture test

Make Magazine’s 3D Printer Torture Test takes a more scientific approach to testing the limits of a 3D printer. By using a range of parts designed specifically to test particular aspects of the 3D printing task, it is possible to identify and adjust for deficiencies.
Make Magazine’s 2015 Torture Test was completed in short order, but not without certain minor deficiencies. The 70-degree Overhang Test demonstrated a tendency for sloppy layer deposition and a bit of curl on the first layers of the XY Accuracy Test.
The Ultimaker did a reasonably good job on the Fine Positive Feature Test with minimal stringing at the ends of the spires. Negative Space Tolerances were excellent, and no force was required to remove the pegs from their slots. Bridging was also very good with some minor stringing from one retraction point. Z Resonance was minimal as the test progressed, but there was some blobbing due to retraction closer to the bottom of the print.
3. 3DKitbash torture test

3DK has released their own set of 10 chips designed to test all the above-mentioned aspects of 3D printing, but also their ability to “Print In Place” which is to means, produce functional assemblies in one print.
The ten-piece set of Test Chips from 3DK was printed successfully, however, high-speed first layer deposition did contribute to one of the chips having a slightly curled corner.
While all chips were dimensionally accurate, surface textures were slightly rough. All Print-In-Place elements were produced accurately and did not require any physical help to engage their range of motion.
4. Twisted Hex Vase

Twisted Hex Vase by bkpsu
A nice-looking vase, perfect to evaluate the 3D printer’s ability to print clean and smooth surfaces. It has a large base so can be hard to unstick from the print bed and can create warping and too much adhesion to the build plate.
The deceptively challenging Hex Vase print turned out surprisingly well with all edges printing accurately. Surface quality at the Z-step started well but dropped noticeably as the print reached the top.
5. Ultimaker Airbus (Not rated)

This model proved to be a significant challenge for the Ultimaker 2+, but not because the printer itself is deficient. Designed by Jacky Wan aka: Valcrow, the Airbus model is actually configured to print on the Ultimaker 2 Extended +, and in order to fit on the U2+ has to be scaled to 65% of its original dimensions.
This, of course, affects the toolpath and the physical geometry of the model itself may exceed the combined tolerances of the 3D printer and material. The first batch of parts was arranged on the build plate manually, with a print-setting of “High” in Cura’s Quickprint mode.
A 60-micron layer height and 205-degree celsius nozzle temperature onto a 60-degree build plate with a speed of 40 mm/sec did not produce any problems over the course of the 28-hour print. Surface details were excellent as well. And while the rear fuselage printed without trouble, we were unable to successfully print the front fuselage in its entirety due to an annoying lip that would develop across an edge, even after changing the nozzle temperature. This would cause the tool head to knock over a portion of the print.
Still, the Ultimaker was able to complete the fuselage, even with the missing bottom layers. The narrow rear wings could not be completed with a brim or glue. But after adding a Raft, the parts did print in their entirety, albeit with some loss of quality towards the top where the tool head would bump into the almost paper-thin edge. This complex 3D print allowed us to once more appreciate the great capabilities of the Ultimaker 2+.
Value
While the Ultimaker 2+ is an excellent 3D printer, for the price, it should be nearly flawless. The cheap Cura software on such a great machine feels inadequate.
Conclusion: Aniwaa’s opinion
Our overall conclusion reflects our experience with the Ultimaker Ultimaker 2+ , printing with the Ultimaker 3 mm Blue PLA.
The Ultimaker 2+ is an attractive and highly capable printer hampered by a shoddy slicer and a very high price. It is an ideal machine for beginners or those looking for a hassle-free 3D printer with a good performance.
Those who decide to go with an Ultimaker 2+ will not be disappointed. It’s a versatile tool that gets the job done quickly and effectively, most of the time. It looks great anywhere and won’t chew up valuable desktop real estate.
A high price and hobbled printing software can ward off more value-conscious consumers, with competitors quickly zeroing in on the same specs at prices significantly lower than $2500 USD. For example, another solid offer on the market is the Zortrax M200 which is a little bit less expensive and comes with dedicated software.
