 English
  Français
HandySCAN 700 review: another go at Creaform’s mid-range handheld 3D scanner

Introduction and context
Today, we’re meeting with an old acquaintance, the Creaform HandySCAN 700– the first truly metrological, portative 3D scanner to have hit the market. At the time, we had taken the opportunity to review the Creaform HandySCAN 700 (a.k.a. HS700) at Creaform’s Tokyo offices.
The handheld 3D scanner, which we are re-reviewing here, is now making a comeback in the Creaform (now an Ametek company) product lineup as the top dog of the new SILVER series along with the HandySCAN 307 (a.k.a. HS307).

| Country | Canada |
| Category | Handheld |
| Technology | Laser triangulation |
| Weight | 0.85 kg |
| Price | $ 31,900 |
Creaform HandySCAN 700 Elite (SILVER Series) overview
The HandySCAN 700 Elite (SILVER Series) is an handheld 3D scanner produced by Creaform, a manufacturer based in Canada.
The HandySCAN 700 Elite (SILVER Series) Creaform uses the laser triangulation technology.
The SILVER series is a mashup of old and new recipes, combining the HandySCAN 300/700’s excellent reputation with ongoing updates to an already highly capable software. Both scanners have undergone a significant price drop, too, bringing the HandySCAN 700’s price down to $29,900.
Creaform’s SILVER series fits in right below the more premium BLACK series, which includes the HandySCAN BLACK and the HandySCAN BLACK Elite that we reviewed in 2019. For reference, this is already our sixth Creaform 3D scanner review and our third HandySCAN review.

As such, we have extensive experience with Creaform products, but unboxing the HandySCAN 700 once again filled me with nostalgia. In 2016, it was the very first portative laser 3D scanner I had the chance to use, and I remember being very impressed with its capabilities, especially in terms of capturing reflective surfaces.
After having tested a range of many other portable 3D scanners over the years, will the HandySCAN 700 live up to my initial impressions?
HandySCAN 307 vs HandySCAN 700
The HandySCAN 307, the entry-level product of the SILVER lineup, boasts 7 red laser crosses just like the HandySCAN 700. However, it doesn’t come with the 700’s single laser line capability and offers an accuracy of up to 0.04 mm whereas the HS700 can reach an accuracy of up to 0.03 mm.
That “Single beam” mode is particularly useful for the scan of deep, intricate details. Hence, it makes perfect sense to choose the 307 if you don’t need the best accuracy and know you’re not going to be scanning such complex parts, saving you around $10,000 off the more advanced 700.
We ran our review as usual, testing both the hardware and software, and this time focusing on the HandySCAN 700’s main selling point: its price-to-performance ratio.
In order to cover a wide range of use cases and part properties, we tested the HandySCAN 700 on two very different objects: a car key and a fire extinguisher.
Before we dig in, here’s a quick recap of the HandySCAN 700’s pros and cons.
 Pros
Pros
- The “Creaform experience”: great product quality and smooth workflow backed by the brand’s extensive expertise
- A complete software solution, honed by years of updates and upgrades
Cons
- Use of markers is mandatory
Unboxing the HS700
The Creaform HandySCAN 700 is very lightweight at only 0.85 kg (1.9 pounds) and is also very compact: 77 x 122 x 294 mm (3.0″ x 4.8″ x 11.6″). It comes in a robust flycase made of reinforced plastic and fitted with protective foam.
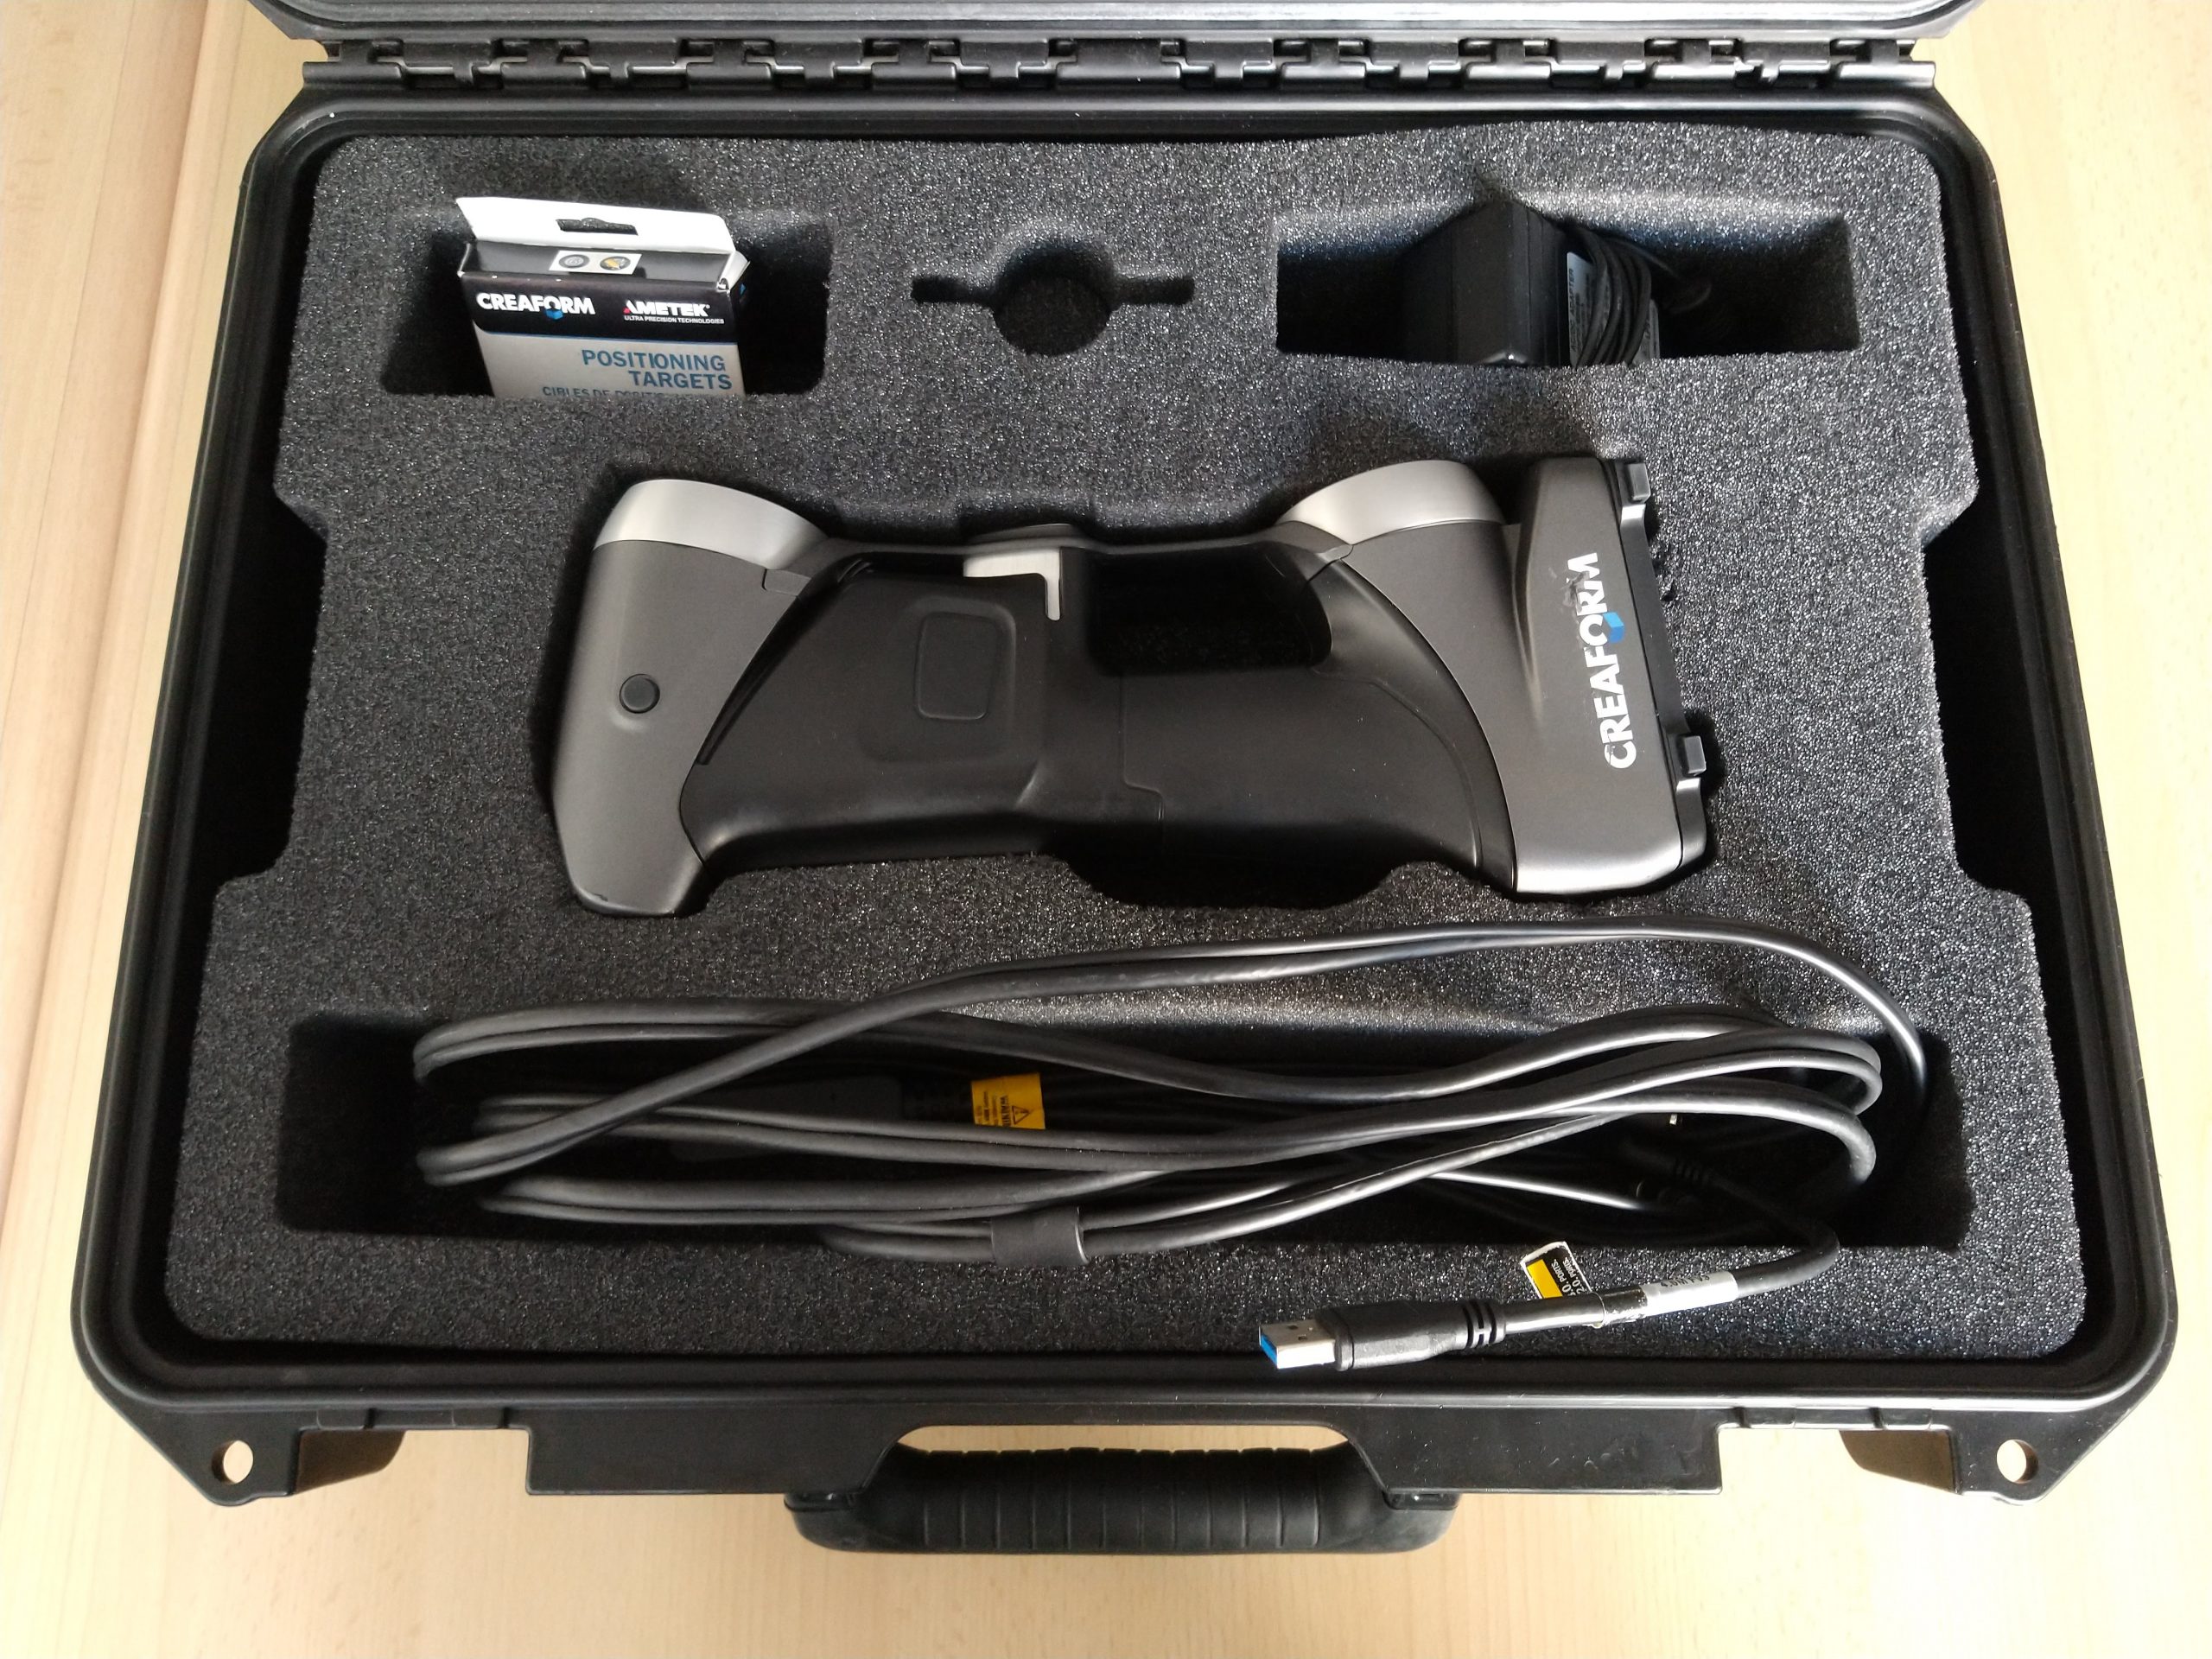
The flycase includes the following accessories:
- Pack of markers
- Calibration plate
- Power adapter
- Power and USB 3.0 data cable
Even laden with all its content (including the heavy, sturdy calibration plate), the flycase is quite lightweight and easy to move around.
HandySCAN technology overview
The HandySCAN 700 features laser-based 3D scanning technology, making use of 14 red laser lines (actually, a single laser dot moving at extremely high speed) that form and cast 7 red laser crosses onto the surface of the object to 3D scan.

These laser crosses are “distorted” as they hit the object’s surface, and the 3D scanner’s two high-resolution cameras capture those deformations. With that information, Creaform’s VXelements software calculates the part’s topology and size and generates a voxel cloud.
Note: Red-colored lasers have a longer wavelength than blue light lasers, meaning they’re supposedly not as effective on complex details and reflective surfaces. This is true in theory, but as we will see in this review, a 3D scanner’s performance mostly relies on its hardware and software quality all-round.
Thus, the laser’s color is pretty secondary. You can obtain better results with a good, red laser 3D scanner than you would with a mediocre blue laser 3D scanner. The same applies to structured light 3D scanners (which often use blue LED projections).
Voxel cloud
The dot cloud generated by the Creaform HandySCAN 700 isn’t exactly just a “dot” cloud, but rather a “voxel” cloud.
When it scans, the HandySCAN 700 generates information in the shape of voxels (3D pixels, if we may). Each time a specific part of the object is 3D scanned, the software creates new data. When the user re-scans a particular area, instead of generating “noise” like 3D scanners usually do, the software refines the position and range of the voxels.
The more you scan an area, the more detail and precision you can obtain. This approach may seem logical and worthy of being standard, but it is far from being common; other 3D scanners don’t work this way.
Laser modes
Two laser 3D scanning modes are available on the HandySCAN 700: cross grid mode and single beam mode. Cross grid mode enables fast data acquisition, while the single beam mode enables the scanner to acquire hard-to-reach areas like piping, deep pockets, or intricate part geometries. The single-beam mode is often used after the object has been scanned in cross grid mode first, to gain precision and detail.
Creaform software overview
Creaform has a complete lineup dedicated to 3D scanning and its use cases. For this review, we had the opportunity to try out two of their software solutions, VXelements and VXmodel.
- VXelements: This software controls the 3D scanner and performs all the actions required for 3D scanning. It is used to set up and calibrate the 3D scanner, and allows users either to follow a step-by-step 3D scanning procedure or to start 3D scanning without any guidance.
- VXmodel: This scan-to-CAD module smoothly integrates with VXelements. Once a “voxel cloud” has been created in VXelements, it can be exported to VXmodel, where the cloud is used to create– and not transform– a mesh.
“Created and not transformed” is an important point, as the original information captured by the 3D scanner is always available. The Creaform software suite is, in this sense, very similar to a CAD tool; it allows the user to edit their model without losing any data between saves, contrary to a mesh editing software that only saves the latest version of the result.
For this review, the Creaform team provided us with a reverse engineering module, allowing us to export not only a closed mesh but also a fully prepared CAD model. We tested this very powerful tool and documented our experience in a separate article, which focuses on software and the reverse engineering workflow.
Computer configuration
For all the software and hardware to operate smoothly, Creaform recommends the following computer configuration:
- Operating System: Windows 10, 64-bit
- Graphics card: ≥NVIDIA QUADRO T1000
- Video memory: ≥4Gb
- Processor: ≥I7-8700
- RAM: ≥32Gb
Creaform lent us an even more powerful PC with monstrous, gaming-grade specifications:
- Operating System: Windows 10, 64-bit
- Graphics card: NVIDIA QUADRO P5200
- Video memory: 16Gb
- Processor: I7-8850
- RAM: 64Gb

We emphasize the importance of using a powerful computer; it is absolutely essential in order to experience a smooth and fast 3D scanning process.
Languages
VXElements is available in English, Dutch, Spanish, French, Italian, Chinese, Korean, Portuguese, Japanese, Polish, and Russian. We used the software in French, and everything was accurately translated.
For new users, it’s often easier and more comfortable to explore new software in their native tongue, especially when translations sound natural.
Creaform training center
We signed up for the Creaform training center to follow the same workflow a new user would. Since the courses are interactive training sessions– one for the software, one for the hardware– that are several hours long, we did not go through them entirely.

Nonetheless, we did see enough to acknowledge the training platform’s nice user experience and interface, along with the relevance of the available information. It’s a great asset for new users.
Calibrating the HandySCAN 700
Calibrating the HandySCAN is a quick and easy process that only takes a few minutes, but we must admit that in this category, the latest portable 3D scanners (including other Creaform scanners we’ve tested) do a bit better, especially on the “discoverability” side.
The calibration plate comes in a wooden case that looks like a cigar box and almost has a vintage feel to it. It’s quite small and surprisingly heavy.
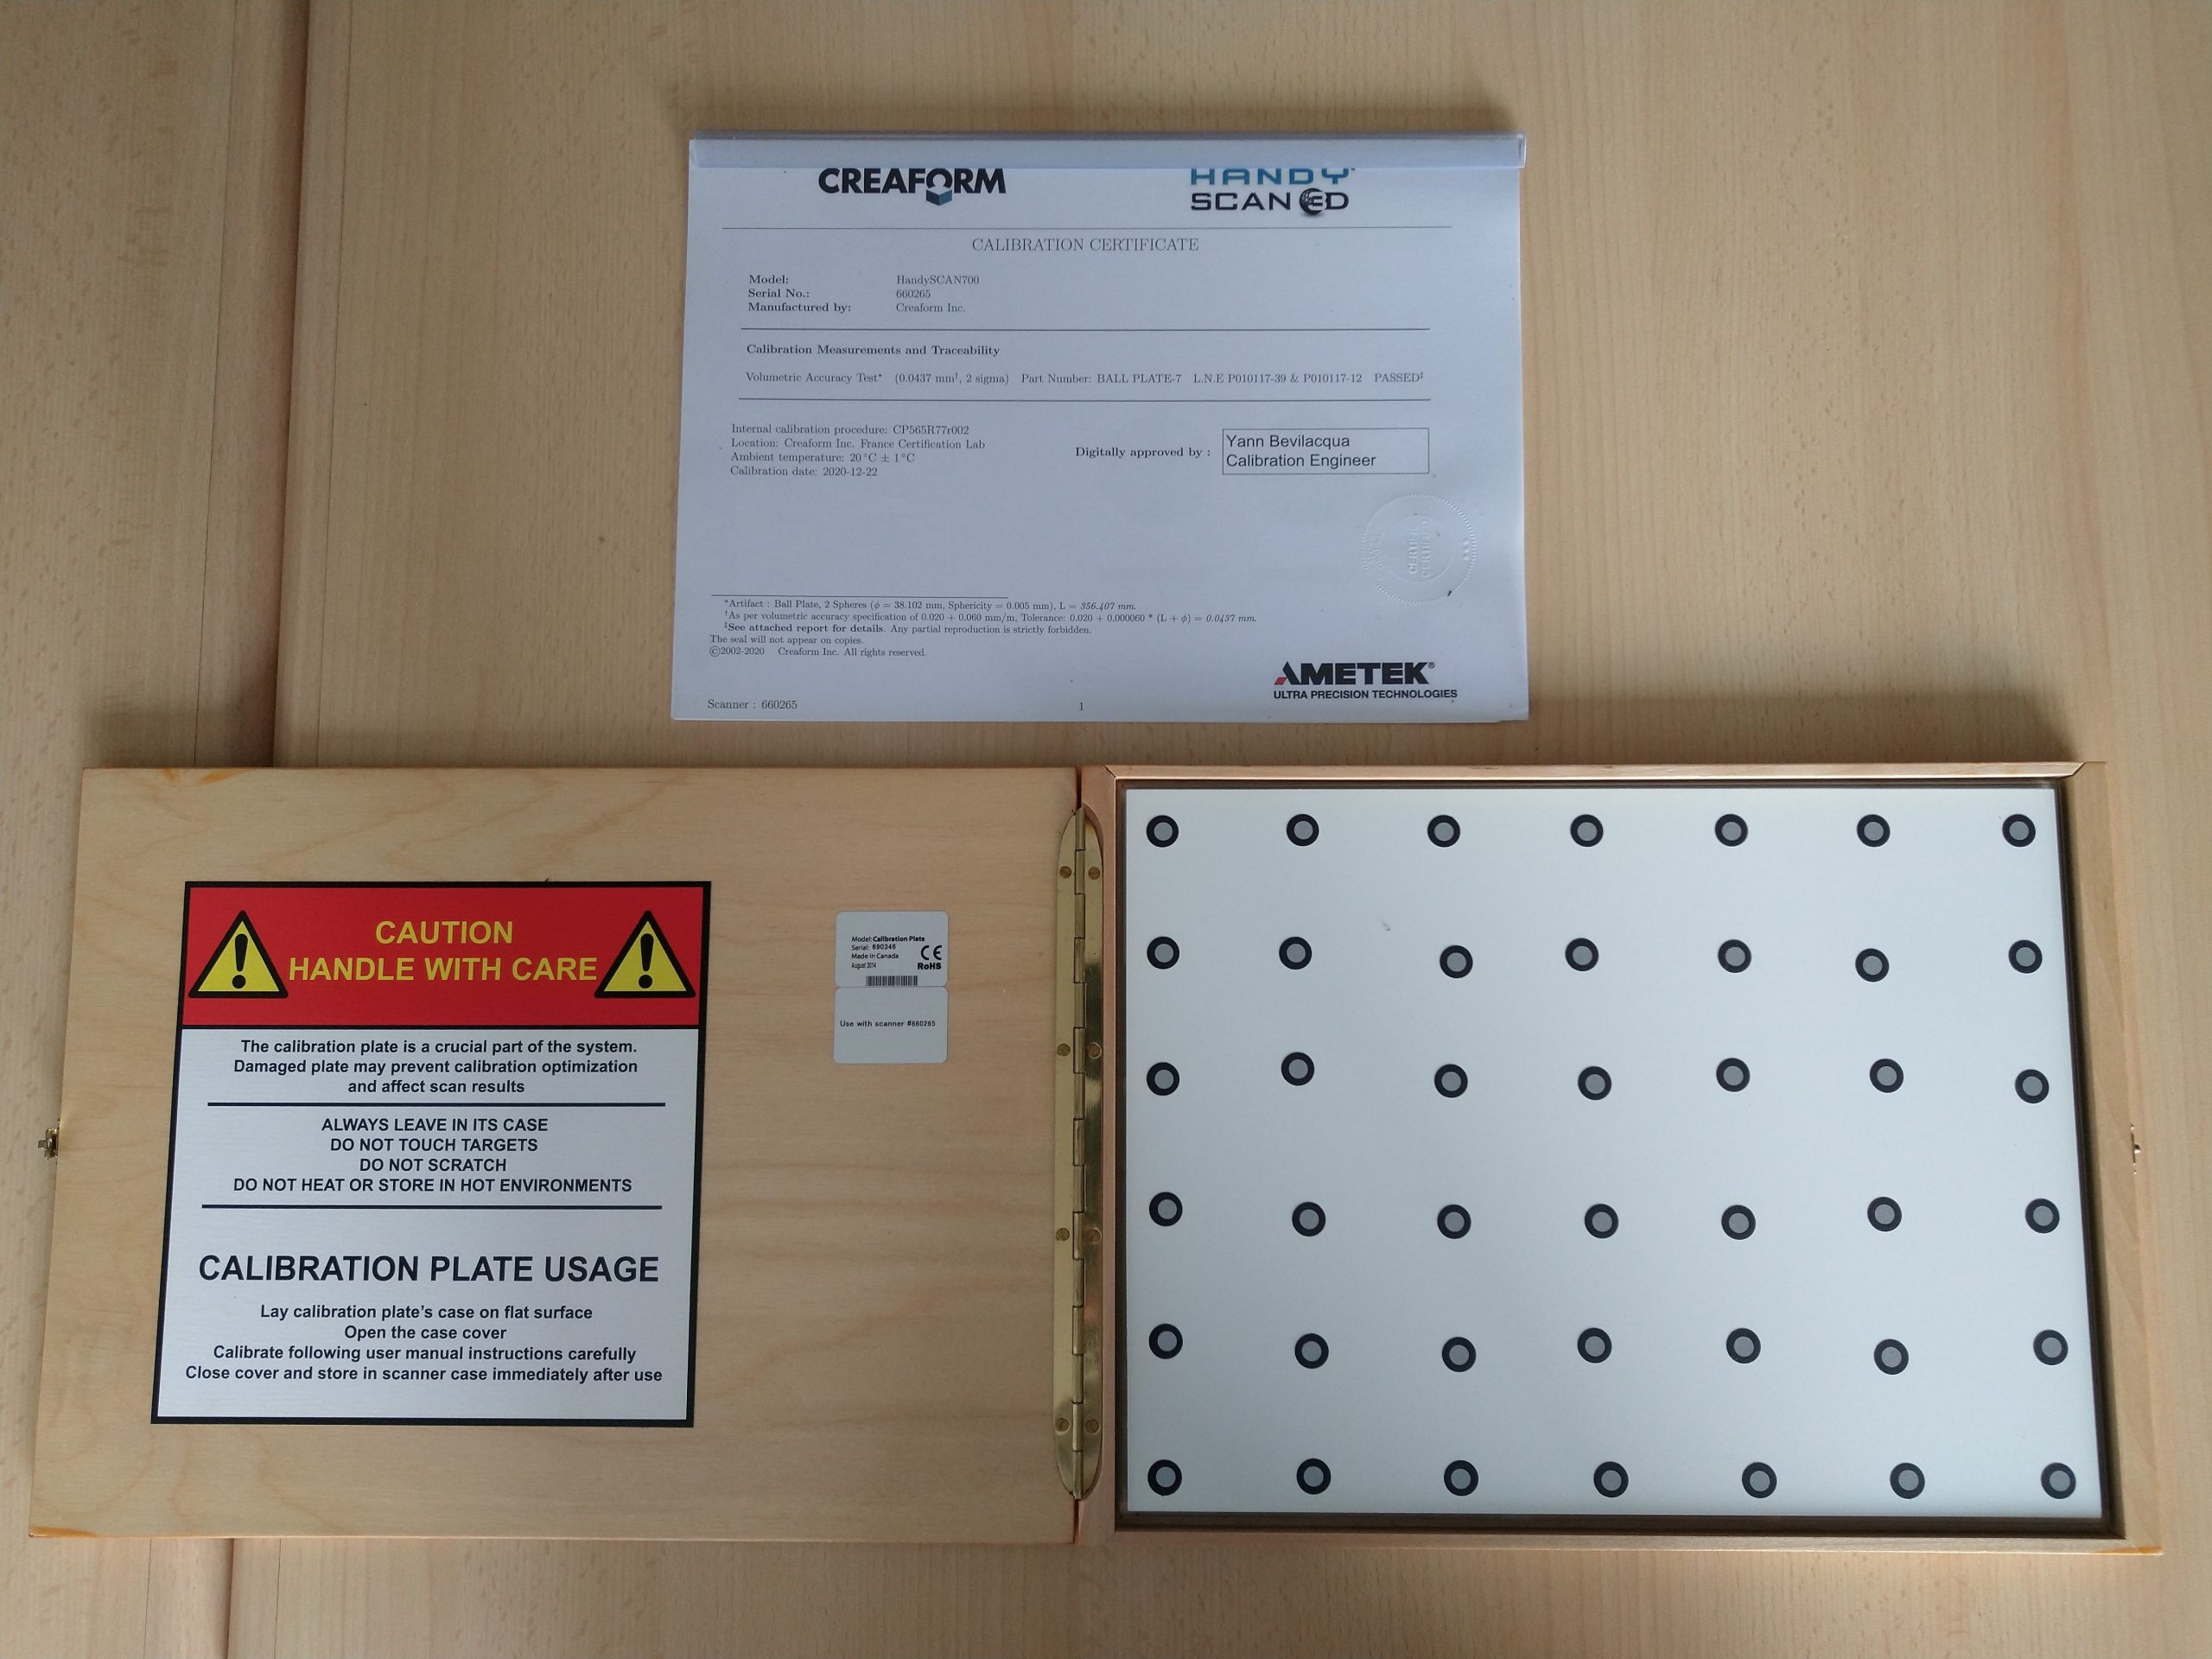
Once the calibration plate is open and placed in portrait mode, it is possible to launch the calibration process.
Note: Each individual scanner has its own, unique calibration plate and number. Hence, if the plate gets damaged or lost it must be replaced by Creaform.
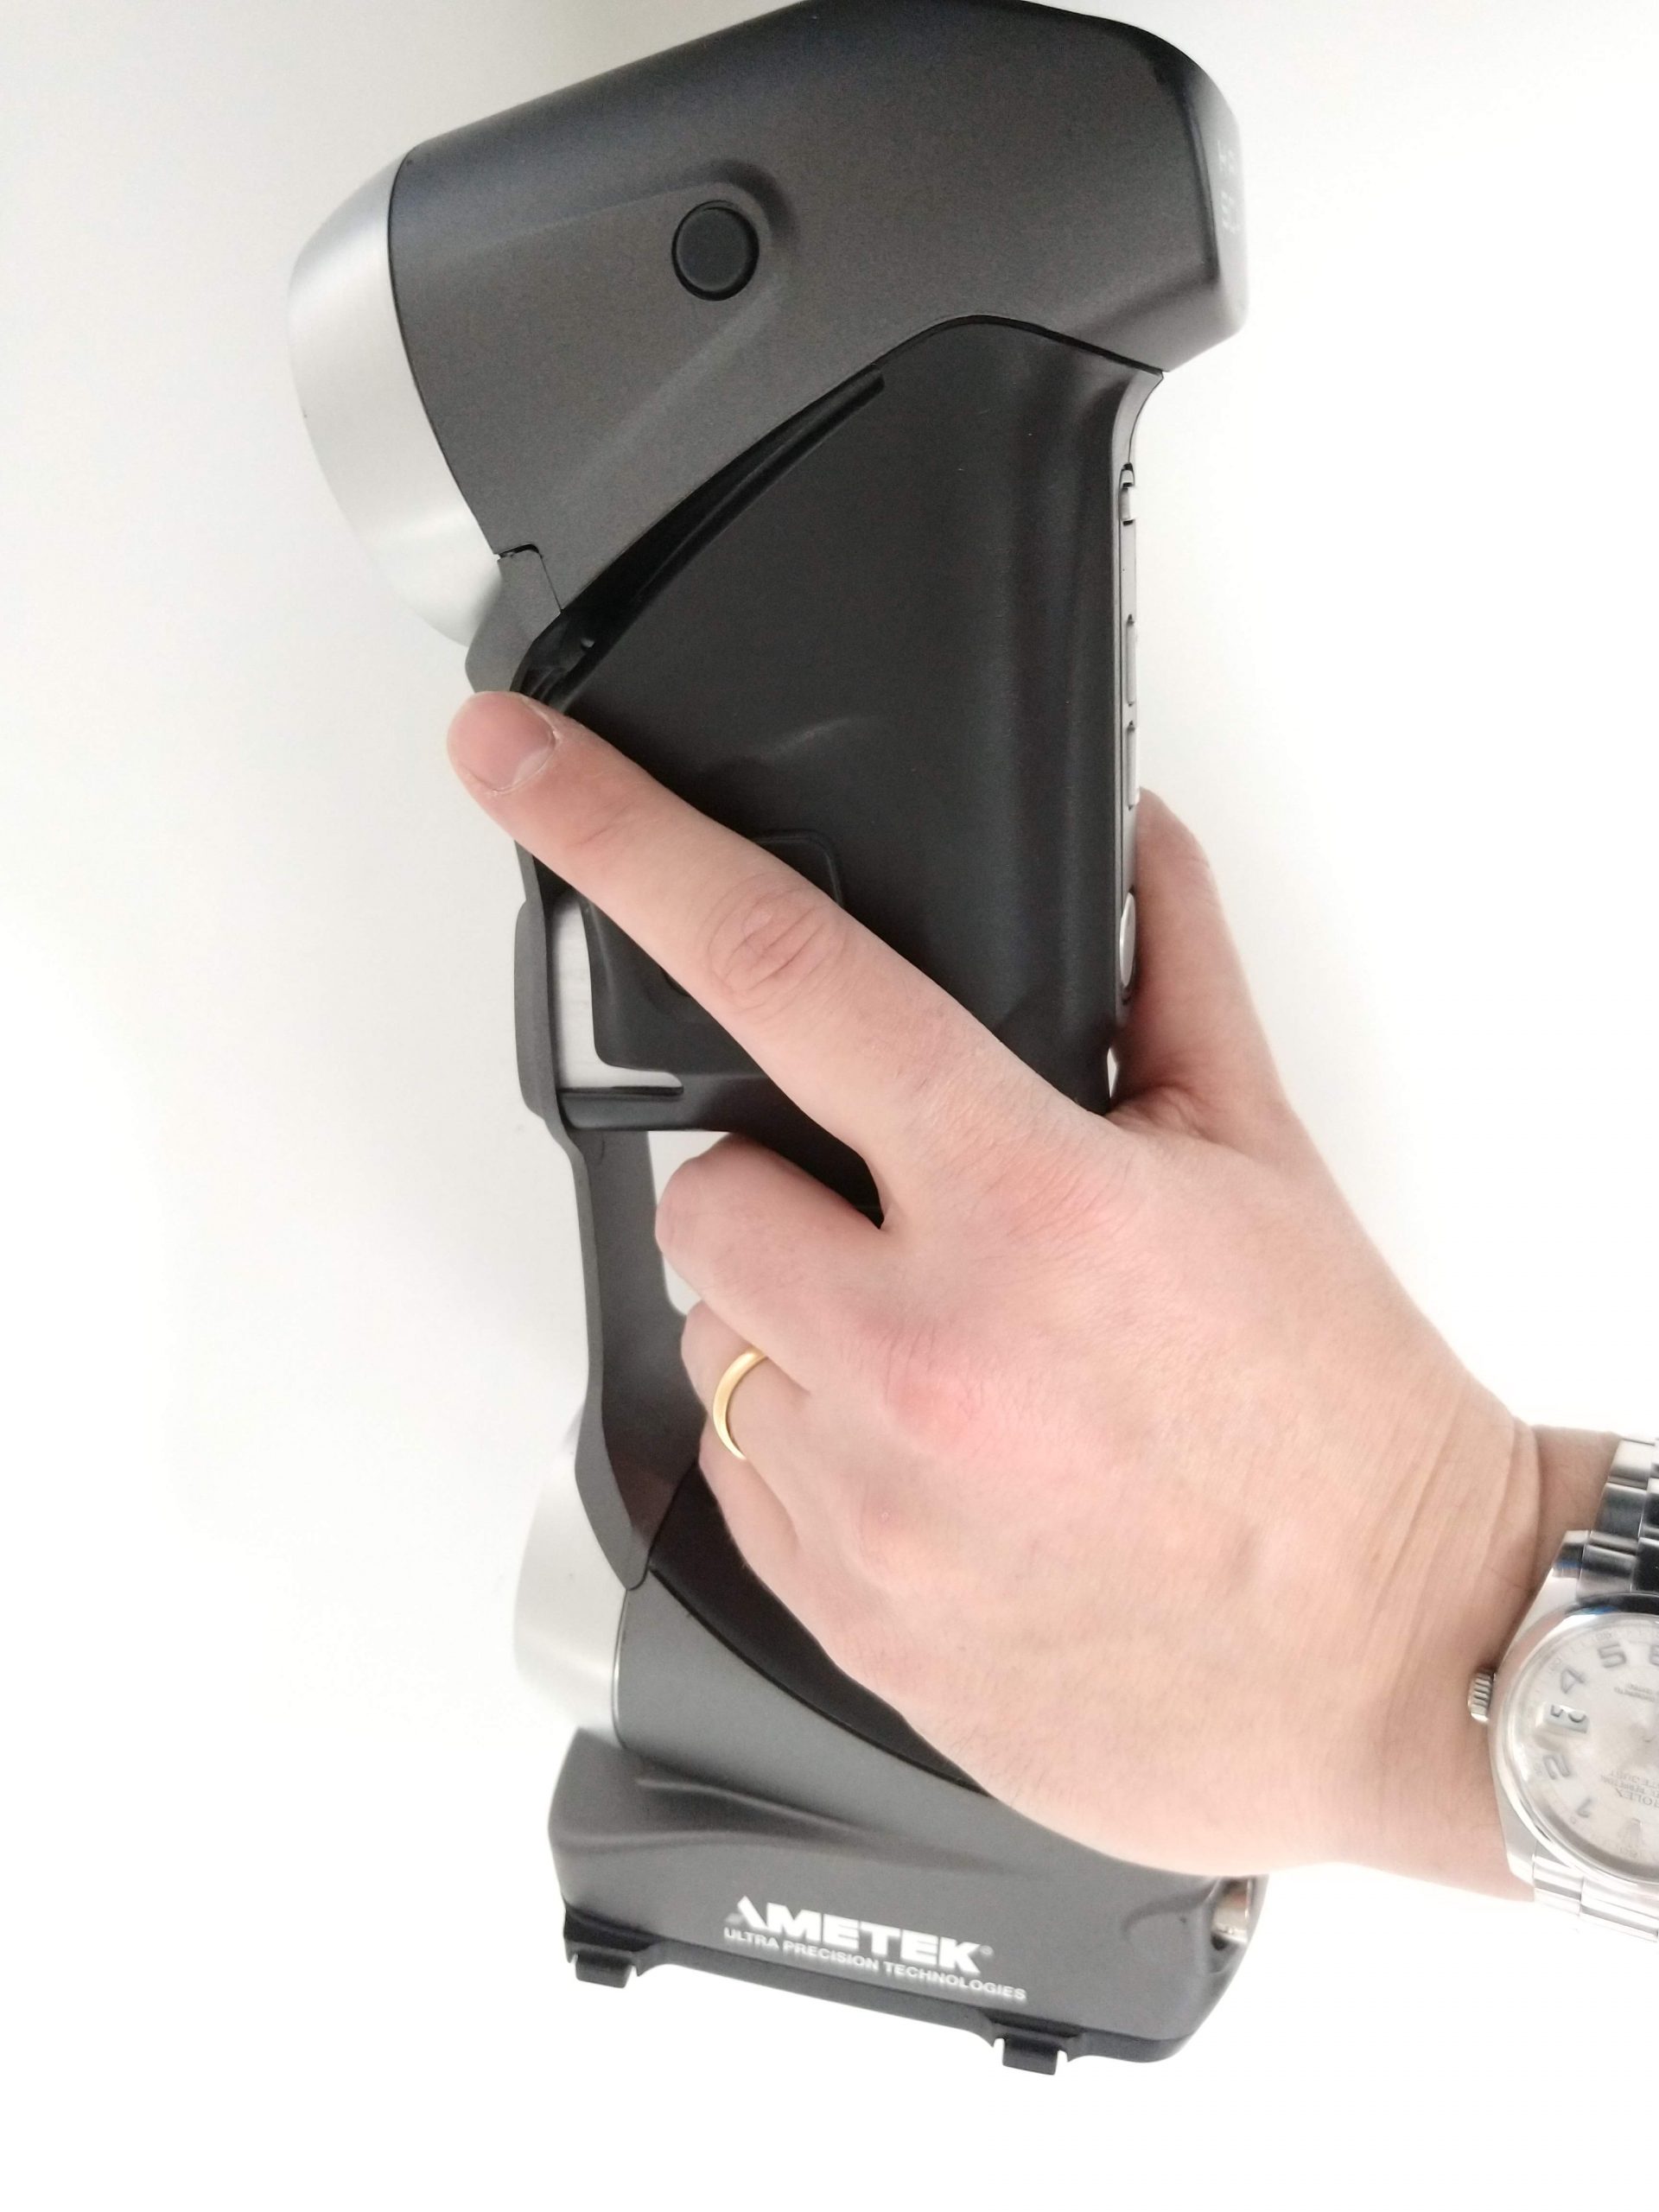
Picking up the HandySCAN 700 brought back a lot of good memories. The hand position is a bit unusual as you need to place your index finger along the body of the 3D scanner (and not grip the handle along with the rest of your hand), but it’s still very intuitive and comfortable. The HandySCAN is perfectly ambidextrous, offering good ergonomics for both right and left-handed users.
The calibration process requires you to hold the HandySCAN 700 at a specific distance from the plate, and then to slowly tilt it in 3 different directions before switching positions. Once you understand how it works, the full calibration process can be done in under a minute.
Getting started and workflow
Upon starting VXelements software, you can choose between two different modes:
- “New scan” mode: This mode launches the full VXelements software interface with all its dropdowns and panels, and it’s possible to jump right into 3D scanning. The user is free to pick the scanning resolution and explore the mesh options. It is also possible to launch the calibration process at any time.
- “Guided” mode: In this mode, the user is guided all throughout the process. When launched in this mode, the software prompts the user to name the new scan and to define key parameters for the mesh. Then, the calibration interface is directly displayed and, once everything is ready, it is possible to start 3D scanning.
In a nutshell, new users should start with the Guided mode, and should afterward be able to know their way around the standard New scan mode with all the options.
Both modes are very complementary to each other, and even experienced users can benefit from launching the guided mode if the 3D scanner hasn’t been calibrated for some time. Quitting the Guided mode to switch to the standard New scan mode is possible at all times.
Scan alignment: a breezy process
To capture complex and/or hard-to-reach areas, you need to perform several 3D scans and align them together. Several alignment modes are available, we tested the two most popular ones:
- Geometry alignment: This mode solely relies on the geometry of the scanned object. The software automatically searches for similarities between the two 3D scans and aligns them properly together. If the automatic alignment doesn’t work right away, you can manually pre-align the scans and then let the automatic alignment do the rest.
- Marker alignment: When a part is large enough to require marker placement on several sides, such as a car door, it allows the software to rely on markers that are visible from both sides (markers on the top of the door, for example) to reposition different sets of scans and merge them into a single one.
In both cases, the software is intuitive and highly efficient. Furthermore, since the HandySCAN 700 generates a “voxel cloud”, aligning several 3D scans together doesn’t tamper with the global resolution and accuracy of the final result, as all of the information is stored and taken into account.
The resulting meshes are of very good quality: there’s a balanced amount of triangles and the scans are in high definition, while the exported STL files are surprisingly small.
Design, buttons, and LED indicators
The HandySCAN 700 features a large handle and four buttons that can be effortlessly reached with the thumb.
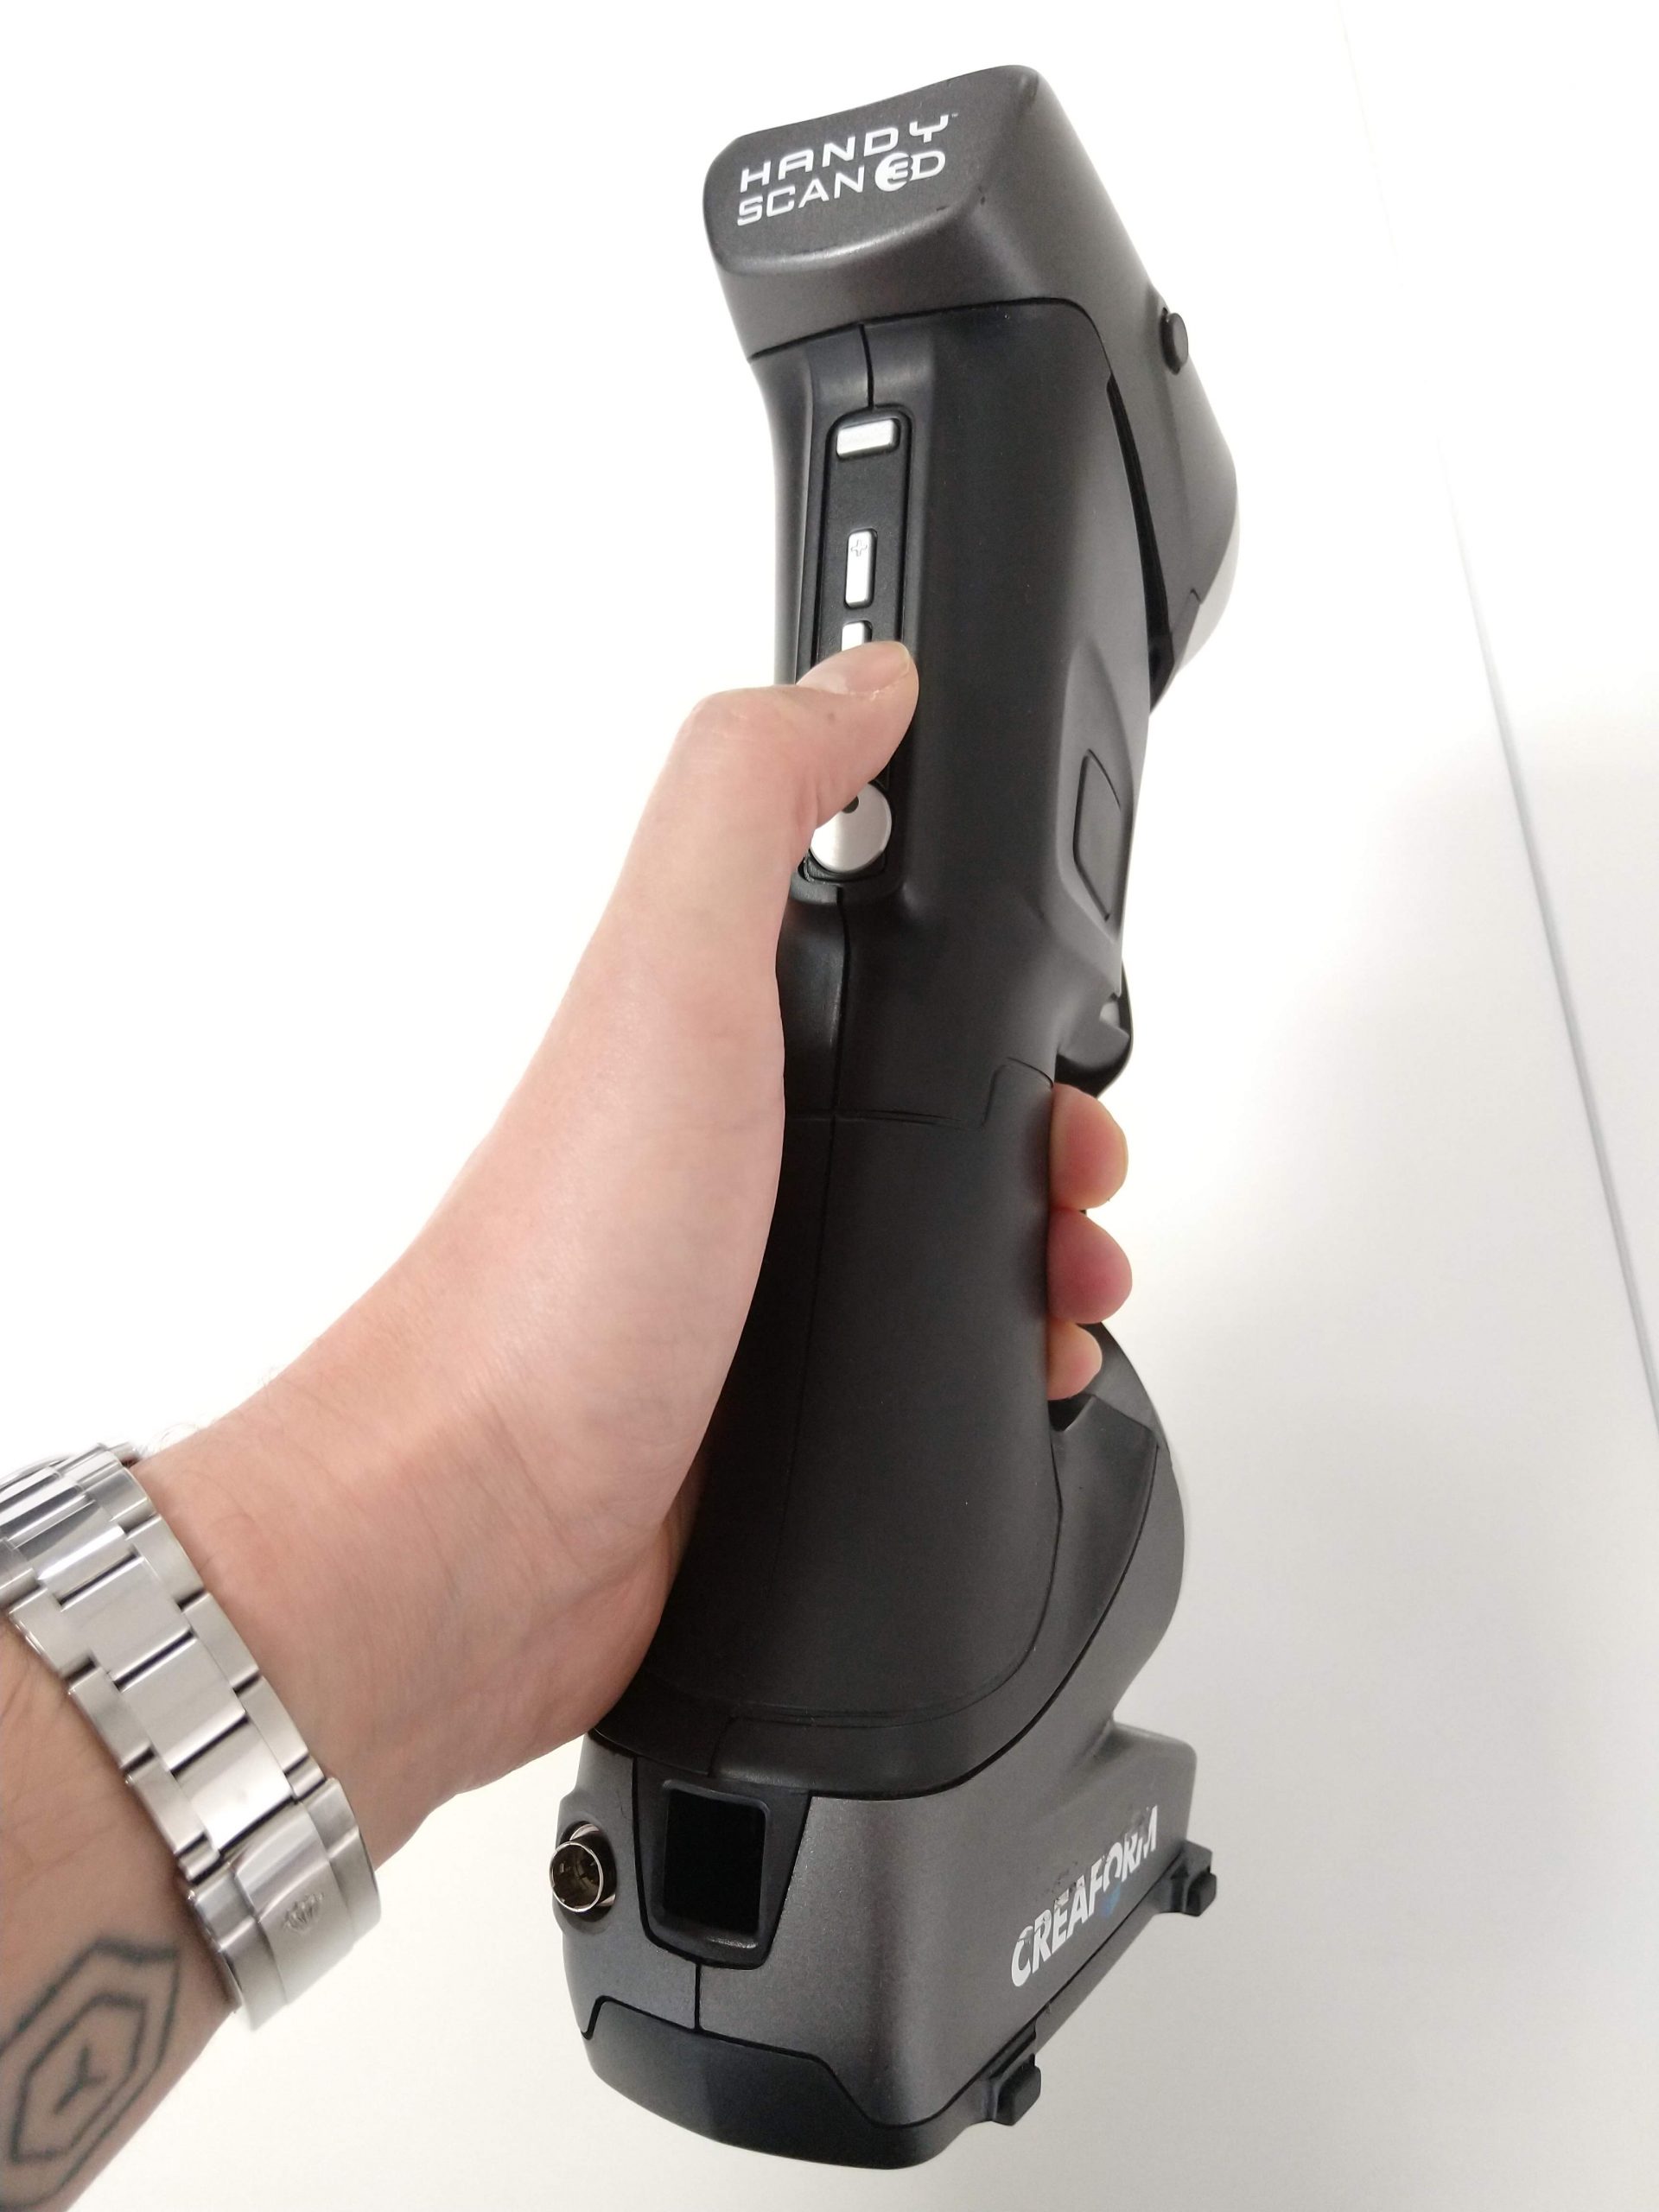
The round button allows you to easily switch between the cross grid mode and the single line mode with a quick double-tap. The + and – buttons can be configured via the top square button, to either zoom in or zoom out in the software, or to change the shutter speed.
Note: Shutter speed is somewhat similar to the ISO rating of old photographic films. The higher the value (max is 8), the more sensitive the scanner is to its own lasers. This means that when 3D scanning a black surface, the shutter speed value should be cranked up. When 3D scanning light (e.g. white-colored) or reflective surfaces, it should be lowered. Forgetting to do so will result in the generation of small voxel artifacts.
The HandySCAN also boasts a LED display that changes colors depending on the distance between the scanner and the object to 3D scan. When red/orange, the sensor is too close; when green, it’s at the correct distance; and when blue/purple, it’s too far away. This provides real value for users, as you don’t have to constantly look back at the computer screen while performing a 3D scan.
The HandySCAN 700 was the very first 3D scanner to have this very powerful feature, which is now mimicked by an increasing number of competing brands.
3D scanning results
Since it wasn’t our first time around with the HandySCAN 700, we wanted to put the scanner and its software to the test by trying them on two very challenging parts: car keys and a fire extinguisher.
The car key is a good test object as it’s small and made up of different materials and textures, including chromed details and matte, black surfaces. It does not fall into Creaform’s part size recommendations for the 3D scanner (0,1 – 4 m), so we will be pushing the HandySCAN 700 to its limits.
As for the fire extinguisher, it will also be a “torture test”, as it displays an even wider range of materials and textures, from plastics to metal and composite fibers. Furthermore, it features complex shapes and difficult-to-scan areas, such as its hose and nozzle.
Car key
This object features very difficult surfaces for a 3D scanner, with a mix of chrome and shiny details on the side, while the rest is black, matte plastic. On top of the part, the Lexus logo is challenging in itself, being simultaneously small, transparent, and shiny. The actual key has small holes which are also difficult to capture.
3D scanning the key entirely requires multiplying 3D scans from all around the object, without being able to put markers on it. Everything was conducted at a resolution of 0.2mm. We put markers on a homemade turntable (a cheap plastic TV stand we found on Amazon) and stuck the key in different positions with the help of some blu tack.
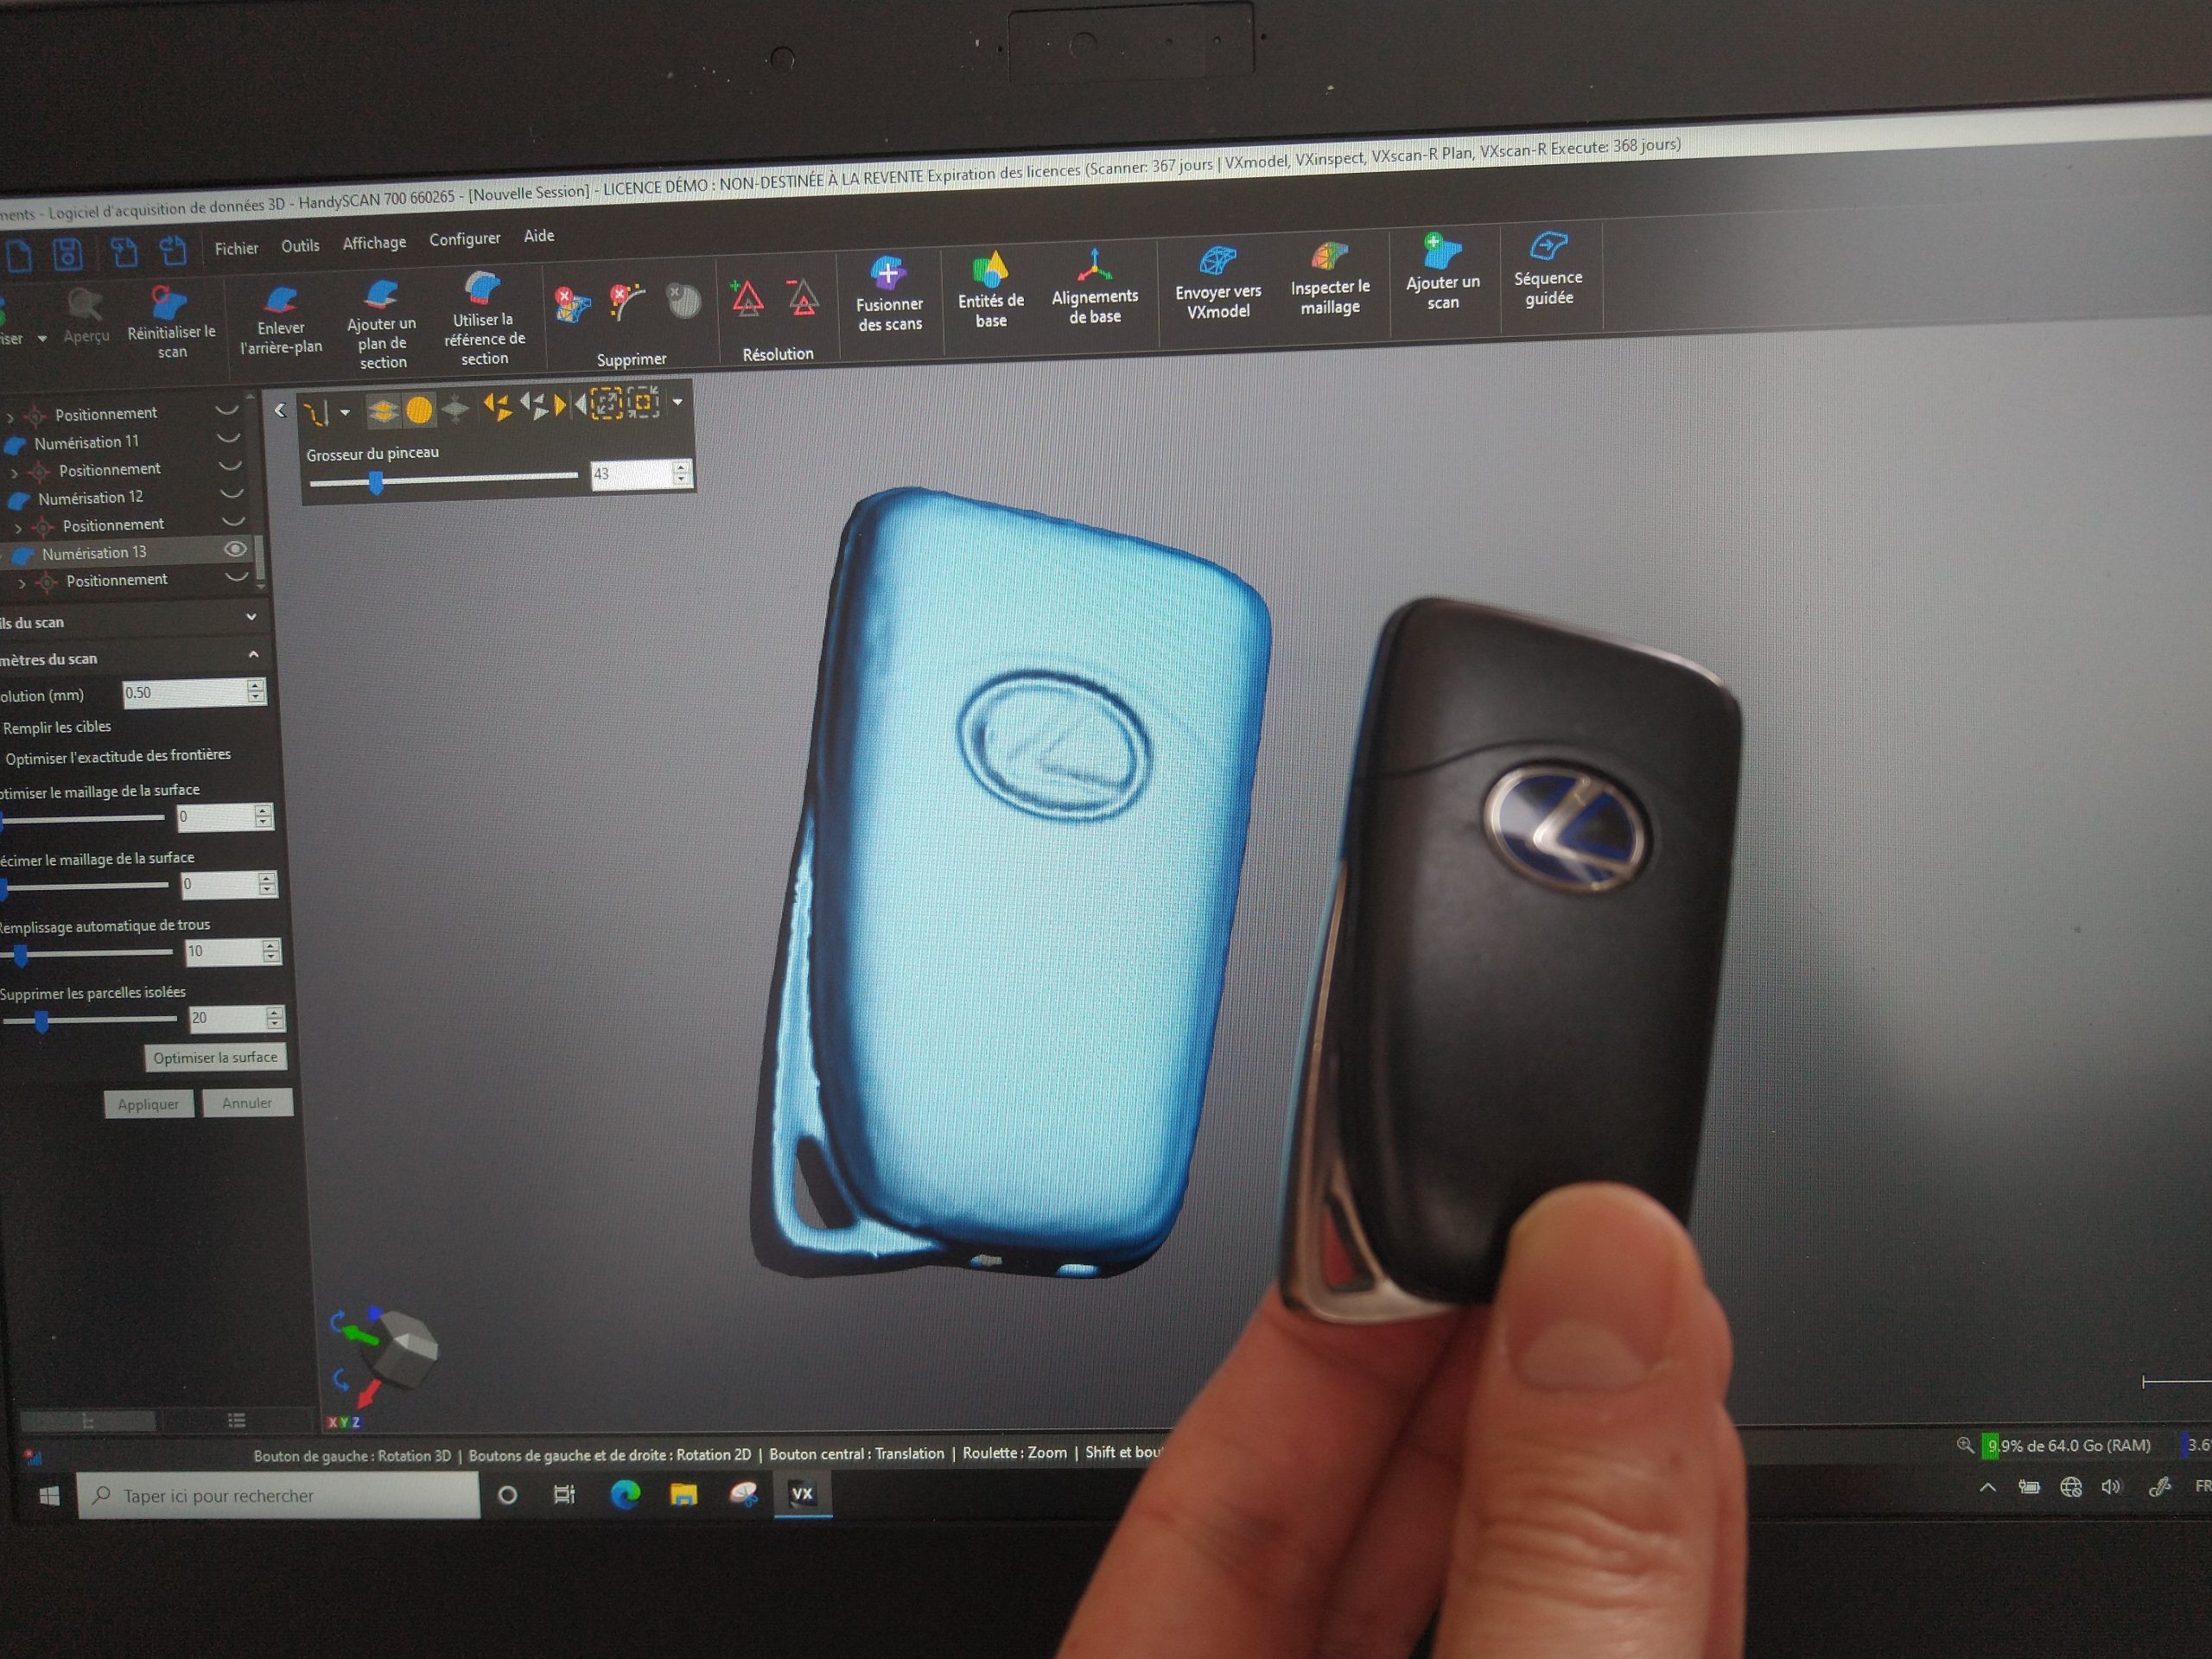
We had to align 8 different 3D scans together to obtain a closed mesh. With a little help from the software’s automatic cleaning tools, we made the mesh watertight and generated an STL export of less than 1.6Mo (3D scanning files usually weigh around five to ten times more).
Aside from making the 3D mesh watertight, we didn’t smooth or modify its surfaces. The model below shows the raw results you can obtain with the Creaform HandySCAN 700 on a very difficult object.
Fire extinguisher
To contrast with the small, previous object, we looked for a bigger object with different materials and textures. We picked a fire extinguisher that is approximately 80cm tall when fully equipped with its pin, handle, pipe, and hose. The hose and pipe are black and matte, while the body is bright red, and the pin and other elements are shiny and metallic.
We placed markers on the extinguisher as well on the floor surrounding it. Placing the markers in an “organized chaos” all across the object takes a bit of time and requires some head-scratching, as the scanner must be able to have at least 3 markers in its field of view at all times.
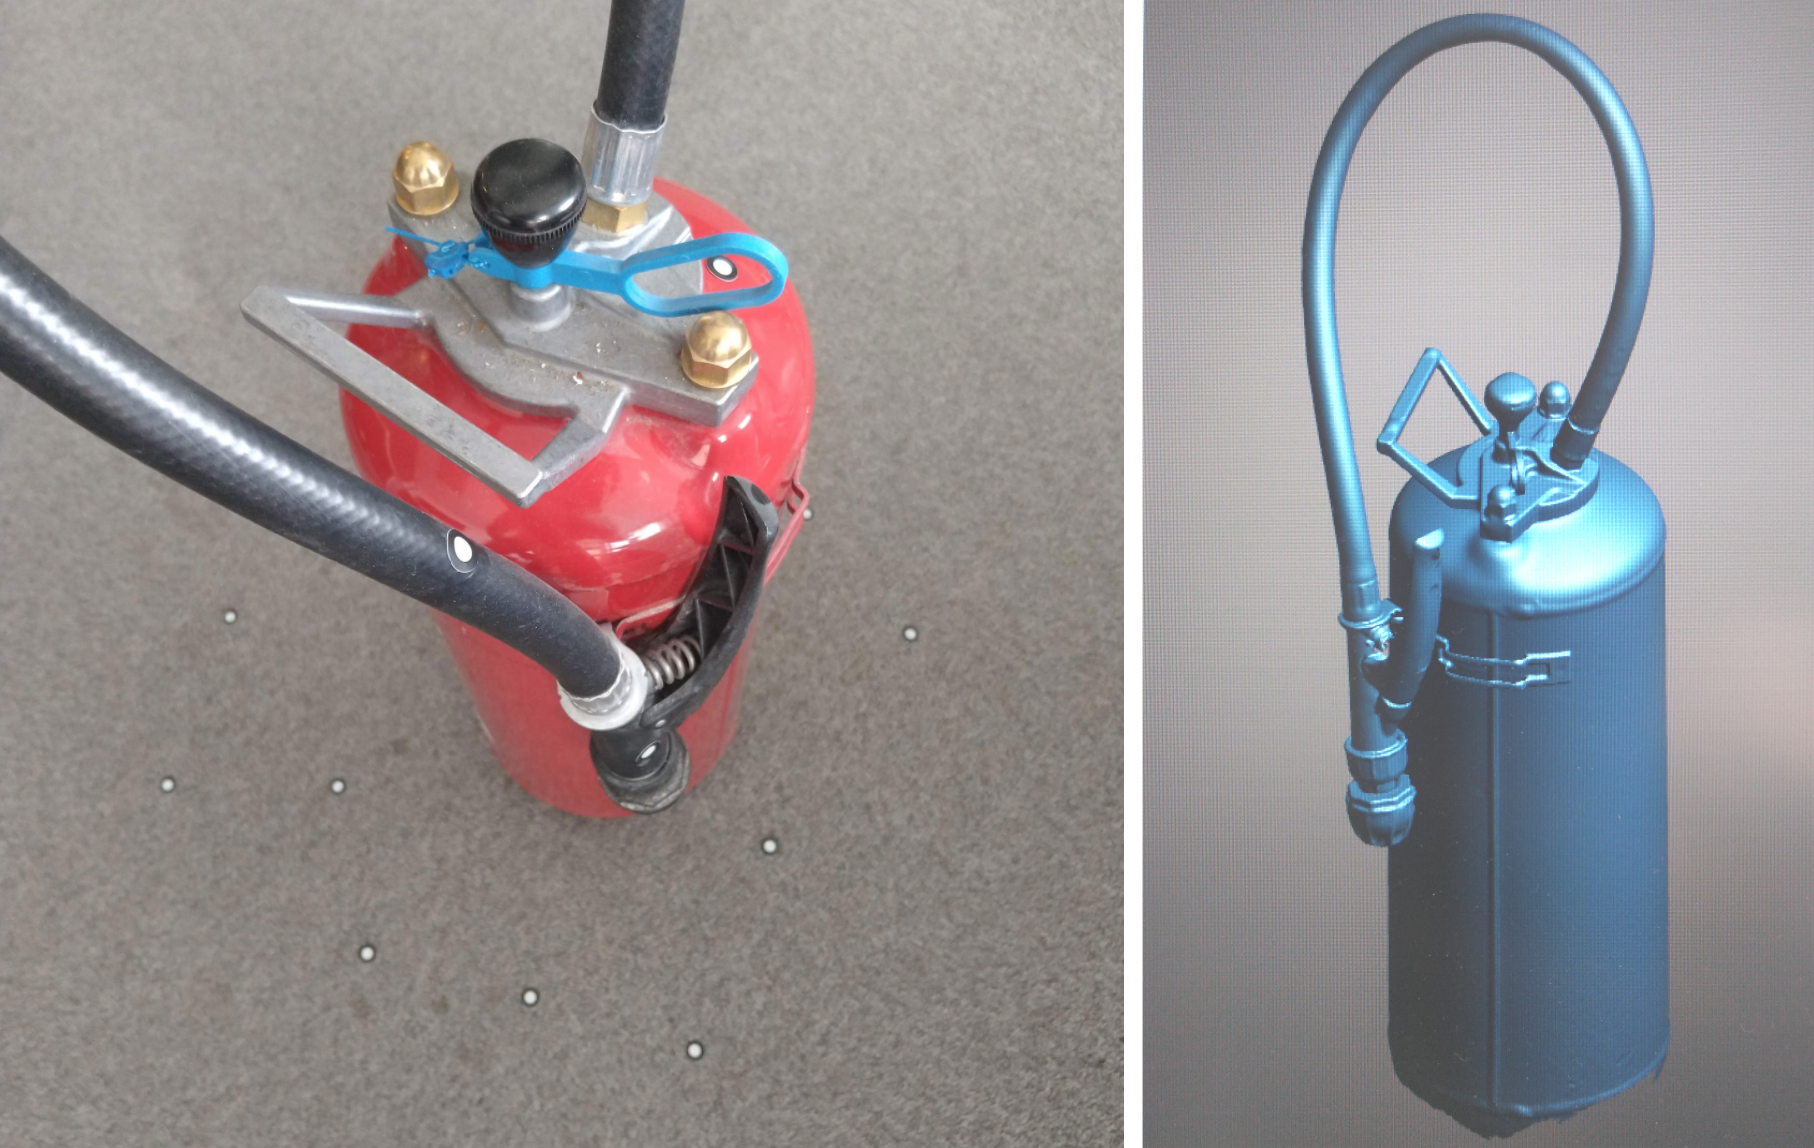
We were able to generate three 3D scans in 1mm resolution and automatically align them thanks to the “marker recognition” option in VXelements. Later, to fully test Creaform’s software, we used the resulting 3D model to carry out a complete reverse engineering use case.
Conclusion
The HandySCAN 700 is a trailblazer on several levels. Its cable management system, colored LED distance indicator, and “thumb-accessible” buttons are innovations that have become standard on Creaform products and are now imitated by competing brands.
Its red-colored lasers provide great results, even on reflective surfaces, although we must say that the mandatory markers are a bit of a hassle. The “single beam” mode is a bit slow but performs very well on intricate details and geometries.
In short, the HandySCAN 700 is an excellent product with a well-rounded and professional software suite. We highly appreciate the fact that the software saves every bit of information from each scan before letting you decide (reversibly) what you keep and which mesh resolution you want.
What do you think about the results? If you have a HandySCAN, we’d love to see your scans!
