 English
  Français
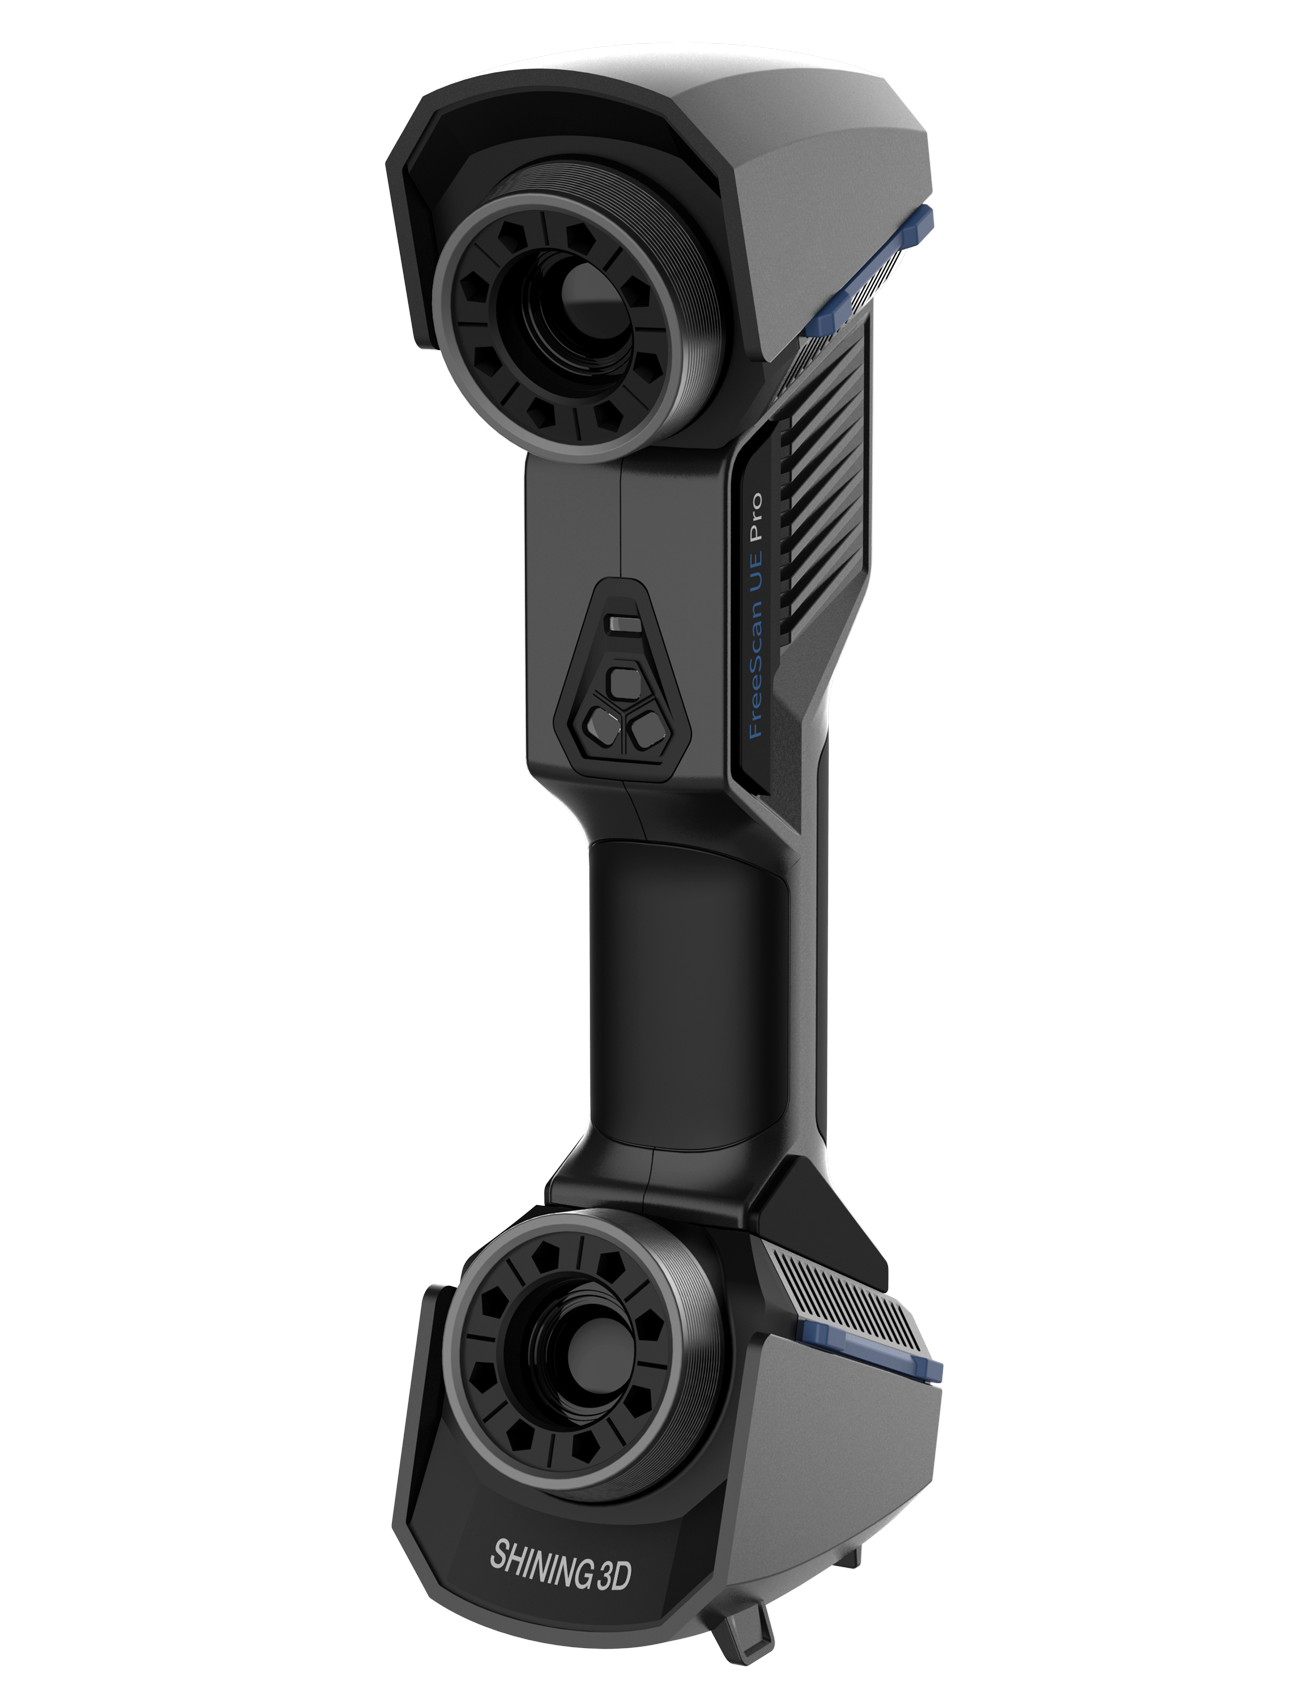
FreeScan UE Pro review: a cost-effective metrology-grade 3D scanner that delivers


Introduction
We have been reviewing Shining 3D’s scanners since 2016, and the Hangzhou-based company has come a long way since then. It is now an international brand with worldwide recognition and offices in the US and Europe. Shining 3D’s Stuttgart office in Germany went from 3 to 30 employees in the past two years alone, demonstrating impressive growth that the team has been reflecting in the increasing quality of their products.
Today, we’re stepping out of its EinScan lineup, and looking at the FreeScan UE series. It’s a follow-up to the metrology-grade FreeScan X series of handheld laser 3D scanners. The FreeScan UE series brings all-in-one metrology 3D scanning solutions for objects of various types, sizes, and materials, in a way that makes professional 3D scanning affordable to more and more companies.
| Volumetric accuracy | 0.02 mm + 0.015 mm/m |
| Acquisition speed | 1,850,000 points/s |
| Topic | handheld-3d-scanners |
| Price | $ 24,000 |
The FreeScan UE Pro is a more powerful version of the FreeScan UE series. Shining 3D is a leading 3D scanner OEM based in China with offices in Germany.
Shining 3D first introduced the UE lineup last year with the UE7 and UE11, before topping it off this year with the new and improved UE Pro version. The three blue laser 3D scanners feature a varying amount of laser lines, scanning speeds, and prices:
| Model | FreeScan UE7 | FreeScan UE11 | FreeScan UE Pro |
| Light source | 14 lines + 1 extra line | 22 lines + 1 extra line | 26 lines, 5 parallel lines + 1 extra line |
| Speed | 650,000 points/sec | 1,020,000 points/sec | 1,850,000 points/sec |
| Price | $18,699 / €16,999 | $24,199 / €21,999 | $24,000 / €22,000 |
One major difference with the UE Pro version compared to the rest of the lineup is that it comes with photogrammetry bars to digitize marge-scale objects (eg. small planes, cars, etc); a feature that we’ll explore further in a dedicated section. The FreeScan UE Pro’s 3.2MP camera is also a step up from the UE7 and 11’s 1.3MP camera. Basically, the further up the lineup you go, the more versatility you get and the higher the accuracy– especially volumetric accuracy, thanks to the scale bars– you can achieve.
Shining 3D markets the UE Pro as a professional 3D scanner for “metrology-grade accuracy inspection, reverse engineering, additive manufacturing, and other applications.” Will it live up to our expectations?
Let’s see how the FreeScan UE Pro fares!
 Pros
Pros
- Excellent metrological accuracy
- Lightweight and sturdy design with a high-end feel
- User-friendly features and UI
- Photogrammetry mode (large-scale objects)
- Partial HD scanning mode
Cons
- The HD mode is slow
- The 3D scanner is a bit bulky
- Some buttons are hard to reach

Unboxing
Something I immediately noticed while unboxing the UE Pro is an upgrade in quality. The cardboard was thicker, and the foam inside the hard case was denser. While these are minor details, they contribute to the overall sense of quality you get from a product.
The FreeScan UE Pro comes with the following accessories, all packed in a heavy, robust travel case:
- USB drive with FreeScan software
- Two-in-one data and power cable
- Two sets of markers
- Calibration plate and certificate
- Two photogrammetry scale bars
The 3D scanner itself is surprisingly lighter than what you’d expect when looking at its bulky, industrial design. It feels like a good-quality, nicely finished product with its soft feel, and velvety coating (which could, on the downside, make it more prone to scratches).


Software and computer requirements
The FreeScan UE Pro works with the included FreeScan software. For the software and hardware to operate smoothly, Shining 3D recommends the following computer configuration:
- OS: Windows 10/11 64-bit
- GPU: ≥ GeForce RTX 3060
- VRAM: ≥ 6GB
- CPU: ≥ i7-8700
- RAM: ≥ 32GB
Shining 3D lent us an even more powerful PC with the following specifications:
- OS: Windows 10 64-bit
- GPU: GeForce RTX 3060 Ti
- VRAM: 8GB
- CPU: i7-11800H @ 2.30GHz
- RAM: 64GB
Shining 3D’s minimum recommended setup should be more than enough to post-process your scans in 3D design or inspection software. You can export your results to the Shining 3D Edition of Solid Edge or other major software suites such as 3D Systems’ Geomagic (included in the package) or Verisurf with the click of a button.

Getting started and workflow
Setting up the scanner
We set up the FreeScan UE Pro in no time. You simply need to plug the power cord into an outlet and into the data cable, which you connect to the PC (by USB) and to the scanner (two outputs).
Calibration and software
Calibrating the FreeScan UE Pro took under 5 minutes and was very easy to carry out. You first carefully need to take out the calibration plate from the bottom of the travel case. The plate is heavy, and it’s a little hard to open as there are strong magnets to firmly hold it in its folded position.


Then, you can launch the calibration process from the FreeScan software on your computer. It displays a series of instructions for you to point and shoot at the calibration plate from different distances and angles- a typical calibration process.
Resolution
When you’re done calibrating, you must indicate whether you’re starting a new project or building on an existing project. If you’re starting an all-new project, then you can choose the resolution you need. If not, the software will continue with the resolution you originally chose when you first started your project.
Before I started “officially” testing the scanner, I tried the 0.05mm resolution to see just how detailed a scan could be. The resulting preview was amazing but scanning took much longer than it did when I used the 0.2 or 0.5mm resolution. The finer your resolution, the longer you have to insist and spend time on each zone to capture it. (And keep in mind that the higher the resolution, the larger the resulting file will be.)
Note: The FreeScan UE Pro can capture with a resolution ranging from 0.01mm to 3mm.
See the Partial HD mode in use below (we sped up the video, which originally lasted 3:40 minutes):
In most cases, 0.2mm or 0.5mm will do the trick; only use 0.05mm if you really need that level of detail for part inspection or if you’re working with small, complex objects. Another option is to use the Partial HD mode only on a specific, highly-detailed zone.
Note that it is possible to use different resolutions in the same scan project (“partial HD” mode).
3D scanning modes
As mentioned earlier, the UE Pro is meant to provide a high level of versatility for its users. It does so with its multiple 3D scanning modes, catering to all types of use cases:
- Fast 3D scanning: employs 13 laser crosses (26 lines) to quickly capture large objects
- HD mode: casts 5 parallel lines to capture more details
- Single line mode: projects a single laser line, useful for extremely fine details and deep grooves, pockets, or holes
- Photogrammetry: uses two photogrammetry bars as external measurement references for large-scale captures
And you can combine all of these modes to get the best of each of them within the same scan. Meaning, you can first use the fast scanning mode to capture the bulk of the object, then use the HD mode on the detailed or complex areas, and finish with the single line mode to capture holes and details.
The HD mode is very useful to locally increase the resolution and detail of a scan. On a car hood, for instance, you wouldn’t need high-res data on the flat part but might want to get higher resolution on the hood ornament.
It’s easy to switch between each mode thanks to the buttons on the top of the scanner handle, even if they are not very easy to reach with the tip of the thumb (and I have big hands and long thumbs). You can also easily switch between modes on your PC via FreeScan software.
Note: The scanning distance between the object and the scanner is different for each mode; you must keep this in mind when switching modes.
Photogrammetry scale bars
The UE Pro comes with two scale bars that work with the scanner’s integrated photogrammetry system. They enable you to capture large parts while maintaining the dimensional accuracy of the 3D scanner.
All you need is to place them around the object (two bars are included with the basic package, but you can use up to 16 bars). Since the 3D scanner already knows exactly what size the bars are (by loading a dedicated file included on a provided USB stick), it can determine its position with a much higher level of accuracy.
Reverse engineering a legacy car part: Saab 900 air vent
A friend of mine owns a vintage Saab 900 Aero (1993), for which it’s hard or very expensive to get spare parts. Some are even impossible to find, as only 70 models of this specific car were ever produced. And one of the dashboard’s air vents is really damaged:

So he commissioned me to digitize the non-damaged vent in order to reverse engineer it, then 3D print a new one. Here’s how we did it.
Step 1: 3D scanning of the part
The part is made from a rubber-like plastic, flexible yet strong and thick. It has grooves, a leather-like texture on top, and some holes, i.e. a lot of details to capture. Plus, it’s dark-colored. So this was actually a pretty challenging part for a 3D scanner. I briefly tried the scanner on this part a few days earlier and needed to crank up the exposure to the max in order to capture the dark-colored surface. I used a few markers as well, but markers leave holes (in the mesh) and that’s not very optimal on a small and detailed part.
While there’s little doubt the scanner could have succeeded without mattifying spray, I used some AESUB Blue on the part to speed up the process. With spray, you can just start 3D scanning with regular parameters, without having to finetune the exposure.
There was no use in getting an ultra-high-resolution scan, so I chose 0.2mm, which is already a great resolution. I proceeded to scan the part with the parallel line mode first, and paused after a minute or so to clip out the turntable in the software.
This is a great feature (and super easy to use): once you’ve cut out your table’s surface, or anything else you weren’t supposed to capture, the software will automatically filter out the data from those areas when you continue scanning, even when you switch scanning modes.
Once I had captured the bulk of the part with the parallel lines mode, I selected the single line mode to capture more details, namely on the hollow insides, threaded area, pockets, etc. The software goes into a sort of “preview” mode to reposition itself before you can safely press the play button and start scanning again.
After a few minutes of single-line scanning, the result already looked great. But there were some more detailed areas that could’ve used some HD magic– so I tried it!
In the software, I activated the “Partial HD scanning” (0.02mm resolution) feature, which prompts you to select the zone that you want to use it on. The software then deletes the captured data from the zone you outlined (there are rectangle, circular, and lasso selection tools) to replace it with the HD data.
As mentioned earlier, I also used the partial HD mode on a lettered area, and got an excellent result:

Step 2: Aligning the point clouds
As always, to capture a part at a full 360°, you need to flip it over a few times, which I did for the air vent. At each flip, you need to create a new project, which you later align with the software.
We aligned 3 point clouds (out of the 6 projects we did) with the software’s automatic alignment feature. It literally took seconds and worked perfectly.
The software’s file management is a bit messy, it generates a lot of different subfolders and files. It isn’t intuitive to know in which folders a specific file or project is saved. But it’s a bitter necessity, as it’s what allows for automatic saving and the grouping of different projects together in one scan.
Step 3: Mesh conversion
Once you’ve aligned all your point clouds, you can convert the resulting cloud into a mesh to clean up and export. Note that this step is reversible; even if your mesh is already generated, you can go back and take more scans to complete it (with another project).
The conversion took less than a minute for our point clouds. We then used manual hole filling and auto mesh smoothing, with good results. There are also interesting measurement functions, for example you can measure the distance between two given points, know the part’s exact volume, etc.
We obtained a detailed mesh file, then exported it in standard formats, such as OBJ (52 Mo) and STL (63 Mo). We could have used the “simplification” feature to reduce the final file size but we decided to keep all the details before uploading the model in Sketchfab.
Step 4: Reverse engineering and 3D printing via a service bureau
There’s a reverse engineering request form built-in into the FreeScan software. You can send the Shining 3D team your file, project details, and constraints, and they can reverse engineer based on the mesh you send them.

Other 3D scanning results
Khmer lion statue
We placed the lion on a marker-covered turntable, without, at first, placing any markers on the statue itself. We then created a new project in 0.5mm resolution and started with cross-line mode and automatic exposure.
After about 2 minutes of scanning, we paused to manually lower the exposure, and clip out the turntable (“clip plane” feature) and surrounding, floating artifacts. What’s great about clipping out planes and artifacts is that once you’ve done this, the scanner will no longer capture data in those zones. We then switched between parallel and single-line modes in two additional sub-projects, totaling around 5 additional minutes of 3D scanning.
We then cleaned up the point clouds (2 minutes), launched the auto-alignment (30 seconds), and then had the software create the mesh (20 seconds). This session took – minus software exploration and browsing – under 15 minutes.
The mesh was missing data in some areas though, namely on the lion’s underside. So we flipped it over (we placed it on a balled-up sweater to hold it in place) and put markers on it to capture it more quickly. This session, including realigning the new clouds to the original mesh, took us about 15 minutes. We thus obtained a full, clean 3D model in no more than 30 minutes.
Large parts (with photogrammetry bars)
To put the FreeScan UE Pro to the test on a large object, we chose a challenging subject: a lifelike plush of a polar bear used as a decoration in Sopra Steria offices where we conducted these tests. The bear itself is approximately 4 meters long, 1 meter wide, and 1-meter deep. It is covered with thick white fur, making it a very challenging part to 3D scan, as the fur reflects most of the 3D scanning laser light while making it bounce between hairs.
To perform this partial 3D scan we covered both the bear and the iceberg with markers, spaced between 15 and 25 cm. The two provided photogrammetry bars were positioned on the iceberg, close to the bear.

At the start of the 3D scanning process, we loaded the photogrammetry bars reference files in the project, simply by using the Shining 3D USB key. We chose a 1 mm resolution for this project.
In a few minutes, we captured all the markers’ positions along with the photogrammetry bars, and then we were able to perform the 3D scans. All 3D scans were done within the same project as there was no need to change the subject orientations.
Performing the complete scan of half the bear plush took us about 15 minutes in cross lines 3D scanning mode, due to the large size of the part and the difficulty to grab all the hair’s details. We must stress that what takes the longest for such 3D scans is not the 3D scanning process itself but rather sticking the markers (and their removal afterward). Finally, we obtained a detailed mesh file, rich with a lot of details (raw exported STL file: 175 Mo, but after a single optimization pass we managed to obtain a less than 50 Mo file).
We were impressed by the overall photogrammetry 3D capture process and result, as the model was definitely challenging. On more standard parts, such as automotive bodies, it shall perform very well without a doubt.

Conclusion
The FreeScan UE Pro was a breeze to set up and calibrate, and just as easy to use. It’s a very powerful laser 3D scanner that can capture an extremely high level of detail, and it’s fast at doing so. We obtained excellent meshes on complex parts in about half an hour, which is amazing, especially at this price (when put into perspective with $50K solutions, for example).
FreeScan software is an excellent product as well, with useful features that work well and fast. It helped that Shining 3D lent us a monster-like PC; if you want to acquire such a powerful scanner and use its software effortlessly, we really recommend spending a little more on a PC that surpasses the minimum requirements.
While software used to be one of Shining 3D’s shortcomings, we saw the company step up over the past couple of years (namely with the EinScan HX), and they have done it again here. FreeScan software could still use some UX enhancements and a few fixes here and there, but it is no deal-breaker in our view – especially, again, at this price. It has everything you need to cover basic to advanced metrology use cases, unlocking access to features that used to be exclusive to a small handful of other brands.
Gallery


