 English
  Français
Shining 3D Einstar review: a solid and all-around impressive handheld 3D scanner (under $1K)


Introduction
Just after we tested Shining 3D’s latest FreeScan UE in July, we eagerly received the all-new Einstar for another exciting review.
While it was our first time reviewing a product from the FreeScan series, the Einstar is our fifth review from the EinScan line. We tested the EinScan-Pro (2016), the EinScan-SP (2017), the EinScan Pro 2X Plus (2019), and the hybrid laser and structured light EinScan HX (2020).
As you’d expect from so many generations of products, they just keep getting better all around. In terms of performance and software, there’s always been constant evolution over the years, and we noticed an even bigger step up when reviewing the HX.
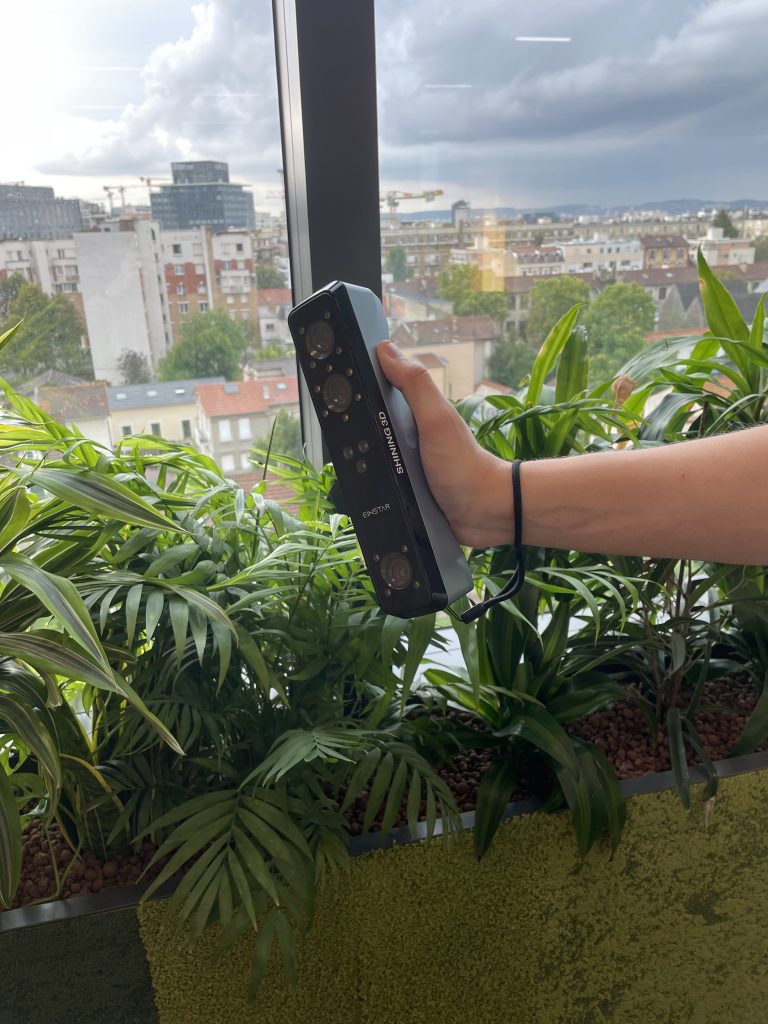
Back to the Shining 3D Einstar: it’s a sub-$1,000 3D scanner that uses white structured light paired with VCSEL technology. This infrared laser technology is particularly interesting for face scanning applications, as it does not “blind” users during the scanning process. Apple, for instance, uses VCSEL for its Face ID feature.
The Einstar can capture colors as well thanks to its onboard cameras; this used to be an expensive add-on on some of the previous EinScan 3D scanners.
Over time, we have always been quite happy with our experiences using EinScan 3D scanners. When skimming through old reviews, some keywords are common to all of them: “great price-to-performance ratio”, “affordability”, “powerful”, … Let’s find out if these keywords apply to the Einstar as well.
 Pros
Pros
- Affordable
- Quick to capture surfaces
- Excellent textures
- Doesn’t heat up
Cons
- Not super ergonomic
- A bit noisy
- Sometimes loses tracking
Unboxing
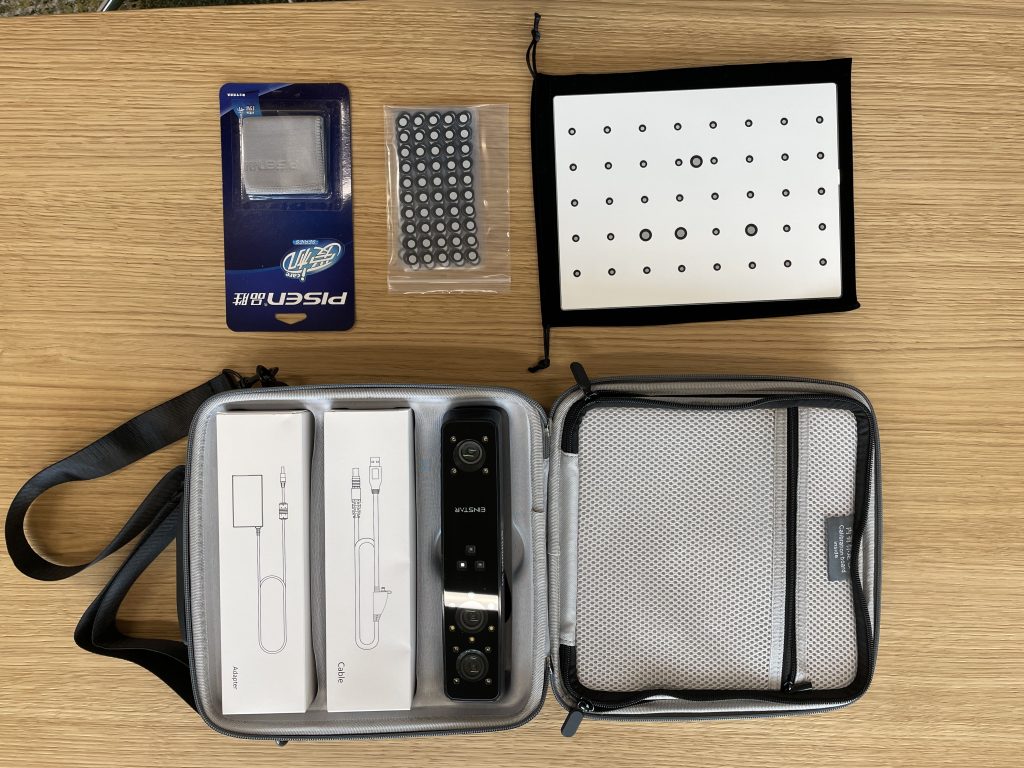
The Einstar comes in, aside from the cardboard box, a very practical carrying case. It safely stores the scanner, its cables, the calibration case, and markers. It’s the first time we see so much effort put into affordable 3D scanner accessories. Even some more expensive scanners don’t have such a nice protective case.

Shining 3D even included a cleaning cloth for the scanner’s front face, where the sensors are. It’s quite welcome as when you start using the scanner, you quickly realize it’s easy to get fingerprints all over it.
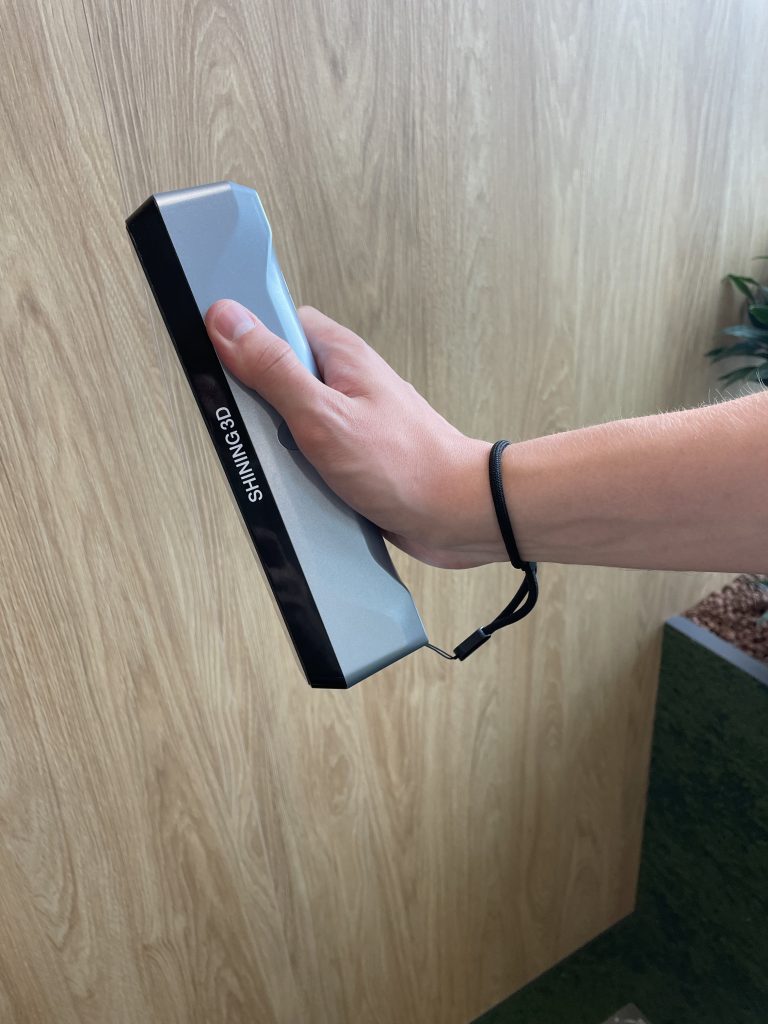
The scanner has a rectangular, boxy shape, and doesn’t have a special “gripping” zone (there’s just a wrist strap to avoid dropping it). You have to hold it from the tip of your fingers while being careful not to wrap them around the front side of the scanner. It’s not a very comfortable hand position, we felt a strain on top of the hand and wrist after just a few minutes of scanning. Not great for long scanning sessions, but fine for small/medium size objects or parts.
Software and computer requirements
For all the software and hardware to operate smoothly, Shining 3D recommends the following computer configuration:
- CPU: Intel Core i7-11800H or above
- RAM: 32GB or above
- Graphics card: NVIDIA GTX 1060 or above
- VRAM: 6GB or above”
We still had the PC that Shining 3D had lent us for the FreeScan UE Pro review, with the following specifications:
- OS: Windows 10 64-bit
- GPU: GeForce RTX 3060 Ti
- VRAM: 8GB
- CPU: i7-11800H @ 2.30GHz
- RAM: 64GB
The software– called EXStar– mostly worked great but lagged a little bit sometimes despite these monster specifications. It is really important that you have a powerful computer to run the software smoothly.
Getting started
Installation
Since the laptop Shining 3D lent us could not connect to the internet for security reasons, and EXStar wasn’t already installed, we had to go through the offline installation process.
You first create an account on Shining 3D’s website and then download a file that you transfer via USB to the offline PC. It was a pretty quick process.
We then set up the Einstar by plugging everything in. It comes with a two-in-one cable just like on more professional 3D scanners; the power cable plugs into the data cable, which is plugged into the scanner.
Calibration
The process was really easy, too, and took under 10 minutes for both calibration types: one regarding geometrical precision and the other dedicated to colors.
First, you’ll need to place the included, marker-covered calibration plate (compact and lightweight) on your desk or table, and then launch the calibration mode from Einstar software on your computer.
EXStar prompts you to hold the scanner at different distances and angles from the plate. If you are new to 3D scanner calibration processes, you might need to get the hang of some of the angles. Make sure you follow the same movement shown on the software interface.
Once you’ve validated all the angles and distances, the software moves on to the white balance part. This part literally takes just a few seconds.
Scanning modes
After you’ve successfully calibrated your scanner, you can start your first scan. When you start a new project, EXStar asks you to create and name a new folder for it.
Then, there are several options to choose from, to get the best performance according to the kind of object you’re planning to capture.
Portrait or object mode
Here, you must indicate whether you’re scanning a person (for a 3D face scan) or an object. If you select “portrait” mode, you can move on to the next setting.
If you select “object” mode, you must indicate its size:
- Small, for object sizes ranging from 50 x 50 x 50 mm to 200 x 200 x 200 mm
- Medium/large, for objects measuring 200 x 200 x 200 mm and up
Capture mode
You can choose between different capture modes: feature, texture, or hybrid (feature & markers).
In feature mode, the software and scanner will position themselves based on your object’s shapes. This mode works best on objects with a lot of different geometries. But it won’t work well on:
- Objects with repeating geometries, like a grid; it wouldn’t be able to tell where it is since the geometry repeats itself everywhere.
- Objects that are too simple, like a vase. Again, since the vase looks the same from all around it, the scanner wouldn’t be able to differentiate one side from another.
- Objects with few, flat faces, like a box. Objects that are too flat do not have enough features for the scanner to base itself on.
For the objects listed above, you’ll need to use markers and thus choose the hybrid mode. The hybrid mode uses both features (shapes) and markers to 3D scan the object.
If you’re scanning an object with a lot of texture (like leather or fabric) or different colors, you’ll want to choose the texture mode.
Resolution
If you choose portrait mode, the available resolution goes from 0.2mm to 3mm. And if you’re in object mode, resolution options vary depending on the size you selected:
- 0.1 to 0.5mm for small objects
- 0.2 to 3mm for medium to large objects
These numbers correspond to the distance between each point in your point cloud (a.k.a. dot cloud). The closer the distance between each point, the higher the resolution.
Keep in mind that the finer your resolution (and thus the closer you are to 0mm), the larger the resulting file will be (and the longer it will take to generate it). We recommend trying with a lower resolution hence a higher number (like 3mm) first and then see if you really need to push for better.
You may also like:
3D scanner accuracy and resolution: The basics

3D scanning experience
Once you’ve chosen your scanning mode and resolution, you can start the scanning process by pressing the button at the top of the scanner.
Preview step to adjust settings
Before the scanner and software actually start capturing data, there’s a preview mode that shows what the camera sees (top left corner) and what the scanner captures (center of the screen).
This allows you to adjust the exposure and scanning distance sliders to get the best results. If you’re scanning a dark object, you need to put high exposure (stronger light) so that the scanner can “see” it better.
Scanning
If you’re all set, you can press the button on the scanner again to start the actual capture phase. Both the software and the scanner’s LED light indicator (another professional-grade feature that has trickled down to the Einstar) let you know if you’re at the right distance from the object.
As you scan and capture data, you can see your object’s point cloud start to appear on the computer screen in real time. And there’s a super useful feature called “Data Quality Indicator” that indicates where there is enough scanning data and which areas lack scanning. When you start, it’s pretty much all red, and areas become green as you go along. Super intuitive UI and UX.
Note: Our colleague Elliot is color blind, so the red and green indications were illegible to him. It would be nice to see a color-blind mode added to the software; it’s estimated that around 300M people in the world have some form of color blindness.
We experienced a small connection problem during one of our scans, EXStar couldn’t detect the scanner anymore. If that happens, you just need to unplug the scanner (tug hard on the cable because it is firmly plugged in) and plug it back in.
After you’re satisfied with your capture, you can stop your scan by pressing the button again. If you need to flip your object over to scan another side, make sure you start a new project, which you will then be able to align to your first one. If you flip your part and pick up the scanner again without having started a new project, it is likely that the scanner will lose track which will ruin your initial scan.
Point cloud cleaning
EXStar includes a suite of useful tools, including a super handy plane clipping tool. This type of feature is usually only available with professional-grade software. This tool allows you to easily remove 3D data of the support on which the part rests (your desk or a turntable for example).
There are also practical selection tools, which can help you eliminate artifacts (useless, unwanted data floating around the object) in seconds. You can contour your object with the polygon, rectangle, or lasso selection tool, then use the “inverse selection” tool, and simply delete everything. All that remains is your object, but you may have to re-do this process a few times at different angles, or manually remove data in areas that are too tricky.
All of these tools are intuitive to use, you get the hang of them in a single afternoon or less.

Aligning the point clouds
Once we were done with our two-point clouds (2 projects) and they were both cleaned up, we proceeded to align them to get the final mesh.
Just as with professional 3D scanner software, you can choose to manually align them by selecting three common features between the two, or have the software automatically align them.
Automatic alignment is an incredible feature at such a low price, and the best part is that it worked perfectly. Less than 30 seconds after launching the auto-align feature, we obtained the 3D mesh.
Mesh editing
It’s also amazing that you can edit your mesh directly within EXStar. On most other low-cost 3D scanners, you’d have to install and use a second software that may or may not be from the manufacturer. This means additional export steps, getting to know another software and UX if it’s not from the same editor, etc. In short, a hassle.
We haven’t yet explored every single option, but it has everything a typical scan mesh editor would offer, like smoothing and hole filling.
We used the hole-filling tool to fix a few areas that were hard to reach with the scanner. You can manually fill each hole and use different parameters for each hole, or use the auto feature. We used the automatic hole-filling tool and it worked nicely- even on a pretty big area (see the video below).
The filled areas don’t feature the color you would have captured though, but you can use the texture remapping tool for the software to re-apply the colors.
Texture remapping worked really well on the Khmer lion statue we scanned, given the random “aging” spots of the material. This would be harder to use on something more precise, like a globe map or anything with writings, which would likely end up distorted (since the software stretches the textures onto areas that didn’t previously exist).
When you’re happy with your result, you can export it in most of the common formats (STL, obj, ply, asc, …) and save it to your computer.
One small downside: when you want to save a new project, you’re taken to the folder of your previous project. It’s a minor detail but a bit annoying over time!
3D scanning results
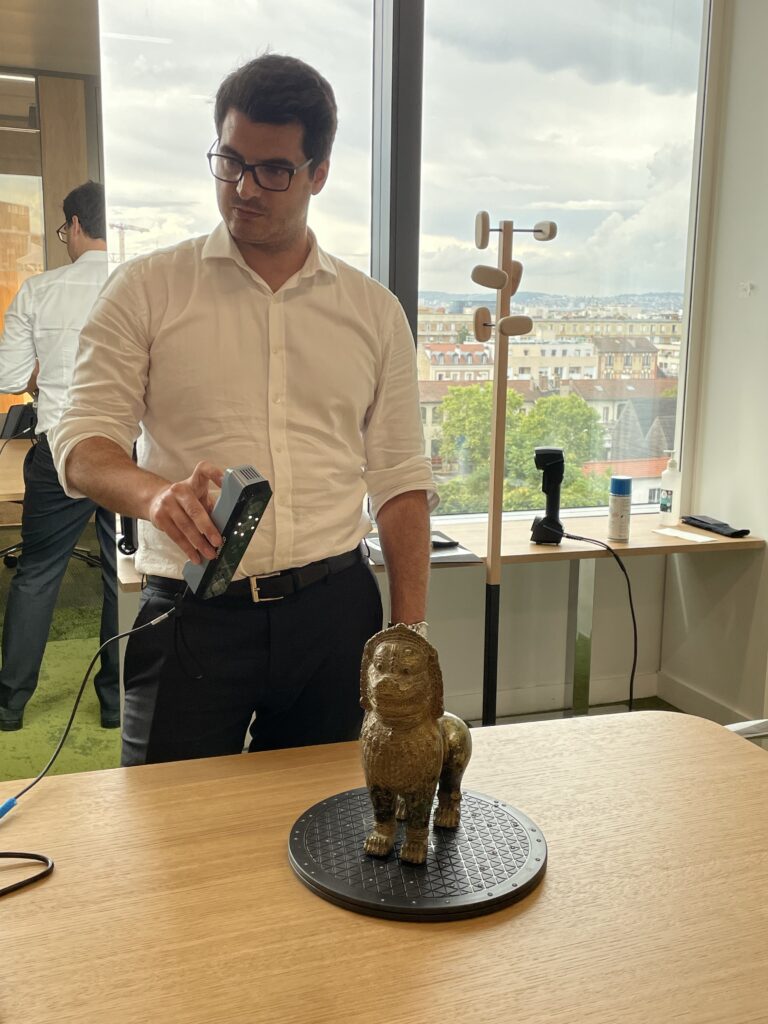
Khmer lion
We scanned this lion before with laser 3D scanners that didn’t capture colors, so we wanted to try with the Einstar and see how good a color scan would look compared to the real statue.
We used the following modes and settings:
- Medium/large object mode
- 0.2mm resolution
- Hybrid mode
To be able to capture the lion’s belly and feet, we split this scan into two projects. The auto alignment feature worked great, as did the hole-filling and texture remapping tools mentioned earlier. On the final 3D model, it’s difficult to tell which areas were automatically generated.
In terms of time, it took us about 10 minutes for the first project and a little under 5 minutes for the second one (the lion’s underside). The auto alignment was almost instantaneous, auto hole filling took a few seconds, and the texture remapping took about a minute.
Thus, overall, taking out the time we took for notes, pictures, screenshots, and software exploring, we got this amazing model in under half an hour. This speed and quality are mind-blowing for a $1K 3D scanner.
Face scan
Since face 3D scanning is one of Einstar’s key use cases, we just had to try it out. We scanned a friend, Julien, in portrait mode and got an amazing result in 0.5mm resolution.
When doing a face scan, the person being scanned has to stay completely still and not blink their eyes. And while the infrared VCSEL is invisible, there are still white LED lights that are pretty bright and can catch you off guard. Julien stayed super still and did not move an inch or blink an eye despite these lights, so we got a great result!
Box of Ricola candy
This object was too flat and perhaps a bit too small for the scanner. We managed to get a good scan of the front side, but as soon as we wanted to capture the other sides, the scanner lost track. We got the message “Markers required for flat surfaces”.
Frog
To put the Einstar further to the test, we tried to digitize a small plastic model of a frog (actually a small piggy bank, hence the coin slot on its back). Don’t be fooled by its playful appearance: it’s an interesting subject for a 3D scan as its small size (roughly 5 x 5 x 10 cm) is close to the Einstar minimum scanning range, and its bright, shiny colors could also be challenging to capture.
To make things interesting, we chose to capture a 360° scan of the frog in three positions. One standing up, one on its front, and one on its back. The whole process took less than 15 minutes using our homemade rotary table (a cheap TV stand from Amazon, don’t tell anyone)- including the texture smoothing at each step and at the end when producing the watertight textured result.
At this point, we noticed little bright dots on the captured texture, due to the lighting conditions in our testing lab (see picture below). Fortunately, the software was able to perform the remapping smoothly and we ended up obtaining a quite nice result. That being said, the final model is a lot less detailed when compared to what we obtained with the Freescan UE Pro (see here, full review coming soon!).

Backpack
Texture mode worked really great on this object. But, if you missed an area and want to pick it up again, we found that the scanner had trouble getting back on track.
We didn’t scan the bottom of the backpack because flipping it over would have made it change shape, and the software wouldn’t have been able to align the two point clouds together.

Our verdict
We were overall very impressed with the scanner throughout our hands-on testing sessions. The Einstar is a powerful and truly easy-to-use device. Its intuitive software includes a range of professional-grade features that make for an enjoyable experience for both beginners and more advanced users.
On the downside, the Einstar lost track during a handful of our tests and we experienced once the “device reconnecting” issue. The Einstar is also a bit uncomfortable to use for long periods of time due to its angular design and weight.
That said, it’s pretty incredible that today it’s possible to get such 3D capture performance and speed for just $1,000. And with a smooth, 10-minute only, setup (including calibration!). If we’d been told this a few years ago we would not have believed it- but that’s the beauty of the tech industry and Moore’s law.
To wrap things up, from our experience the Einstar is a solid, cost-efficient handheld 3D scanner. The Shining 3D team has years of experience behind them (including on five-digit-priced metrology equipment), and it shows. The aggressive pricing makes it a compelling choice in the competitive entry-level 3D capture landscape, with the potential to unlock the power of 3D scanning for hundreds of professionals.
