 English
  Français
Thor3D Calibry review: a lightweight and intuitive handheld 3D scanner

Introduction
Today we are testing the Calibry, Russian manufacturer Thor3D’s latest 3D scanner. Thor3D is a young company which is best known for introducing one of the first-ever wireless, handheld 3D scanners on the market in 2015, called the Thor3D.

| Country | Russia |
| Technology | Structured light |
| Max resolution | 0.3 mm |
| Acquisition speed | 3,000,000 points/s |
| Weight | 0.7 kg |
| Price | $ 5,790 |
THOR3D Calibry overview
The Calibry is an handheld 3D scanner produced by THOR3D, a manufacturer based in Russia.
The Calibry THOR3D uses the structured light technology.
Discontinued since July 2018, the original Thor3D scanner’s first successor was the Drake, a modular machine capable of swapping optics to suit various parts and objects of different sizes.
The Calibry 3D scanner is convenient for medium-sized to very large-sized objects. Thor3D states that the Calibry is able to capture objects from 20cm to 10m, including human figures which are often challenging to scan due to the difficulty of capturing hair.
| Scan area (near) | Scan area (far) | Depth of view | |
| Calibry specs | 230 x 360 mm | 490 x 650 mm | 350 – 950 mm |
Unlike most of its closest competitors, the Calibry offers large object 3D scanning capabilities. However, due to our lack of available large objects in our office, we were not able to fully evaluate this 3D scanner in that regard.
Priced at $5,790, the Calibry is advertised by its manufacturer– Thor3D– as a “professional, affordable, and easy to use 3D scanner”. Will it live up to this statement?
Before we dive into this Thor3D Calibry review, here’s a quick recap of the scanner’s pros and cons according to us.
 Pros
Pros
- Lightweight and portable (700g)
- Very large size 3D scanning capabilities
- Intuitive interface (touchscreen and buttons)
- Affordable price tag ($5,790/€4,990)
Cons
- Software is slow for processing
- Not the best choice for small objects
Packaging
Unboxing
We received the 3D scanner along with its calibration plate, both in two different packages. Due to the scanner’s large object 3D scanning capabilities, the calibration plate is bigger than usual. Hence, its package much bigger than the one for the 3D scanner itself.
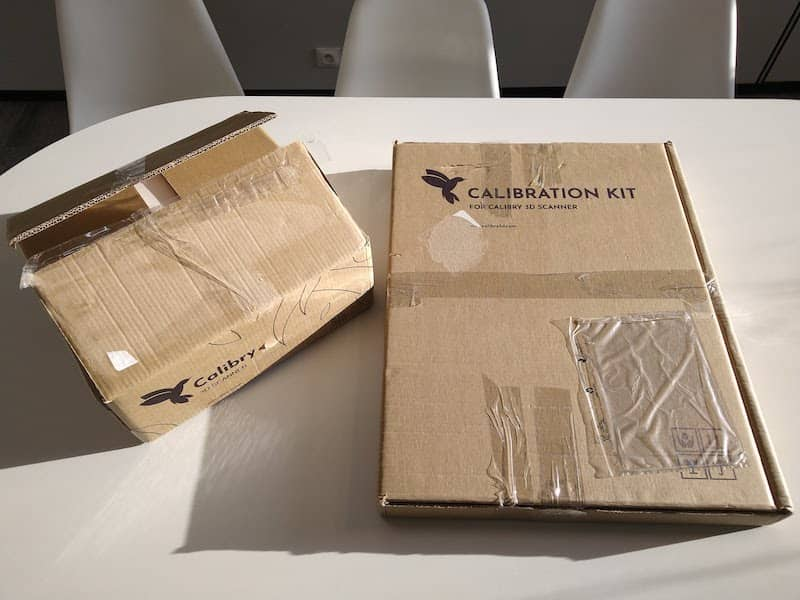
The Calibry and its accessories were contained within a single and robust cardboard case, where everything is well packed into thick styrofoam. The calibration plate’s box contains the plate and the supports required to hold it and the 3D scanner in place.

Instruction manual
The instruction manual included in the Calibry box provides a step-by-step guide to set up the hardware and software and quickly start 3D scanning. Thor3D also offers a very useful “Download Center” on their website, where it’s possible to download the Calibry Nest software and the user manual PDF.
Accessories
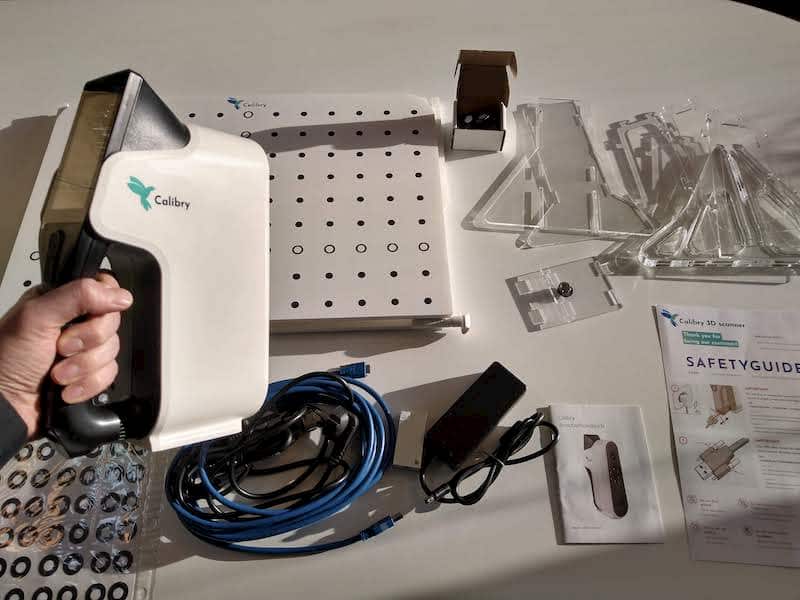
The Calibry 3D scanner comes with everything needed to use it, including :
- One cable to connect the 3D scanner to the adapter
- One very long USB cable (USB 3.0) 5m long
- An adapter to connect the 3D scanner to a power source and PC
- One power cable and charger
- Two packs of markers
- A large calibration plate
- Acrylic supports for the calibration plate and the 3D scanner
The software is not included and must be downloaded from Thor3D’s website.
PC requirements
To run Calibry Nest software during our tests, we used our own hardware: a powerful HP Workstation dedicated to design and Virtual Reality experiences.
Our testing configuration:
- Windows 10 Pro 64
- Intel Core i7 8700k
- 32GB RAM
- Nvidia Quadro P4000 8GB
- 512GB SSD
The specs of our HP Z2 TOWER G4 workstation are above Thor3D’s recommendations regarding minimum PC requirements for Calibry Nest.
Minimum computer requirements:
According to Thor3D, the bare-minimum specs needed to use its device are :
- Windows 8.1 or better
- Support for OpenGL 4.3 or better
- Intel i7 processor
- 8GB of RAM
- Nvidia graphics card
Recommended computer requirements:
Recommended specs for a smoother experience are the following:
- Windows 8.1 or better
- Support for OpenGL 4.3 or better
- Intel i7 processor
- 16GB of RAM (32GB is optimal for fast post-processing)
- Recent Nvidia graphics card
Thor3D does not recommend using built-in Intel graphics cards.
Overview and setup
Software
We used the Thor3D download center to obtain Calibry’s proprietary software called Calibry Nest. It is light and fast to get (as long as you have a good internet connection), with a minimal 72Mo size.
Installing it only takes a few minutes and requires no setup at all. Calibry Nest automatically detects the 3D scanner when it’s connected.
Hardware
Setting up the hardware is quite simple. There is one cable that connects the 3D scanner to the adapter, a small metal part intended to connect everything together.
Then there’s a long, 5-meter USB cable that goes from the adapter to the PC (USB 3.0).
Finally, there is a power cable to connect the adapter to the power outlet. Thor3D insists that connecting the power cable must be done last in order to avoid damaging the Calibry.
Once everything is connected, the Calibry automatically boots up and displays its welcome screen.
Getting started
When in hand, the Calibry feels light yet robust and ergonomic. It boasts a clean finish, and with its sober design and colors, the scanner would blend in well with a science fiction environment, like some kind of futuristic probe.
The “Start scanning” and “Stop/Pause scanning” rubber-like buttons are ideally placed, at the tip of the thumb. They also provide a soft, satisfying “click” feedback.
The Calibry touchscreen offers bright colors and is smoothly integrated at the back of the 3D scanner, just above the two buttons. It is quick and reactive, with intuitive gestures to perform basic operations like deleting a scan, calibrating the machine, or switching between different capture modes.
This 3D scanner relies on structured light 3D scanning technology to capture objects, parts and/or humans in 3D. In a nutshell, the 3D scanner casts a light pattern onto the object, and a set of cameras capture the pattern’s deformation. This allows the software to calculate the object’s underlying surface, and therefore its topology.
Calibration
In order to start 3D scanning, calibration is recommended, but not mandatory. It takes a few steps to assemble everything together.

The very large calibration plate (about 60cm wide and 80cm tall) must be unfolded and erected on two acrylic supports.
With the 5 remaining acrylic panels, you build a sort of stand for the 3D scanner. Finally, you can start the calibration procedure directly from the Calibry screen.
During the calibration process, the 3D scanner must be placed in 7 different positions one after the other: close, far, and along different orientations and angles.
Once calibration is complete, it is possible to choose a 3D scanning capture mode directly on the main screen menu, and to then start 3D scanning.
Experience
Software
The main software interface is found on the 3D scanner’s touchscreen. It only takes a few swipes and clicks to get started and select the best 3D scanning mode from the following options:
- Geometry 3D scanning mode
- Texture 3D scanning mode
- Marker 3D scanning mode
By default, the geometry 3D scanning mode is activated. All three 3D scanning modes generate a colored dot cloud. The difference between them is that the software uses different data to position each captured frame relative to one another.
We only tested the geometry and texture 3D scanning modes, and got the best results with the geometry 3D scanning mode.
One interesting feature of Calibry Nest is the possibility to mirror the Calibry’s screen interface directly on the computer. This allows for faster manipulations and easier workflows in some cases (e.g. deleting unwanted data).
Calibry Nest software is pretty straightforward, as it serves the purpose of transforming the sets of captured frames into a colored 3D mesh.

3D scanning
As usual with structured light 3D scanners, it is recommended to be in a room without direct sunlight, to make the 3D scanning process easier.
We tested two of the three 3D scanning modes, one based on geometry, the other on textures.
We did not try the marker 3D scanning mode as it is usually recommended for large or hard-to-scan parts. In our opinion, marker modes are best suited for 3D scanning large objects such as a car door or piping as demoed on Thor3D’s website.
For each capture, the user can manually remove unwanted data with a basic yet efficient array of tools.
Each capture consists of a set of frames. During our tests, we noticed it was optimal to capture between 500 and 1,500 frames.
Capturing more frames than that makes the processing step very slow, and often the extra frames have issues correctly aligning with one another.
The first step after a capture consists in “registration”, a step that properly aligns the frames together and creates a mesh. It must be performed for each capture before it is possible to manually align the different meshes together, which is required to obtain a fully closed mesh.
There are only a few parameters available regarding the mesh generation, such as hole-filling or unwanted artefacts removal, but they prove to be sufficient.
After the mesh is generated, it is then possible to export it to four different 3D file formats: STL, OBJ, PLY and P3.
The Calibry Nest user interface is clean and simple, and for most users, it would be a good fit. However, advanced users may feel a bit restricted by the limited set of available options.
Processing
During our testing, we experienced very long processing times even though we had a powerful PC. Furthermore, the progress bar is largely misleading and adds to the frustration of waiting. It can jump from 10% to 50% in a flash and slowly crawl towards 80% before being stuck at 99% for several minutes.
Processing times and bar progress should be fixed or improved by future software versions, but for now it feels quite inefficient.
3D scan results
1. 3D body scan (bust)
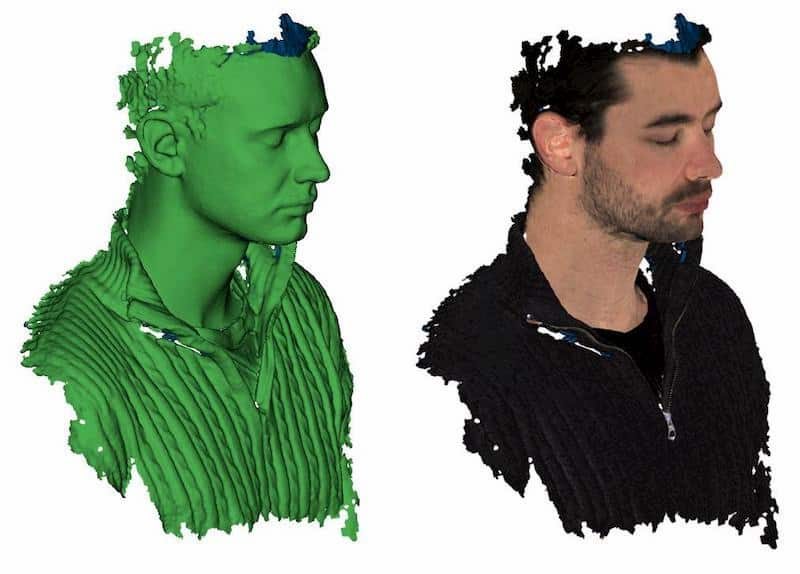
We asked one of our colleagues to sit down and keep still for a few seconds in order to perform a 3D scan of his bust.
As usual with structured light 3D scanners (and other technologies), 3D scanning the hair did not work well. Using hairspray or having the person wear a beanie hat would be the best course of action to quickly obtain a closed mesh. Otherwise, you can resort to a bit of tinkering with an authoring tool such as Blender.
The bust result is good, especially considering everything was generated automatically without any manual editing. The colors are slightly dull but close enough for most uses, while the mesh appears to be clean and detailed.
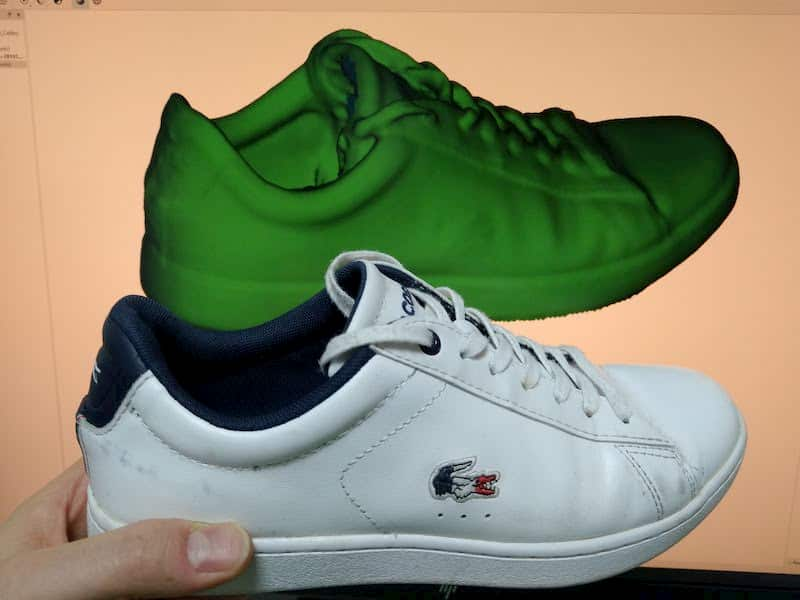
2. 3D scan of two different shoes
The Calibry did a great job at capturing the leather shoe, with only 2 complete 360° captures around the support it was positioned on. There is rich detail, including the stitching between the leather and the rubber sole.
For the tennis shoes, the final mesh result was even better. However, we had to discard the textures to obtain a nice result; the software was a bit confused by the white color and the crocodile logo.

Value: Aniwaa’s opinion
The Calibry is a very affordable handheld 3D scanner, with the rare ability to perform large 3D scans. It does not work well on objects smaller than 200 mm in length, so it won’t face most of its competitors at the same ballpark price.
Its hardware is a success, with a large, easy-to-use touch screen interface paired with a lightweight yet robust body.
Calibry Nest software is great for beginners and people who don’t want to dive into complex functionalities. It does the job while keeping it simple. Nevertheless, it is very slow and its progress bar makes it frustrating to use.
Thor3D Calibry review: conclusion
The Calibry offers amazing ergonomics (lightweight, touchscreen) and is among the best we’ve tested at this price point. However, the software still lacks processing speed and functionalities, putting it a step behind some competitors such as the Artec Eva or the Shining 3D EinScan Pro 2X Plus.
That said, its attractive price tag of €4,990 ($5,790) makes the Calibry a great option to easily capture medium to large-sized objects in 3D, if you’re ready to deal with the software’s limitations. We don’t recommend it for scanning small and/or intricate parts.
