 English
  Français
Reviewing the Rangevision Smart, an affordable desktop 3D scanner

Introduction
RangeVision is a Russian company with products available in more than 20 countries, through a dense network of resellers, the majority of them being in Europe and Asia. RangeVision has been selling professional 3D scanners for more than a decade with their Standard Plus and Advanced lineups.
| Country | Russia |
| Technology | Structured light |
| Price | $ 2,529 |
RangeVision Smart overview
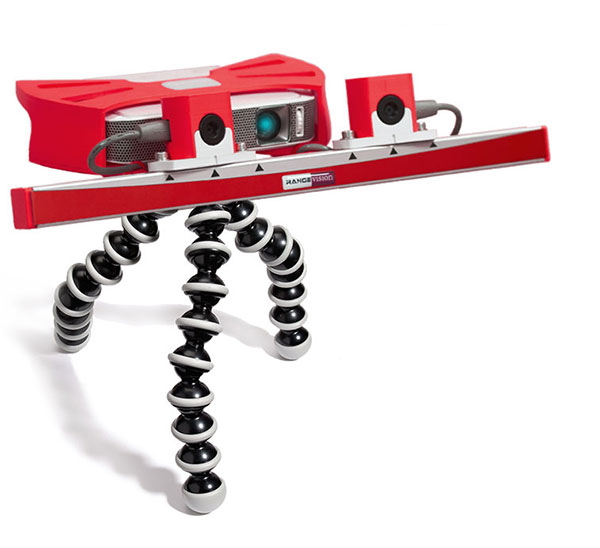
The Smart is a budget 3D scanner produced by RangeVision, a manufacturer based in Russia.
The Smart RangeVision uses the structured light technology.
RangeVision 3D scanners are based on structured light 3D scanning technology. The basic principle: a video projector casts a pattern on a 3D surface. The surface modifies the pattern in a specific way which is captured by 2 cameras. This pattern deformation allows the 3D scanner to calculate the 3D surface’s topology and to create a 3D mesh.
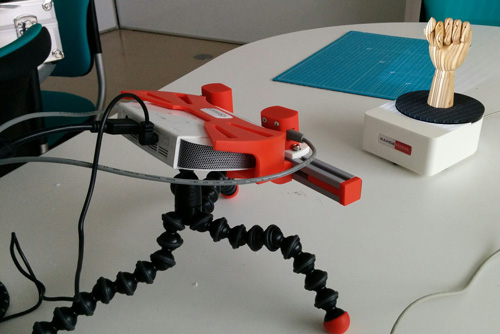
RangeVision recently introduced an affordable desktop 3D scanner called the Smart. The Smart is available in 3 colors: grey, red and yellow.
Objects used for test 3D scans: a wooden hand (usually a drawing reference for art students), a hand, a shoe, and a small figurine.
 Pros
Pros
- Price-to-performance ratio
- Manufacturing quality and accessories
- Flexible and very capable for several different use cases
Cons
- Software is difficult to use and offers limited options
- Tedious setup and getting to use the 3D scanner
January 2018 update
Since our RangeVision Smart test, the manufacturer released several new versions of their software suite. Some significant changes were achieved following our feedback.
The major changes notably include the following upgrades:
ScanCenter 2016.3
- Texture scanning for all models, including out-of-production 3D scanners
- Auto white balance for texture scanning
- Light filters check
- Improved markers algorithm
- Realign function for incorrect aligning with markers
- Improved performance and model visualization for low-end PC
- Improved frame-rate test
- Alarm sound for cameras warming up
- Show/hide scan in ScanCenter
- Clipping planes depending on FOV
- Auto turntable rotation direction set
- Auto display setting correction in OS
- Manuals download
- Auto groups registration
- Auto local registration
- Visualising sphere diameter while deleting markers
- Aligning by points
- Improved alignment and trimming by plane
- Fixed and improved Configuration Wizard
- Export to OBJ type 2
ScanCenter 2017.1
- Camera resolution selection
- Test scanning
- Test texture snap
- Indication of clipping planes
- New texturing
- Improved scanning with markers
- Automatic turntable calibration
- Font scaling
- Sped-up data loading
- Dynamic adjustment of mouse sensitivity
- New local scan registration
- New united model building method
- Trimming unnecessary fragments with part selection
- Trimming of underlying surfaces
- Model scaling
- Automatic calculation of camera frequency
- Automatic software update
- Developer feedback
ScanCenter 2017.2
- Calibration process in the software was improved and speeded up.
- Now the user can specify the ambient temperature to improve the accuracy of the calibration.
- Option to repair the model in the MeshFix added.
- Undo/redo actions added in the ScanMerge.
- New .rv3d format for the ScanMerge added.
- Model export in .ptx format added.
- Program performance and overall user experience were improved.
RangeVision makes it very clear that all updates are available for all Smart users, who will benefit from lifetime upgrades.
Packaging
Unboxing: Nice packaging, including a transport case
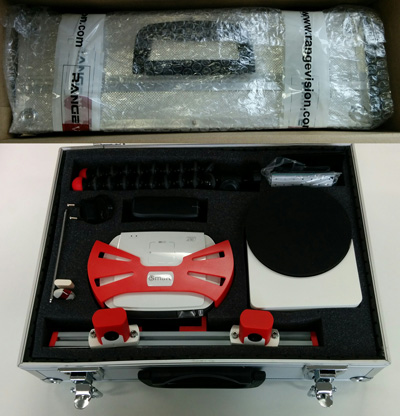
The RangeVision Smart is delivered in a thick cardboard box that contains a rigid transport case. It is not often that such a case is included with an affordable product such as the Smart.
The case has a nice aluminum finish and is quite strong. Everything inside the box is protected by thick foam, with the 3D scanner being well surrounded by this soft material.
Instructions manual
The Smart instruction manual was sent by RangeVision as a PDF. A paper manual is also included in the case.
The manual is written in English and highlights the main characteristics of the 3D scanner, how to set it up, and how to use it. It is easy to read and understand.
Accessories
All of the Smart’s accessories were included in the rigid transportation box. We notably had access to the RangeVision turntable (Automatic Turn Table – ATT), an $800 option.
Next to it were the included tripod, AC adapter, HDMI and USB Cables, USB key for software installation, USB key for licenses, and calibration panels.
The Smart requires 3 USB slots to be operated, which can be difficult to manage when working on a laptop. If you plan to use the turntable, then 4 USB slots are required.
Overview and setup
Software
The RangeVision Smart can be operated under Windows OS only (includes Windows 10). Its software can be installed from the provided USB key.

Software installation is quite long and involves setting up several programs and drivers. We had some issues obtaining the right configuration for the cameras.
We weren’t provided with the latest version of the software and we had to download the whole suite from scratch. The 441Mb package requires an internet connection and it quite long to download (at least 20 minutes). Make sure you’re using the latest software version before starting your 3D scans!
Update (Jan. 2018): The full software package is now a lot smaller, weighing only 237 Mb, almost a 50% reduction. The new installation file also includes all the necessary drivers (cameras, automatic turntable, etc.) which allow for a simpler and faster installation.
Several drivers are required for the camera and the rotating table to be installed before starting 3D scanning. There are actually two separate software solutions that come with the RangeVision Smart:
- ScanCenter is used for scanning the desired object and creating individual scans.
- ScanMerge is used for post-processing and for creating 3D models.
Hardware
The RangeVision Smart is a very well manufactured product with a nice overall feel. It is not as good as standardized consumer electronic products, but the plastic casing of the scanner is shiny with a good finish.
The product itself is based on an Asus DLP projector, two mini USB cameras, and a tripod. Its Asus projector offers HD resolution and can serve other purposes beyond 3D scanning, such as watching a movie at home or displaying a presentation, like any DLP projector.
RangeVision’s tripod is easy to use and the cables are well packed so they don’t get tangled together. The 3D scanner is surprisingly quite small and lightweight, and therefore easy to move around.
Good to know: the RangeVision Smart 3D scanner can work for up to one hour without being tethered to a power source. After this duration, the projector’s brightness progressively decreases to avoid overheating. This degrades the scan results and requires the environment light to be reduced.
Getting started
Hardware assembly is fast and straightforward. You only have to attach the tripod to the 3D scanner upper elements and plug in the 2 USB cables and the HDMI cable. Running the software is easy as well.
The warmup (required for the cameras) is quite long and takes up to 10 minutes. The first time, it took us 12 minutes.
A YouTube demo video is included to help you calibrate the 3D scanner for the first time. It is in Russian with English subtitles.
The English is very good and easy to understand, except that they had the bad idea to include a kind of lame rock music as a blank filler for when the person in the video is not talking. It can be painful when you need to listen several times to the same part to precisely understand what to do.
But RangeVision also provides additional videos to further explain how to operate the Smart. These tutorials show for example how to scan and merge the meshes. Sadly, a lot of keyboard shortcuts and actions are not detailed and the user must go through a trial and error process.
The calibration process itself is quite well explained (but not obvious) and simply requires users to follow step-by-step instructions. In order to get a good 3D scan, it took us a lot of time, even though we are used to working with 3D scanners. The resulting quality is really good but getting there is not a piece of cake.
Here are the necessary steps to produce a 3D scan:
- Calibrate the 3D scanner.
- Position the object in front of the scanner, on the rotating table if you have one.
- Launch the scan function in the RangeVision ScanCenter which will capture one side of the object.
- Repeat the scan until you obtain scans from all the sides of the object (automatically done if you have the turntable).
- Import the 3D scans inside the RangeVision MergeCenter with the integrated function of ScanCenter.
- Align and run the registration function to obtain a simple 3D file from the multiple 3D scans.
Note that the RangeVision Smart is capable of producing textured 3D scans (in color) at a good resolution. It is also compatible with a wide range of sizes, from 1 m to less than 5 cm, classified into 3 categories that require specific calibration settings.
Update (Jan. 2018): The video tutorials have been upgraded, which means less confusion. This recap of all the ScanCenter functions is very useful. Also, now it is mandatory for all RangeVision retailers to conduct training for new users. This way they can get all the basics and more in their native language or, at least, in English.
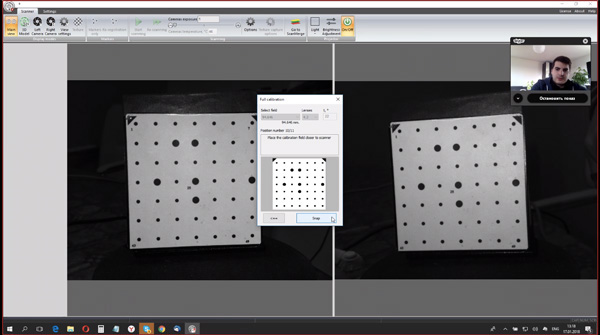
The calibration process is more intuitive thanks to functions being better annotated within the software. Also, all the buttons have been grouped together in a better, more logical way. Calibrating the ATT can now be done without a calibration plate, directly with the part to be 3D scanned.

Experience
Software
The RangeVision software suite only has a restricted number of functions that are neither easy to discover nor easy to use. The lack of a canceling option is also quite disturbing.
After several tries, you will understand how to use it properly and what are the specific mouse and keyboard shortcuts. A tutorial would have been really useful.
ScanCenter software only serves the purpose of generating the 3D meshes, with or without textures. Once the 3D scans are generated, the user must switch to MergeCenter software.
In MergeCenter, the first operation required is to clean the 3D files, removing extra data and artifacts. The tool is not very intuitive and sometimes encounters display issues.

Aligning the meshes is easy for simple objects. For more complex ones, it gets a bit tricky, because the visibility is not optimal and the manipulation tool is only based on mouse buttons. A manipulation trihedron, like in most CAD software, would be very useful. Smoothing and hole-filling tools should also be more complete and easier to use.
However, after some practice, it gets easier to understand how everything works and the realign feature becomes more effective.
Update (Jan. 2018): The undo feature has been successfully implemented, for a much better user experience. ScanCenter now boasts a dedicated set of tools for defining a parametric 3D scanning zone, depending on the specific use case.

MergeCenter’s cleaning tools were also improved, namely with the ability to automatically remove a specific zone of all 3D scans, such as the ATT’s surface.

3D scanning
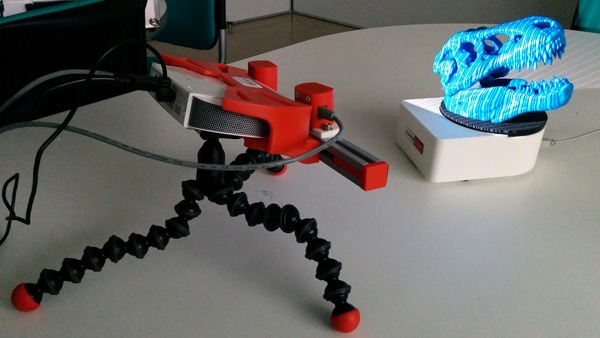
The Smart offers an enhanced 3D scanning experience when equipped with the turntable. The user is only required to press the Scan button in ScanCenter to automatically generate several 3D scans from all the sides of the object (except the top and bottom which could be captured on a second step).
Without the turntable, the user is required to press the Scan button, then manually turn the object and repeat these steps until the object is scanned from all sides. 5 to 6 scans can be enough to provide a 360° model of the object.
The major constraint to 3D scanning with the Smart is to simultaneously use 4 different USB ports. One for each camera, one for the turntable, and one for the Licence USB key.
Only a few laptops are equipped with so many USB ports, and that would prevent you from using an external USB mouse, which is more than helpful to do the merging operations.
The long warm-up time is also painful, we regularly experienced over 12 minutes of delay between the installation of the scanner and being able to start 3D scanning.
The turntable works really well and for 360 degrees scans it is a great option. 3D scans are quick to perform, 12 captures being sufficient for a full 360, each capture takes less than 5 seconds. Like with all 3D scanners, the Smart does not like shiny objects or dark ones. The use of a mattifying spray can solve this issue.
Update (Jan. 2018): The warm-up process has been accelerated and is now less stringent, 5 minutes now being sufficient. RangeVision gave us some background on this important feature: warming up of cameras came from the professional 3D scanners and is needed for a stable temperature of sensors in it. The physical size of pixels depends on temperature. For the best possible results (accuracy-wise) it is recommended to wait until warming up is completed. However, it can be skipped once the cameras’ temperature reaches 40°C.
3D scan results
Wooden hand model
This hand is used as a reference for drawing. It is only made of one material, wood. A mono-texture object is always simple to 3D scan.
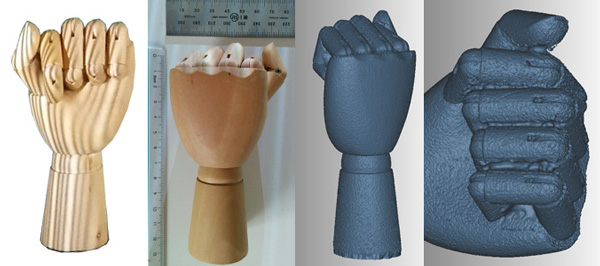
This object has a lot of details and a huge variety of depth (holes between the fingers) which are hard to 3D scan. The wooden hand measures about 120 x 70 x 40 mm. We performed 8 different scans by manually moving the object.
See the 3D model below:
Human hand
We performed a scan of my own hand, with only 3 different captures. The result is good, even if it was difficult not to move the hand at all.

Small offset stripes (due to the structured light technology) can be seen on the 3D model.
Shoe
This leather sneaker is size 10. It is white and highly reflective, which makes it a very difficult object to scan. We performed 12 automatic 3D scans with the rotating table.

The scanner’s field of view was a bit small compared to the scan of the shoe, but the result is very good. Only the black sticker was not captured.
Figurine
The figurine is a classic use case for evaluating 3D scanners. This one is quite complex with different colors and textures and features many details. We performed 12 automatic 3D scans with the rotating table.
The result of this 3D scan is very good, with a nice level of detail. On this model, ScanMerge software’s realignment function performed nicely and swiftly. A better mesh could have been obtained by combining scans from the top and bottom of the object.
Mikhail Skobelev bust (January 2018 update)
This scan was performed in January 2018 when RangeVision released their software updates.
This small-sized statue is a portrait of Mikhail Skobelev, a famous Russian general. It is made of plaster and, interestingly enough, the part was broken and then glued back together.

On the high-resolution mesh (on the left in the image above), it is possible to see the small groove on the lower left part of the statue’s support.
Value
The RangeVision Smart is a good desktop 3D scanner with an excellent price-to-performance ratio. It is one of the most affordable 3D scanners capable to delivering good and detailed results.
Conclusion
3D scanners are generally not very user-friendly products, and the RangeVision makes no exception.
The hardware reflects its quality of fabrication and its potential as an affordable desktop 3D scanner. Its software could be more intuitive, and several functions like a manipulation trihedron would be useful.
A step-by-step tutorial would also be really useful even if the PDF and videos that RangeVision provides are good starting material.
The RangeVision Smart is an interesting 3D scanner for design studios, universities, and research labs. Mechanical and reverse engineering applications can also be fitting use cases.
We would not recommend this product to hobbyists unwilling to dive into complex processes. But, if you have some 3D scanning experience and you’re looking for an efficient and affordable 3D scanner, the Smart is definitely an option to consider.
Furthermore, at this price point and at the time of writing this review, there are not many alternatives. The Fuel3D SCANIFY is cheaper but offers very little flexibility (it is mostly great for face 3D scanning). The DAVID SLS line is powerful and a little more expensive, but won’t offer much better performance, and their user experience is also quite complex.
Update (Jan. 2018): After dramatic software improvements (ease of use, setup, and automatic features) the RangeVision Smart anchors itself in the entry-level professional 3D scanners category. One interesting alternative in the same price range is the Open Technologies Scan In A Box, which offers fewer accessories but a similar level of performance.
