 English
  Français
Reviewing AESUB’s lineup of consumables, allies to speed up the 3D scanning process


Introduction
AESUB is a German company that produces a range of consumables to make the 3D scanning process more efficient. The name AESUB is a clever contraction of the words AErosol and SUBlimate, denoting the company’s aerosol sprays that vanish via sublimation. These consumables namely include mattifying spray– in versions with varying coat durations– and rolls of adhesive markers. AESUB also provides a modular reusable 3D scanning frame.
This review will focus on the first category, AESUB 3D scanning sprays. The goal of using mattifying scanning spray is to capture challenging surfaces in a much more efficient manner. AESUB’s lineup is particularly interesting as there are vanishing spray options, meaning zero cleanup required, and their sprays are free of carcinogenic TiO2 pigments.
Our partners at AESUB sent us several boxes with dozens of spray cans, as well as a generous amount of rolls with sticky targets. (They also kindly included some Haribo candy- thanks Sebastian!). We tested these products, mainly the sprays, throughout several reviews of 3D scanners in different price points and use cases.

How mattifying spray can help with the 3D scanning process
Mattifying spray is essential for any 3D scanner owner. But why?
Typical challenges faced by most 3D scanners
3D scanners are excellent tools for reverse engineering, product design, culture preservation, and many more fields where 3D data must be collected and stored. However, it is well-known that these tools do have their limitations; you can’t 3D scan anything you want, or at the very least not without proper preparation and/or post-editing.
To better grasp these limitations, let’s look at regular old photography. Cameras have become much better over the years, and we are now able to snap excellent shots in most situations. But– to take just one example of a challenge for photo cameras– taking pictures in a low-lit environment often results in low-quality, grainy images. Of course, the quality of your camera will determine how big of a challenge these situations are; pictures obtained with a $200 smartphone will definitely not be on par with what you’ll get from an $800 smartphone.
The same kind of limits apply to 3D scanning. 3D scanners have their own pet peeves: shiny and reflective surfaces, transparent or translucent areas, bright ambient light, dark colors, … We can explain this by understanding how 3D scanners work.
Most 3D scanners work by projecting light patterns or laser lines onto an object’s surface. Its sensors capture the deformation of these patterns and lines when they hit the surface.

Now, this works just fine when you are scanning simple surfaces, say a white, matte statuette. But as soon as your part is a little bit shiny (glazed ceramic, chromed details, mirror-like finishes, …), the lights or lasers tend to bounce off the object in random directions and blind the sensors; the data is therefore unusable. Very dark-colored surfaces are also a challenge, as they tend to absorb light and thus throw off the 3D scanner’s measurements.
Again, the question of how big a challenge these surfaces are will depend on the quality of your 3D scanner. Some industrial-grade solutions are able to capture dark and/or reflective surfaces quite easily now, though you may need to take extra time on such surfaces.
You may also like:
3D scanning spray: a complete overview

When 3D scanning spray steps in
Over the years, several workarounds have popped up to transform any complex surface into a 3D scanner’s best friend, i.e., a white and matte surface.
I remember, for example, making my own matte coating with some white toothpaste and water to scan a shiny saxophone mouthpiece for a review. It was very effective to eliminate the metallic shine, but the paste was heterogeneous and, applied by the finger, did not reveal the part’s exact surface. (Imagine spreading tomato sauce with a spoon onto flat pizza dough; the sauce is an uneven layer that, if scanned, would not reveal a flat surface underneath.) Plus, this hack worked for a very small, metallic part. I would definitely not have used this technique for a large object or any object whose surface could be damaged by toothpaste ingredients.

Some users prime their parts with matte paint, but the result is permanent and requires quite a bit of preparation; definitely invasive and time-consuming.
Another option is to spray white pigment onto parts for the best of both worlds. You can apply a homogenous layer all while being able to remove the powder when you’re done 3D scanning your object. That last part is, however, yet another barrier; while cleaning the powder off a small, simple part can be quick, removing it from a large and/or intricate part is much more tedious. And, whatever the part size, these volatile pigments can get into your 3D scanner (and hinder its performance) and stick to anything in the room: clothes, carpet, … Using pigments is messy.
Two of the founders told us the story behind AESUB around a cup of coffee last year:
Fritz, one of AESUB’s founders, used to be the managing director of a 3D scanning service provider. He had a brand new, dark blue carpet installed in their office and was very proud of the fresh, elegant look. On the very next day, his application engineers came back covered in white powder from their respective scanning missions. Powder residue was everywhere: in their cars, on their clothes, and… on their shoes. They left white footprints everywhere on the brand new carpet, and the founding AESUB team still laughs about the situation today.
The powder also got, unfortunately, into the filter mat of a GOM ATOS system (very expensive hardware!). The team cleaned it up, but the powder still ended up clogging the filter which led to the system overheating. This side of the story is much less amusing!
This is why four good friends launched AESUB together: to provide a cleaner, safer, and easier way to prepare shiny parts for 3D scanning. AESUB develops and sells high-quality sprays that offer thin, even layers that vanish after several hours, entirely removing the cleanup step from the workflow.
How does AESUB’s vanishing scanning spray work?
AESUB’s sprays vanish via sublimation. Sublimation is when a substance goes from a solid state to a gas state without going through a liquid state (whereas evaporation is when a liquid turns into a gas). The process is triggered mostly by temperature; hotter environments mean quicker sublimation.

Overview of the AESUB 3D scanning spray lineup
AESUB Blue (Standard)
This is AESUB’s flagship 3D scanning spray. It is pretty versatile and will fit most standard 3D scanning applications. This spray requires no cleaning whatsoever; it vanishes by itself after about 4 hours. Being the most practical, universal option, this is the spray we used for most of our 3D scanner reviews.
The thinner the coat of spray you apply, the quicker it will evaporate. A standard coat of AESUB Blue spray corresponds to an added thickness of about 8 to 15 microns, which you can then deduct from your model via your 3D scanning or CAD software.
- Sublimation time: Up to 4 hours
- Effective scan time: 1 to 2 hours
- Color: White
- Price: 19€ to 29.50€ per can + VAT depending on order quantity
- Layer thickness: 8 – 15 μm
- Coverage area: 4m² / can ca
- Area of application: Primarily used for small to medium-sized workpieces like car windshields or rims

ASEUB Orange (Long-lasting)
AESUB Orange is a much longer-lasting spray than the Blue version, as it can stick around for a duration of 12 to 24 hours depending on your environmental conditions. AESUB orange combines longer sublimation time and lower layer thickness and has been the result of intensive research.
While it is a bit more expensive compared to AESUB Blue, the spray solves all problems when the sublimation time of AESUB Blue is too short.
- Sublimation time: 12 to 24 hours
- Effective scan time: 4 to 8 hours
- Color: White
- Price: 24€ to 32.50€ per can + VAT depending on order quantity
- Layer thickness: 2 – 6 μm
- Coverage area: 4 m² / can
- Area of application: Suitable for small to large parts; used for complex measurements
AESUB Green (Spray Gun solution)
The AESUB team decided to introduce this paint-gun-compatible format after using around 120 cans of AESUB Orange to 3D scan a boat. It’s available in buckets (like standard paint) and makes it much more efficient to scan large objects. Also, it is surely more environmentally friendly than using dozens of aerosol cans.
AESUB Green’s composition sits somewhere in between AESUB Blue and AESUB Orange.
- Sublimation time: Up to 6 hours
- Effective scan time: 1 to 2 hours
- Color: White
- Price: 16.5€ to 28€ per liter + VAT depending on order quantity
- Layer thickness: 10 – 20 μm
- Coverage area: 15m² / liter
- Area of application: Large and very large parts; Applied via a spray gun on car bodies, yachts, aircraft
This short video shows the spray gun in use with AESUB Green for a car scan (and shows it sublimating at the end):
AESUB Yellow (Airbrush solution for small parts)
For small parts and high accuracy measurements, AESUB yellow should be your choice. The bulk solution is applied using an airbrush. At just about 1 micron, the vanishing AESUB Yellow has the lowest film thickness of all products.
- Sublimation time: Up to 6 hours
- Effective scan time: 2 to 4 hours
- Color: White
- Price: 32€ to 55€ per 200ml bottle + VAT depending on order quantity
- Layer thickness: 0.5 – 1 μm
- Coverage area: 22 mm² / ml
- Area of application: Small objects such as gear wheels, micro plug connections, measurements requiring high accuracy and thus low coating thickness
AESUB Transparent (Dulling)
This is a new product that is meant to dull down shiny surfaces without completely opacifying them. This allows capturing also the object’s original color while simultaneously scanning its geometry.
- Sublimation time: Up to 4 hours
- Effective scan time: 1 to 2 hours
- Color: None
- Price: 25€ to 34.50€ per can + VAT depending on order quantity
- Layer thickness: 15 – 20 μm
- Coverage area: 4 m² / can
- Area of application: Any object that needs to be dulled and visible at the same time
Many scanners require reference markers to connect the single images made during the scanning process. The beauty of all vanishing AESUB products is that you can stick markers on the spray which also significantly reduces the time during the scanning process.
AESUB White (Water-soluble)
This option does not evaporate and is meant for objects that can stay “dirty” or for environments where temperatures go up to 40°C.
- Lasts: Until washed off
- Color: White
- Price:
- Layer thickness: 7 μm
- Coverage area: 4 m² / can
- Area of application: Any parts where sublimation is not necessary
Comparison table
The table below recaps each spray’s main characteristics:

First impressions
AESUB packages most of its mattifying products in aerosol spray cans, very similar to regular spray paint cans. This is quite practical for storage and makes it very easy to apply the powder.
When sprayed, the product gives off a certain odor. As our friends from AESUB say, you either hate it or love it. Smell is indeed subjective, and hard to describe with words, but we thought the odor was actually quite nice. AESUB spray smells like a mix of candy and soap with a hint of fresh paint.
Spraying tips
The principle is simple: take the cap off, point, and spray. However, you do need to spray the right way! There are numerous videos available online from various users, distributors, and the AESUB team themselves where you can see how the spray is applied and for which use cases.
We were however able to meet AESUB at a print show in Paris last year and they showed us in person how they best apply their spray. A general rule of thumb for those who have some experience with spray painting is to follow the same protocol. For those who don’t, here are a few things you should know before you start using scanning spray.
Distance
You must leave at least 15cm between the spray nozzle and the object so that the powder gently falls onto the part. If you spray too close, you will create clumps that’ll definitely be picked up by your 3D scanner. If you spray too far away, the layer won’t be dense enough. The key is to swipe as you spray while maintaining a steady hand both in terms of applied pressure and distance from the object.
Stop and go
AESUB recommends you start spraying next to the object and not directly on the object:

Quantity
Another element to keep in mind is layer thickness: the more you spray the same zone, the more powder there will be and the thicker your coating. A thick layer wouldn’t be too problematic on a flat surface, but would camouflage small details on a more intricate part.
Think of a dusty shelf: there’s a thin layer of dust but you can still see the surface underneath (if it hasn’t been years since you last cleaned it). That’s what your coat of spray should look like on your object.
Note: It is possible to stick markers on top of a sprayed surface.
Thicker layers also require more time to sublimate. But if your coat is too thin and your object is bigger than a shoebox, it might start to vanish before you’ve had time to finish your scanning session.
If you sprayed a layer that is too thick, or if you made clumps, or in general if you want to re-do your layer or just eliminate the spray, you can simply use a hairdryer to make it disappear.
Our experience and results with AESUB scanning spray
Dark mug (Revopoint POP)
Ludivine used AESUB Blue on a black mug that the $600 3D scanner she was reviewing, the Revopoint POP, was unable to detect. The difference was simple and undeniable: after spraying the mug, it became magically visible to the POP’s infrared light.

Mug without AESUB spray -
Mug with AESUB spray


It was interesting to try AESUB with such a low-cost 3D scanner. Even though the scanner, or rather its software, was giving us trouble, we instantly elevated its performance thanks to just a little bit of spray.
Shiny metallic part (GOM Scan 1)
GOM is a leading industrial-grade 3D scanning OEM that was acquired by ZEISS a few years ago. We visited them a few months ago to try out their entry-level GOM Scan 1 solution, a blue structured light 3D scanner. Their hardware is excellent, and their technology is quite good at capturing shiny or dark surfaces. But, we still used some spray on half of a shiny part to compare its performance with and without spray.
What we found was that the 3D scanner captured an incredible level of detail. It detected all of the sheet metal’s imperfections and tiny dents, all measuring under 0.03 mm. The area that was sprayed ended up almost completely smooth in the eyes of the software, with a surface tolerance of under 0.008 mm.
See for yourself in the screenshot below, taken from GOM Inspect:
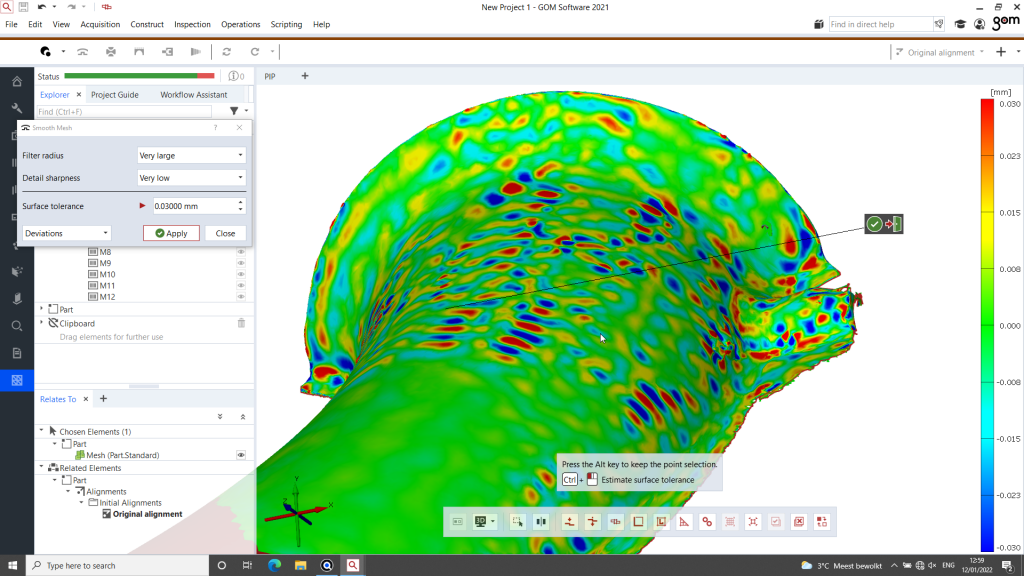
Hence, if you are using a 3D scanner to perform quality inspection and obtain exact measurements of an object and its surfaces, using spray may not be ideal or at least the choice of spray matters more (in such cases we would recommend using AESUB Orange or Yellow). You would not be able to detect such microscopic differences. 3D scanning spray is like a fresh layer of snow on a rooftop; when your house roof is covered with snow, you can barely distinguish the shingles underneath.
There is an upside to this, though. If you’re not doing part inspection or anything that requires micron-level detail, then it doesn’t really matter if your surface is smooth. It can actually translate into cleaner-looking models if you are doing reverse engineering, for example, or uploading your models as 3D previews of the products you’re selling (shoes, tools, …).
There’s also the option to deduct the spray’s supposed average thickness (5 to 8 microns) from your 3D model.
Thin, reflective edges (Scantech SIMSCAN)
The SIMSCAN is another industrial-level 3D scanner that we reviewed earlier this year. This handheld blue laser 3D scanner did an excellent job at capturing dark surfaces as well as shiny metallic surfaces.
However, there was still one area where using spray helped speed up the process: on the very thin edges of a metallic turbine blade. The 3D scanner had captured most of the thin, reflective edges, but some areas were missing from the point cloud.

Blade without AESUB spray -
Blade with AESUB spray
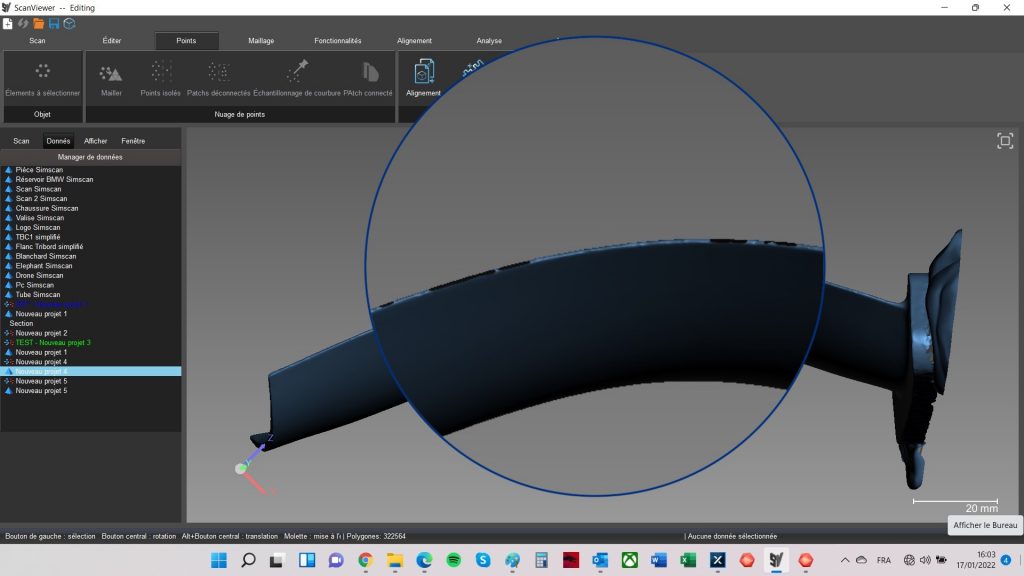
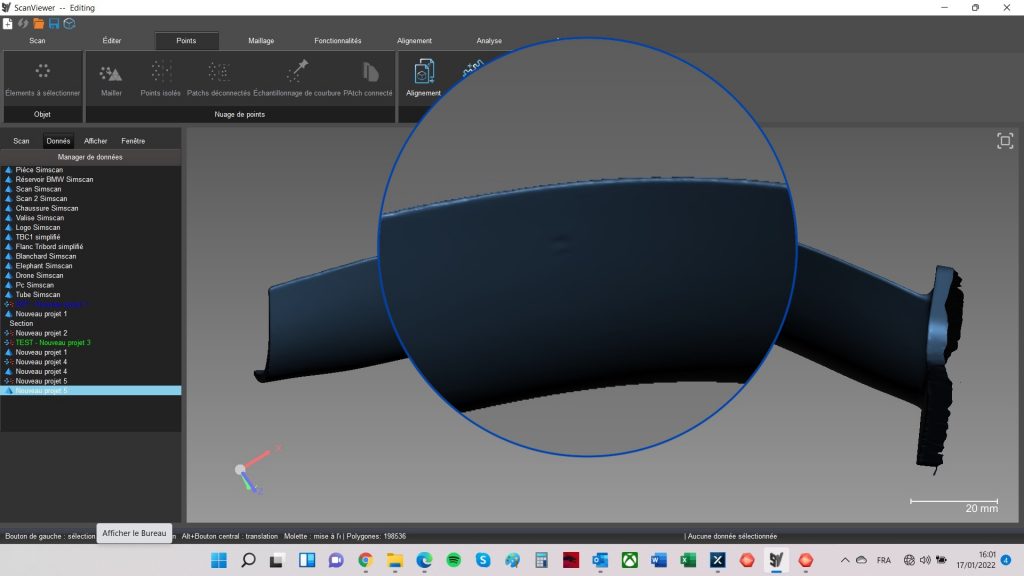
We could have spent more time 3D scanning the area over and over again to get the data, but we were on a tight schedule and spraying the part was more efficient for us. It allowed us to obtain almost perfect results in mere seconds.
Our verdict
Oftentimes, 3D scanner OEMs are uncomfortable with admitting that spray can be helpful. Others actually sell spray on the side, but it’s more or less “hidden” as if it were taboo to use scanning spray.
There are indeed structured light and laser 3D scanners that are capable of capturing reflective and dark surfaces without too much trouble. We’ve been able to do so with 3D scanners that cost around $20K and up, sometimes cheaper.
That said, while it is possible to do so, it is often more time-consuming to adjust your 3D scanning parameters (brightness, exposition, …) and/or re-scan an area several times than to just spray your part with a powder that will disappear a few hours later.
TD;LR: Having used the spray in various situations, we would recommend it for both:
- Makers or amateurs with entry-level equipment, to gain the ability to scan shiny and dark surfaces and obtain more consistent results
- Professionals with professional and industrial-grade equipment, to consolidate their scanner’s strengths all while speeding up the scanning process
