 English
  Français
Sinterit Lisa Pro review – affordability, quality, and ease of use

Introduction
Sinterit launched its first desktop SLS 3D printer, the Lisa, in 2015, and hasn’t stopped growing since. The Lisa is in its third generation of hardware and firmware updates.

Following the Lisa’s success, Sinterit announced the Lisa Pro in 2017, catering to professionals that needed a larger build volume. At the time of writing this review, the Lisa powder 3D printer series has yet to be matched in terms of price and precision, making Sinterit pretty much the only player in this niche market.

Sinterit Lisa Pro overview
The Lisa Pro is a 3D printer produced by Sinterit, a manufacturer based in Poland.
It uses the Selective Laser Sintering technology to produce thermoplastics parts using powder feedstock.
It offers a build volume of 150 × 200 × 260 mm.
To find out more about SLS technology, read our guide to desktop SLS 3D printers.
We were invited to visit Sinterit’s headquarters for a few days to meet the team and try out the Lisa Pro 3D printer.
 Pros
Pros
- Excellent part quality and details
- Intuitive interface and software
- No particularly technical training is required
- Affordable access to SLS technology and its benefits
- Printer-farm-ready software
- Careful quality control and pre-calibration
- Leftover powder is reusable
Cons
- Powder handling can get messy
- Can’t really be used in an open-space type office (heat, dust/powder, footprint)
- Slow print speed (20+ hours for a small part) and time-consuming post-processing
- Currently limited choice of materials and colors (Nylon/TPE/TPU in shades of grey)
Sinterit Lisa Pro review: our verdict
The Sinterit Lisa Pro offers precise, smooth-looking results and is relatively easy to use even for beginners. Complex, moving parts can be printed in one go and without support structures, and the unused, leftover powder is reusable.

This printer’s main drawback, in comparison with ordering your parts online or using a desktop FDM printer, is the fact that powder is very volatile and it’s easy to make a mess. Although the Lisa Pro could technically be placed more or less anywhere you want given its relatively compact footprint, it’s much preferable to have a dedicated room for it.
In any case, it is a great choice if you’re looking to produce parts in small series or if you need to print prototypes regularly. It is also a solid alternative to using a 3D printing service: depending on your output, you can quickly amortize your initial investment and bring down production costs.
Sinterit Lisa Pro: specs, features, and pricing
Build volume
The Lisa Pro offers a build volume of 150 x 200 x 260 mm. This can sound small if you’re used to FDM 3D printers, but in reality, it is quite big for an SLS 3D printer, especially in this price range. Diagonally, you can print parts as long as 316 mm.
Features
This printer is equipped with useful features such as a nitrogen chamber and a large touchscreen with access to the build chamber’s webcam. You can also check in on a print via the small viewing window on the machine’s lid.
Footprint
The Sinterit Lisa Pro does take up a bit of space, although definitely a lot less than an industrial SLS 3D printer would. Its dimensions are 690 x 500 x 880 mm and it weighs in at about 90 kg. You also have to take into account the sandblaster (480 x 370 x 360 mm, 15kg) and the powder sieve (600 x 340 x 300 mm, 22.5 kg).
Materials
Sinterit sells three kinds of plastic powders that are available in different shades of grey:
- Nylon (PA12 Smooth and PA11 Onyx)
- TPU (FLEXA Black, Grey, Soft, and Bright)
- TPE
Their prices range from €60/kg for PA12 to €250/kg for FLEXA Bright. The “FRESH” material you need to add to the leftover powder to recycle costs €120/kg for PA12.
The amount of materials available is limited in comparison with FDM printers or even resin printers which benefit from hundreds of different kinds of filament/resins and colors.
Nevertheless, you can also use third-party materials on the Lisa Pro, and its nitrogen chamber enables you to try out more restrictive materials like PA11.
Note: In some cases, to 3D print sensitive powder materials, it is necessary to introduce an inert gas (like nitrogen or argon) to the build chamber. The presence of the gas ensures that the material isn’t contaminated by air impurities or simply by oxygen itself.
Software: Sinterit Studio 2019
Various versions of Sinterit’s software exist, and they basically determine the materials you can print with. By default, the Lisa Pro comes with the “Open” version, which lets you print PA12, PA11 (nitrogen gas needed), and FLEXA Grey and Black.
To 3D print with FLEXA Soft, FLEXA Bright, or TPE, the “Advanced” version (€1,290) is needed.
Sinterit Lisa Pro price and accessories
The Lisa Pro printer by itself costs €11,999*. Various optional (but strongly recommended for an optimal experience) accessories are available:
- Sandblaster – €450*
- Powder sieve – €1290*
A pack is available at the price of €17,480*, including the sandblaster, sieve, a total of 18kg of various powders, and Sinterit Studio Advanced.
*Prices can vary over time and from one country to another due to shipping costs, taxes, exchange rates, … Don’t hesitate to reach out for an accurate quote.
Sinterit Lisa Pro review: overview and setup
Hardware
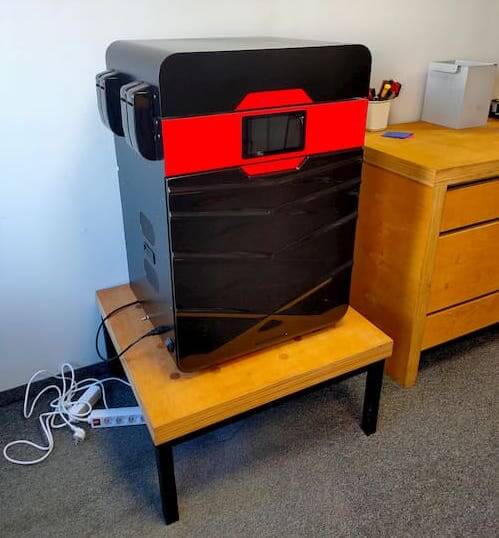
Many manufacturers that aim for their products to be affordable tend to compromise on aesthetics. Sinterit, however, clearly allocated time and resources to their printer’s design. The Lisa Pro shows off a clean, finished look that allows it to blend into an office environment.
On the front side, there’s a large color touchscreen and a magnetically attached panel that gives access to the printer’s motors (not to be touched when the printer is hot, of course).
The printer’s right side hosts the power button, operator key slot, and plug. This side is also home to the powder overflow bin, which is where the unused powder is collected.
To the left, there’s a removable panel– also magnetic– covering the nitrogen chamber pipes.
Atop the printer is a thick, hinged lid, which houses the laser system. This makes it slightly heavy to lift but it’s definitely not an obstacle. The lid also has a small, green (and eye-safe) window on top so you can view your prints in progress.

Software
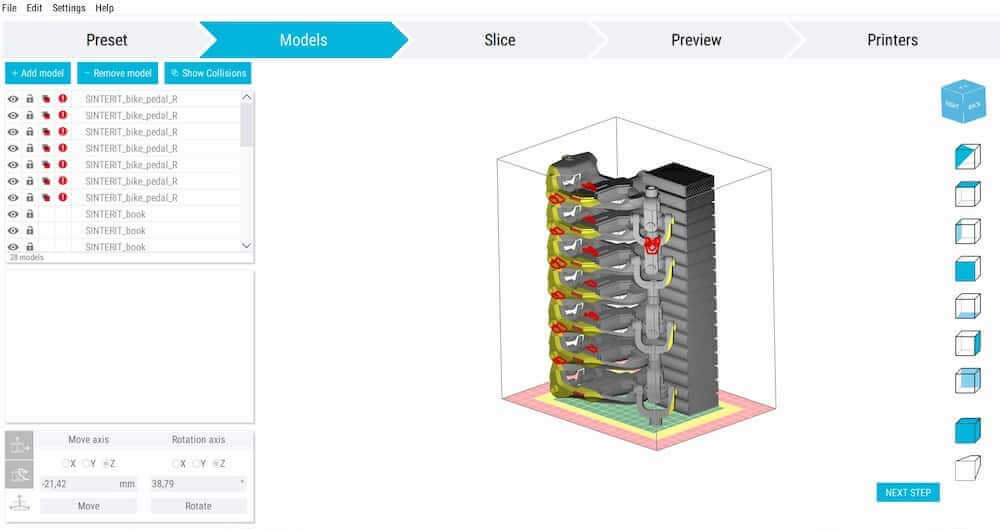
Overall, the software is very complete. Sinterit Studio 2019 offers a streamlined interface, with five simple tabs:
- Preset: choose printer version, material, and layer thickness
- Models: import STL file(s), place, tilt, etc.
- Slice: convert a 3D model to a SCODE file
- Preview: visualize layers individually or cumulatively
- Printers: send a model to 3D printer, view live webcam stream and estimated printing time

The “Models” tab, like many slicers, allows you to tilt your model and automatically snap it to the build plate, among other standard functionalities. You can also pile different models on top of each other– one of the biggest advantages of SLS technology– and the software will tell you if any of them are overlapping.
What’s interesting is that the software shows three different zones in the print area. The green zone in the center is the official build volume listed on Sinterit’s website. You can also place models in the yellow and red zones, but in that case, Sinterit can’t guarantee good results, so it’s at your own risk of potentially wasting material and time.
The “Printers” tab allows you to connect to a virtually unlimited number of Lisa and Lisa Pro printers. If you want to operate a farm of Lisa printers, you can. Sinterit has around forty of them in their network.
However, although you can send files to the printers, you can’t launch prints through the software. As a security measure, someone must manually do this directly on the 3D printer’s screen.
One feature that would potentially be nice to have is an automatic cost calculator, so you know more or less how much it costs (material-wise) to print a specific part. You can do the math yourself though, with the report that the software automatically generates (it indicates powder quantities).
Our experience printing with the Lisa Pro
1. Slicing the model with Sinterit Studio
Since the software is so streamlined, it’s really simple to navigate. First, we selected our 3D printer model (Lisa Pro), material (PA12), and layer thickness. Then we imported our file in the next tab.
Usually, placing the model is a tricky process, as there are a certain amount of rules to follow to make sure there isn’t any warping or deformation (post on that coming soon). Ours was fine off the bat. After placing it flat in the build area, we proceeded to slice the file and sent it to our Lisa Pro via the “Printers” tab.

2. Launching the print on the Lisa Pro
Once the model was sent to the printer, we selected it on the touchscreen, which also has a very simplified interface leaving little room to go wrong.
The printer calculated how much powder we needed, or rather up to which height the powder container needed to be filled. It then automatically adjusted itself to the correct height and all we had to do was fill it with powder.
At first, it felt a bit strange not to wear a mask, as you’d think it would be unhealthy to potentially breathe in particles of plastic. Grzegorz assured us that it was fine and wouldn’t do any harm.
Anyways, then we had to pack down the powder (this step just consists of “compacting” the powder with a square metal tool) and add more powder.
Note: Powder material is similar to flour in terms of texture; it’s very volatile. Hence, you have to be careful when pouring the powder into the printer. It has to be inserted gradually and carefully. It’s also recommended to wear gloves.
We then let the printer know we were done by pressing a button on the screen, and it proceeded to level the powder with the rollers. The powder bed’s surface has to be completely flat before anything can be printed.
After all of this preparation is done, and after closing the lid and pressing “Start” on the screen, the printer starts to heat up. Several layers of powder are spread onto the build plate before the actual printing, too.
Note: A few millimeters of powder are always automatically spread onto the bed by the roller before prints. It acts as a sort of cushion between the metal plate and the 3D printed part.
The touchscreen displays simple information such as remaining time and temperature, and you can access the webcam. At the moment, the screen only lets you see the live stream for 10 seconds before returning automatically to the main, informational window. If you want to monitor your print, it’s best to access the cam via Sinterit Studio where there’s no time limit.
3. Post-processing: removing and cleaning the print with the sandblaster
With the heat-up time (to 170°C) and cooldown time (to 50°C), it took a little over 20 hours to get the part, which is quite long given the small size of our object. We waited a little bit extra until the build chamber had cooled down to around 35°C.
Note: In most cases, it’s better to wait for the chamber to be as close to your current room temperature as possible in order to avoid warping.
At the press of a button, the build chamber moved upwards to release the block of powder or “cake” as the Sinterit team fondly calls it. We scooped it out with a special box-like tool and placed it in a plastic tray, where we could then fumble around for the part, take it out, and brush the excess powder off.
Once most of the unsintered powder was removed, we stepped over to the sandblaster, which is as fabulous to use as it sounds. After putting your part in the machine, you slip your hands through a huge pair of heavy-duty gloves, step on the floor pedal, and abrasive material is whipped out of a special nozzle.
This post-processing step helps remove additional loose powder and smoothes the part’s surface. In our particular case, however, it wasn’t enough to remove all of the powder. Some material was left in between moving parts, so we couldn’t unblock the mechanism.
We tried getting in between the parts with a thin metal tool, but it just didn’t do the trick. After a while, we finally solved the issue by letting the part sit in water for a few minutes.
4. Recycling unused powder with the sieve
The last step consisted of gathering all of the leftover powder to recycle. Again, the touchscreen guided us, and the bottom of the powder container was lifted all the way to the top. All you have to do is sweep the powder to the overflow bin entrance. This step is as easy as all of the other steps and only takes a few minutes.
Note: Before and after each print, you also have to clean the glass laser cover from the lid to make sure nothing obstructs the lasers, as well as the heat sensors inside the printer.
Then, after unlocking the overflow bin via the touchscreen, we slid it out and dumped the powder into the tray where the cake was left. After that, we poured the powder into the sieve. The sieved powder ends up in a special container that you can take out, seal, and reuse for your next print.
We ran out of time, but during this step, you are also supposed to add a certain quantity of Sinterit’s FRESH powder to the material to be able to reuse it. The printer’s touchscreen indicates how many grams you need to add to the leftover powder from your print. It corresponds to around 30% of the total quantity of material (Sinterit’s R&D team is working to bring that percentage down).
Final thoughts on the whole process
Looking back, each step was quick and easy to do, although there are quite a bit of small actions to complete which can make the whole process quite time-consuming. It can be longer or shorter depending on if your model is intricate or not.
- Favorite step: brushing excess powder off of the part (you feel like an archaeologist).
- Least favorite step: slowly pouring unused powder from the overflow bin to the tray and trying to avoid making a mess.
Something important to mention is that there’s no calibration process to go through. Sinterit pre-calibrates each printer and makes sure they all work before shipping them off; no further calibration is necessary.
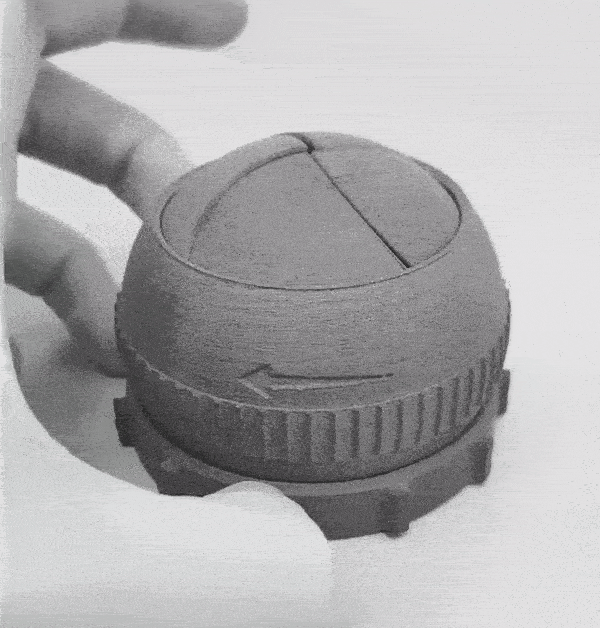
3D print results
The model is adapted from LoboCNC’s Iris Box file for FDM printing on Thingiverse. We chose it because it is a moving part with thin walls and some level of detail. We printed it in PA12 at 0.1 mm layer thickness.
The result is impressive, boasting a clean surface with barely visible layers, and offering mechanical functionality. It would be unfair to compare it to an FDM-printed part; it’s simply a whole other level of quality.
There is nevertheless one small group of layers where you can notice some “over-sintering”, which could be due to a tiny temperature change. We did also have a bit of trouble getting the part to move, but it didn’t affect the quality of the print.
Below are a few pictures so you can see for yourself.
Note: We sent the file to Sinterit before our visit, and their designers modified it a little to make it more adapted to SLS technology. The team test-printed the part before our visit, too.


Value and verdict: is the Lisa Pro worth it and for what applications?
It’s hard to sound objective, but we are genuinely enthusiastic about the Sinterit Lisa series.
- It’s very easy to use. Both the slicing software and touchscreen interface guide you through the whole process, and there aren’t any complex steps. You don’t need any technical training, although it is offered for free via Sinterit and their distributors when you purchase a Lisa system.
- The printer and materials are quite cost-effective, and depending on your output, can be quick to pay off. Our part costs just under €12 versus around €30 via an online printing service. Being able to reuse the powder also brings costs down.
- The Lisa Pro’s SLS technology gave us a very high level of quality in the part we 3D printed. We saw other impressive samples, too. Plus, Sinterit’s grey PA12 looks elegant and professional (note that your print will be much darker than the powder itself).
- The Lisa Pro (along with the regular Lisa) is the only truly available desktop/benchtop SLS 3D printer. For now, at least.
Note: Formlabs announced the Fuse 1 SLS 3D printer mid 2017, but its launch has been constantly delayed. Swiss manufacturer Sintratec is Sinterit’s only real competitor, with the Kit and S2. See all desktop SLS 3D printers here.
Virtually anyone can use the Lisa Pro, whether it’s professionals that need to churn out high-quality prototypes or businesses of any size that make small production series.
It can also be useful in factories or workshops where you need to replace tools or machine parts, to some extent.
On the other hand, there are a few downsides with the Lisa Pro and its technology.
- We do think you need a separate workspace to avoid getting powder in places where it shouldn’t go, and because the printer heats space around it.
- You need to wait a long time for your prints to come out, even small ones. It’s more efficient to fill the build volume with parts.
- At present, Sinterit’s range of available materials is limited to Nylon, TPE, and TPU. The Lisa Pro is open to third-party materials, but you should know what you’re doing. This characteristic is mostly destined for material research labs and universities.
Of course, these elements need to be put into perspective: overall, at this price and size, the Lisa Pro is a very capable machine.
Also, its material limitations are more linked to SLS technology rather than the printer itself, and Sinterit says they are constantly working on releasing more options. Hence, it’s not necessarily a con, but it is something you should be aware of.
Note: Let it be said clearly that the machine isn’t destined for consumer use.
