 English
  Français
Photocentric Liquid Crystal High-Res (LCHR) resin 3D printer

Update Nov. 20, 2018: Photocentric has released a newer, upgraded version of the LC HR, the Liquid Crystal High-Res 2. The LC HR 2 has an improved drive unit, comes pre-homed, and features a flexible build plate for easier print removal. Furthermore, it comes with a new disposable vat system which eliminates the painful process of re-skinning. Photocentric now also offers a lifetime license for their Photocentric Studio software.
At Machines-3D’s Machinarium 3 event, we saw a few samples from Photocentric’s new range of resin 3D printers. They were highly detailed and of great quality.
Introduction
The manufacturer: Photocentric
Today, we are reviewing the Liquid Crystal High-Res (LCHR) made by Photocentric Ltd, a manufacturer originating from the UK. Photocentric started out by commercializing polymers for stamp-making, and a stamp-making machine known as imagepac. They now also have headquarters in the US.
The beginnings of Photocentric’s daylight-activated polymer start in 2005 and 2006. However, Photocentric only really entered the 3D printer market in early 2016. Since then, the Photocentric team has won several innovation awards. Indeed, their patented DPP (Daylight Polymer Printing) technology is new, although it is similar to DLP 3D printing technology.
While other resin 3D printers use a projector or laser to solidify the resin, Liquid Crystal 3D printers use an unmodified LCD screen to harden the material. This is possible thanks to Photocentric’s highly sensitive daylight resins that require less power to cure (SLA and DLP 3D printers use UV resins).
The 3D printer: Liquid Crystal High-Res (LCHR)
The Photocentric Liquid Crystal HR, or LC HR, is a resin 3D printer targeting professional users, but its affordable price tag of £1,599 (about $2,100) makes it accessible to advanced hobbyists as well. An important thing to point out, though, is that no matter the type of user, a dedicated and well-ventilated space is definitely a prerequisite; the vapors coming from the resin are toxic and smelly.
We encountered quite a few issues while testing the Photocentric Liquid Crystal HR. Granted, it was our first test of a resin 3D printer. However, (we think) most issues were not linked to our lack of experience with DLP 3D printers. Plus, we were provided with only 1 small bottle of resin material (250g), thus preventing us from further pushing our tests and tinkering with the LC HR.
Resin 3D printing: reminders
As a reminder, resin 3D printing is pretty different from regular extrusion 3D printing. These are some important things to keep in mind for this review:
- Resin 3D printing technology is generally much slower than FFF 3D printing (although DLP/LCD 3D printers are faster if 3D printing an entire build platform)
- SLA/DLP technology delivers greater levels of detail and precision than extrusion
- Post-processing (curing) is mandatory for objects 3D printed with resin to harden properly
- Resin users must follow more thorough safety precautions and operate the 3D printer in a dedicated environment
 Pros
Pros
- Very high precision and great levels of detail
- Intuitive user interface
- Modern design
Cons
- Low repeatability, as it greatly depends on the “vague” homing process
- The screwed vat film system isn’t optimal and is difficult to replace
- Having to sand the build platform for adhesion
- Requires a dedicated room with very good ventilation (and ideally with controlled light exposition, temperature, and hygrometry)
- Many long cleaning steps, while putting up with toxic resin odors
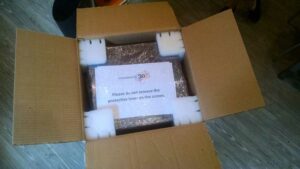
Packaging
After confirmation from Photocentric that they had sent out the LC HR with UPS, the package quickly arrived at our office in Phnom Penh, Cambodia. The box is pretty tall, and a bit heavy– good thing our 3D printer testing lab is on the ground floor!
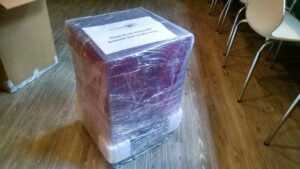
Unboxing
Inside the big, outer cardboard box are two smaller boxes. One contains the accessories, the other contains the 3D printer. Everything fits together really well, and there are styrofoam corners to prevent the LC High-Res from bouncing around during shipping.

Photocentric thoughtfully includes two checklists, showing that they double-check their packages to make sure nothing is missing. There’s also a “QC pass” note on the touchscreen so we know that the 3D printer got a quality check before shipment.
Instructions manual
The Photocentric LC HR 3D printer comes with a short manual that describes the few steps users need to take before launching a resin 3D print. This manual has a nice, professional feel to it, and the basic instructions are clear.
However, this printed version is less thorough than the online version that is available on Photocentric’s website. The aim of this leaflet is probably to be “straight to the point”– after all, it is called a Quick Guide– but we feel that it would’ve been nice to have the whole thing on paper.
Photocentric’s YouTube videos are a great additional source of information though, and we strongly recommend watching them before unboxing.
Accessories
In the small accessories box, there are the following objects:
- Build platform with two securing bolts
- Quick Guide (instructions manual)
- Safety datasheet
- Small spatula/scraper
- Power supply and adapter
- TP-LINK Wi-Fi Nano USB adapter (150 Mbps/2.4 GHz)
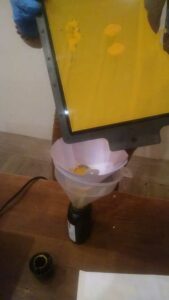
- Funnel with four paper strainers/filters for leftover resin
- Small Allen key for the vat screws
- Pair of rubber gloves
- Multiple replacement vat films
- Sample print of the test ring (though already broken when we received it)
- A small bottle of yellow resin
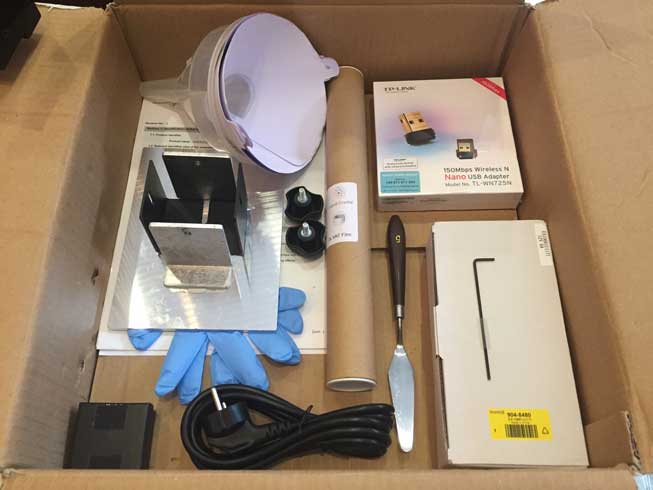
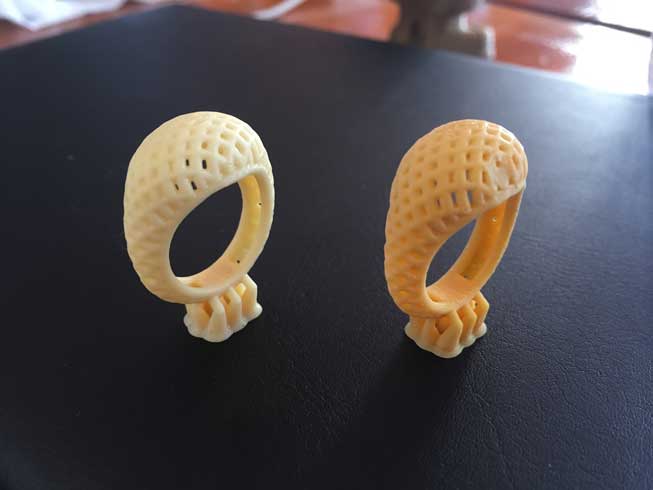
The scraper is a must during print removal, as the hardened resin is still a bit soft before the curing phase in post-processing. Therefore, touching and removing the object by hand can damage it. Actually, we didn’t use the scraper for one of our test ring prints; even while having applied very little pressure to remove it, there is a visible finger dent on the ring.
Overview and setup
Software
The manufacturer provides a license for Envision Lab’s CreationWorkshop slicing software, which is downloadable from Photocentric’s website. The license number, required for software registration, is slightly inconveniently located on the bottom side of the somewhat heavy Liquid Crystal HR.
PrintFlow software for network 3D printing and the touchscreen’s interface is pretty intuitive and user-friendly. It is said to be functional on Windows, Linux, and Mac, but it didn’t work on our MacBooks. A PrintFlow window opens for a few seconds and then closes by itself.
Note: while writing this review, we are double-checking Photocentric’s user manual. It seems that the LC HR must be switched on and connected to the computer for PrintFlow to work. We were trying to test the software’s functionalities without necessarily using it to launch a print (at least in the beginning). Either way, a pop-up message should appear in such a case, something like “No 3D printer detected, try again.”
Hardware
We were pleasantly surprised by the large size of the Liquid Crystal HR. It’s bigger than one may expect! The black plastic design is sleek and modern– it looks and feels professional.
On the base of the LC HR resin 3D printer rests a red, transparent plastic hood. This frame prevents the resin from solidifying itself with ambient daylight. A small stepper switch on the base of the 3D printer detects if the hood rests atop or not. If it isn’t, the LC HR won’t move the build platform or 3D print.
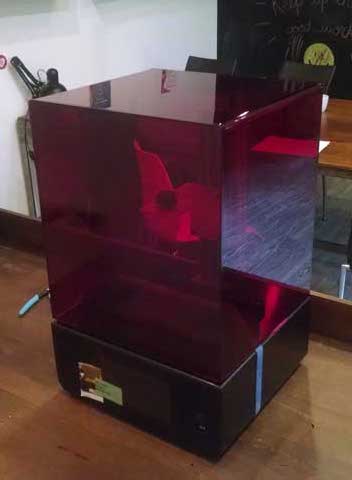
There is a nice color touchscreen on the Liquid Crystal HR’s front side. The colorful PrintFlow interface is user-friendly and easy to navigate. A power button for the resin-curing LCD screen is also on the front side, along with a USB slot.
If we go to the back of the 3D printer, we can see the power switch, power input jack, and another USB slot for the Wi-Fi adapter. There’s also an ethernet port and a cooling fan duct.
Getting started
The HR doesn’t require any assembly, apart from the four base feet that need to be screwed in (we needed a wrench to do so). The build platform also requires handling, but this doesn’t really count for assembly as users have to take it off after each 3D print anyways.

To attach the build platform onto the 3D printer’s arm, there is a big, round bolt on top of it. It must be securely screwed onto the arm. The build platform has two other bolts on the sides; these must be loosely screwed in at first to allow for homing (see below for more details).
After those basic assembly steps, we can turn the 3D printer on thanks to the power switch on its backside. The LC HR takes about a minute to boot its internal system.
Homing process
Homing essentially means calibrating the build platform, by bringing it “home” to the LCD screen. It is comparable to bed leveling for extrusion 3D printers.
For the homing procedure, we simply press a button on the touchscreen which makes the 3D printer bring down the build platform. This lays the build platform flat onto the LCD screen (which by the way has plastic protection).
After that, we just have to press hard onto one half of the platform, screw that side’s bolt tightly, and repeat for the other side. This manual step is very important, otherwise, the prints won’t turn outright.
It’s a bit difficult to know when the calibration is correct, as the instructions are a bit vague. Users have to press down hard on the build platform, and “white corners” should appear when doing so, but there is very little room to see that when the platform is covering the screen.
Filling the vat with resin
To be able to fill the vat with resin, we first have to elevate the build platform by 10mm. Again, this is done simply by pressing a button on the touchscreen.
Note: the 3D printer only moves the build platform if the hood is placed. To “trick” the LC HR, users can keep a finger pressed on the stepper switch, instead of repeatedly placing and removing the red hood.
Only then can we pour the resin inside the vat. Photocentric recommends filling ⅓ of the vat (which doesn’t include the red, plastic walls) for most prints.

After this, the build platform must be brought back down to the base. We can choose to bring it down 10mm (since we first elevated it 10mm) or to press the homing button. This makes the liquid resin move, so we have to wait a few minutes before moving on to launching the 3D print.
Launching a 3D print
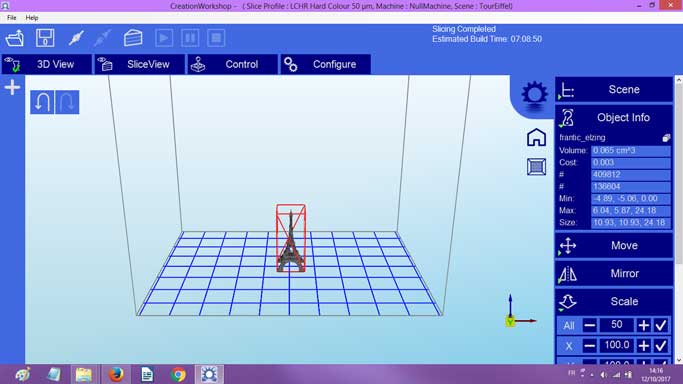
For our first 3D print with the Liquid Crystal High-Res, we chose the test ring file provided by Photocentric. The file is preloaded onto the 3D printer’s interface where it is easy to find. After homing and pouring the resin, we just have to press print– and it’s good to go!
The LC HR takes a few moments to process the file that it is going to 3D print. It calculates how much time it will take to fully 3D print the object, and informs users of the print status and completion rate. This includes how much time it has been 3D printing, the number of the layer being printed versus the total number of layers, and how much time remains.
In the beginning, the screen displays an outrageous “remaining print time” that can go up to several days for a small print. Thankfully, this calculation goes down to a pretty accurate number after about half an hour.
Overall, getting started with the LC HR is pretty easy and intuitive.
Experience
Software
Slicer
As mentioned earlier, the Photocentric Liquid Crystal HR comes with a CreationWorkshop license. This slicing software is more or less intuitive to use and features many different settings that users can tweak. CW can be a bit complex for 3D printing beginners, though.
Photocentric mentions that Nano DLP software may work, but doesn’t provide further instructions about it.
Interface
The PrintFlow software interface on the Liquid Crystal High-Resolution’s touchscreen is very user-friendly. Its menus have a modern design and are clear and simple to navigate.

PrintFlow is also downloadable for Windows, Mac, and Linux to connect to the 3D printer via Wi-Fi. We didn’t get it to work on our computer though. We thought it was a software problem when actually the 3D printer needs to be turned on for it to operate.
While it may seem logical, we didn’t think to turn on the LC HR; at the time we just wanted to take a first look at the software’s design without launching an actual print.
Considering the friendly PrintFlow interface on the LC HR’s touchscreen, we can imagine that the computer version is also intuitive.
3D printing
Grading the 3D printing part of this review is a bit tricky. On one hand, we had difficulties getting successful 3D prints, but on the other hand, we did get a very impressive result of a test chess rook.
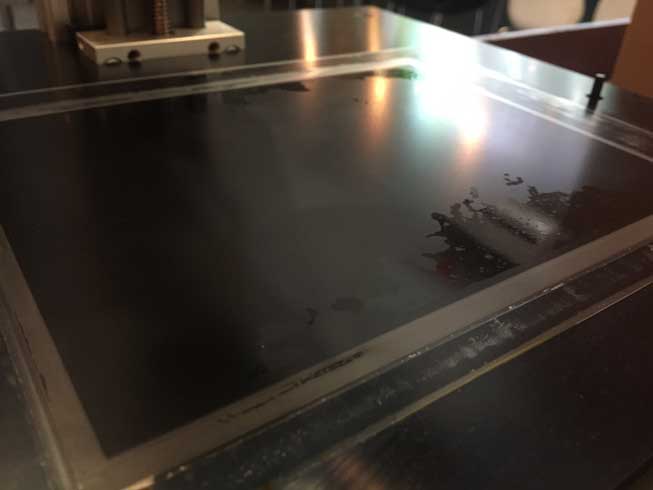
One of the problems we faced several times was the lack of adhesion to the build platform– objects just fell off mid-print. Since this printer 3D prints objects upside-down, adhesion to the build plate is critical. We contacted Photocentric’s technical team and they told us to sand the build platform for more adhesion.
It helped a little, but we still encountered the same problem after doing so. Considering that this isn’t a cheap 3D printer kit, it is unexpected and a bit annoying to actually have to sand the build platform.
Anyways, it’s definitely frustrating to see your prints fall in the vat after a few hours of 3D printing and even more so considering all the necessary clean-up steps.
As it can be seen in the photo below, one of the models we used for testing simply came out flattened (sad for an Eiffel Tower!). The manufacturer’s technical team checked the file and said it was fine, so we’re unsure of where the issue was coming from.

Also, as one can expect with 3D printing resins, the material has a strong, toxic chemical odor to it. We found it difficult to stay more than a dozen minutes in the same room with the LC HR while it was 3D printing. Photocentric’s safety data sheet indeed mentions various health hazards: skin irritation, allergic skin reaction, respiratory irritation, and serious eye irritation.
As we mention further on, we also had problems with the vat screws that quite easily stripped when we tried to unscrew them.
Cleaning process
Although this doesn’t affect the 3D print quality, the cleaning process is quite time-consuming. These are the steps to follow:
- Take off the red plastic hood, loosen the side bolts to tilt the build platform, place the frame back onto the LC HR. This is to let excess resin drip into the vat for a few minutes.
- Remove the red frame again, loosen the top bolt and pull out the build platform to place it on paper towels or newspaper. Quickly place the red frame back to avoid the leftover resin from hardening.
- Scrape off the 3D printed object with the spatula tool. Rinse the object with warm water and dishwashing soap. Same for the build platform.
- Place the object inside a plastic or glass container filled with soapy water.
- Remove the red frame again to take out the vat. Pour the leftover resin back into its bottle with the help of the funnel and a filter/strainer.
- Clean the vat with the help of a soft sponge and some clean paper towels. There are always small little blobs of solidified resin that stick to the vat film. Plus, resin inevitably goes into the corners and between the two plastic frames that hold the film. When you think it’s all good, there’s always more resin somewhere. It really is a pain to clean.

The process becomes more intuitive and takes less time as users repeat it, but it’s definitely important to take it into account when planning a 3D printing session.
Vat film
Concerning the vat film forming the bottom of the vat (there’s no hard plastic bottom), we wouldn’t say that the system is a very efficient one. The transparent vat film holds in place with about twenty hex screws and it is meant to be replaced regularly.
Firstly, this means that to change the film, users have to unscrew and re-screw twenty hex screws. They are pretty tightly screwed in, and we unintentionally stripped a few of them after multiple unscrewing attempts. Photocentric sent us a second vat, and we were more careful when using the Allen key to not strip any more screws.
Secondly, as mentioned earlier, this system leaves room for resin leaks on the LCD screen under the vat! This is quite bothersome, as it adds another cleaning step to the already long process. To get rid of leaked resin on the LCD screen, Photocentric advises using the scraper. Users must be careful not to damage the screen, though.
Post-processing
Resin objects require certain post-processing steps to find their final form. First, users must clean the object with warm water, as described earlier in the clean-up section.
Then, users can proceed to the removal of rafts or support structures and curing. When the resin is 3D printed, it is solidified to a certain extent and is still a bit soft. That is why the material requires extra hardening. Users can do this in various ways, as Photocentric suggests in the instructions manual:
- Placing the object in a water-filled container with liquid detergent, and exposing the container under light from a lamp or sunlight for 60 minutes (what we did).
- Placing the object in a UV unit for 30 minutes (although on their curing unit product page it says 1 to 2 hours).
A UV curing unit is almost a prerequisite for professional users, as it ensures optimal resin hardening. Professionals must take into account the fact that they should buy an additional unit. Photocentric manufactures their own UV light exposure units, priced at 27£ (around 35$).
Printing environment
We were never in the same room as the 3D printer for more than 10 minutes while it was 3D printing. In that period of time though we can still tell that the LC HR is a rather quiet 3D printer.
There’s a very small noise every time the build platform moves up (to create a new layer), and a small ventilation sound. If it weren’t for the toxicity of the resin, we could perfectly spend the day next to this 3D printer and barely notice it’s working.
3D printing results
Out of the seven 3D prints launched, only three were successful, that is to say without falling off the build platform or coming out squashed. Among those three, only one was truly good quality.
1. Test ring
The test ring is the file that is preloaded onto the 3D printer and takes about 6 hours to print. Photocentric intentionally increases the curing time per layer on this file. This may explain the lack of detail on this object’s intricacies (several holes on top of the two rings are filled).
Also, the user manual recommends cleaning the objects with a soft brush or sponge, but in our case, it just made the prints a bit sloppy, even when brushing lightly. Photocentric advised us to use IPA or methylated spirits, which helped a little.
2. Eiffel tower
We wanted to test this 3D printer’s capacity to produce objects with a high level of detail by printing a model of the Eiffel Tower. Unfortunately though, after 3 tries, we never got a decent result with this object. It always turned out squashed! Photocentric’s technical team confirmed that the CWS file was fine, so it wasn’t a slicing problem. We’re still wondering what the issue is.
3. Chess rook
This chess rook piece, which took about ten hours to 3D print, is really impressive. We can clearly see a beautiful spiral inside the tower, and the interior staircase has an equal level of precision. We left this piece in a water-filled container out in the sun, and the resin’s usual yellow color turned grey for a few days. The color turned back to yellow after being exposed to daylight for a few days.
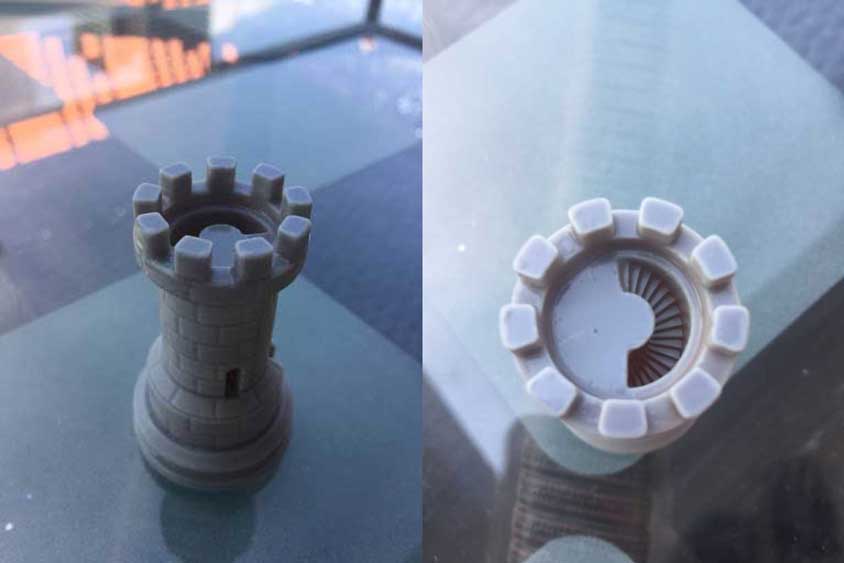
Note: our first try at 3D printing this object was unsuccessful. It didn’t stick to the build platform and seemed to have shifted layers.
Value
We know that the LC HR is capable of offering very high levels of detail and precision. However, we only achieved such results once out of seven tries. With limited resin material supply, we were not able to do much tweaking and carry out more tests.
We believe that this 3D printer, priced at £1,599 (about $2,100), has a lot of potentials. To make the most of this potential, users need to invest some time into it. This isn’t a plug-and-play 3D printer, as its friendly, easy-to-use interface could lead one to believe.
A (possible) future version of the LC HR will likely boast a more optimal 3D printing experience. This is the case for example with Formlabs’ Form 2, in comparison with Form 1.
Conclusion
Overall, our experience with the LC HR was rather disappointing, although we are aware that the Photocentric Liquid Crystal High-Res is capable of achieving great results. Users can obtain such results with a lot of patience, whether it be for cleaning up or preparing for various unsuccessful 3D prints.
The Photocentric Liquid Crystal HR is a relatively affordable alternative to higher-end professional resin 3D printers such as the Formlabs Form 2 ($3,299).
Note: the Form 2 is indeed more expensive, but the price includes a useful finishing kit for cleaning and post-processing. Plus, it uses resin cartridges, so users avoid handling bottled resin and the long clean-up process associated with it. Formlabs also manufactures specific washing units ($499) and curing units ($699).
In the LC HR’s price range, we believe that there are other options either providing a higher value or a smoother 3D printing experience. For example, the Wanhao Duplicator 7 ($399) and the Peopoly Moai ($1,200) have received good general feedback from the 3D printing community.
We ourselves have more experience with extrusion-type (FFF/FDM) 3D printers, and are not experts in resin 3D printing. This is our first test of a resin 3D printer, which we realize may be part of the reason why we encountered such difficulties.
That being said, we watched the LC HR tutorials and read the provided instructions manual before using the machine. Furthermore, we asked Photocentric various times for tips and advice. We also kept them updated on the issues we ran into throughout the testing phase. They were relatively responsive but did not provide much actionable insight.
